How to Take Glorious Golden Hour Couple’s Portraits (Exclusive Examples!)
Last Updated: May 19th, 2026
Dreaming of taking amazingly beautiful photos for a couple in love that are a little moody, romantic, and drenched in sun light and color? Shooting during Golden Hour is just what you need!
As wedding photographers, we are always looking for ways to produce images that accurately reflect our couple’s and that can showcase the love they share in incredible ways. While we can make any kind of lighting work, Golden Hour light is particularly special.
In this post, we’re going to share with you practical information about Golden Hour, and some tips & tricks we’ve learned to use it to the fullest to create stunning couple’s photographs – whether it’s for a wedding, engagement shoot, anniversary, or anything else!
What is Golden Hour?
Starting with the basics: Golden Hour is the time of day when the sun is low on the horizon. As a result of this, the sky lights up with warm colors and the light is diffused – which creates really quite ideal photography light for most photographic styles.
One of the real perks of Golden Hour is that you will not be subjected to really harsh light (as you will find in the mid-day sun virtually any day!). Another benefit that is the result of the sun being low on the horizon is that your couple will have directional light cast on them forming soft and long shadows – all features of more attractive portrait photography.
This type of lighting effect is incredible because it is naturally occurring – and with the exception of cloudy and overcast days – you will not have access to this type of lighting scenario throughout the majority of the day.
Pro tip: what we love most about Golden Hour is that it is predictable. Every day (unless there is a wicked storm rolling through), you will be treated to the benefits of this time of day.
When is Golden Hour?
Can you predict what time “Golden Hour” will happen every day? Yes!
Depending on where you are located in the world, Golden Hour can be a very short or long period of time each day. This can even vary by the time of the year!
In general, most areas of the world have at least a full 60 minutes of this golden light (this is why it’s called “Golden Hour”).
In some areas of the world, like the Arctic Circle (includes countries like Iceland), during the summer months – Golden Hour can stretch on for multiple hours worth of time in an amazing phenomenon known as the “Midnight Sun.”
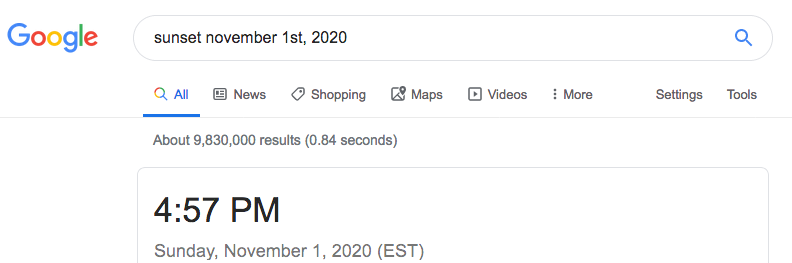
To predict the Golden Hour easily – run a search in Google for “sunrise time on November 1st, 2026” or “sunset time on November 1st, 2026” (note: change the date to the shooting date your interested in). A result will pop up at the top of the search engine. The sunrise Golden Hour will be from the specified time to an hour past it, and the sunset Golden Hour will be an hour before the time listed in your search.
Explaining this with an example:
If we wanted to schedule an engagement photo shoot for November 1st, 2026 with a client who just recently booked a wedding + engagement package with us, we would type into Google “sunset time on November 1st, 2026”. In our case, the result we get is 4:57 PM. With this information, if we wanted to have a 1 hour long session – we’d want to meet our clients and start shooting promptly at 4:00 PM sharp.
We have applied this technique to hundreds of sessions + wedding timelines (where we wanted to sneak out for portraits at Golden Hour) with great success.
Is there still a “Golden Hour” if it’s cloudy or rainy?
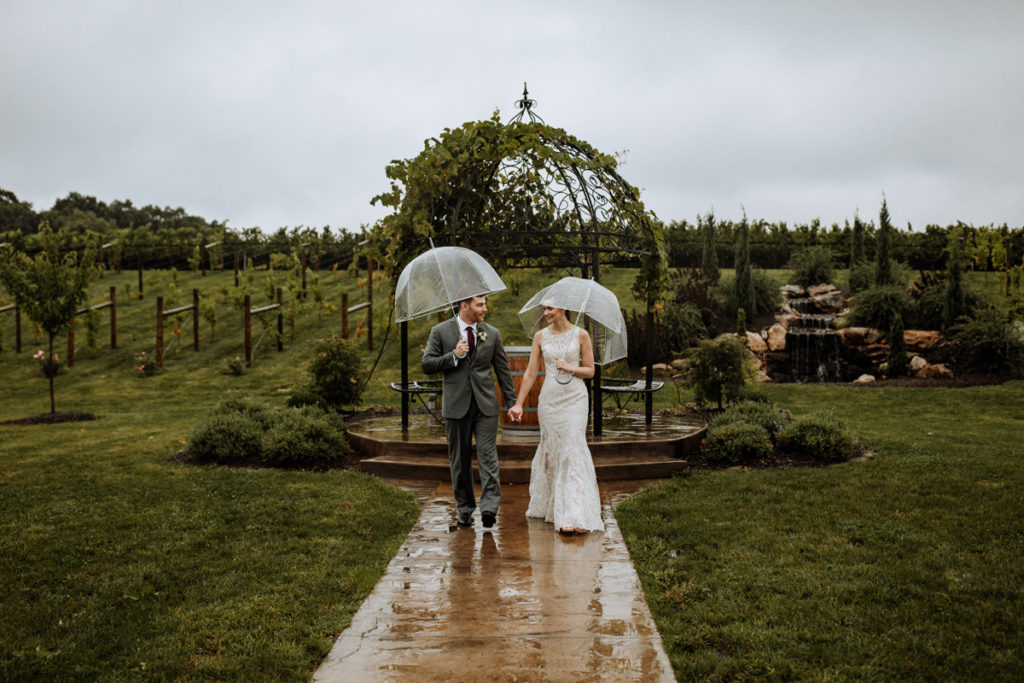
This is one of the most common questions we get about Golden Hour from our couple’s, here’s the answer:
It depends what you are thinking about. With dense clouds, rain, and storms – you will most likely miss out on the really warm glowing light that we all tend to think about when it comes to Golden Hour. However, the sun is still low on the horizon and portraits will still have the benefit of softer and more diffused light. Clouds serve as a natural diffuser of sorts!
In our book, while the vibrant colors of a sunset are really incredible to showcase in a photo, the ease of shooting in that more diffused light (even if it’s a little dreary from rain clouds) is still very enticing. It is just so much easier to shoot in than harsh light that is often found in the middle parts of the day.
5 Tips to Prepare to Shoot Golden Hour Portraits

We find taking portraits during Golden Hour to be far easier than any time of day. This is because lighting is on our side – and we can give more focus to posing our couples instead of hunting down a great spot for them to stand.
The only tough part about working during Golden Hour is that this time is limited!
Outdoor portrait photography – even at this relatively easy time of day – is further simplified with just a little bit of preparation before the shoot. Here are a list of 5 things we regularly do to ensure we can take full advantage of our limited Golden Hour shooting time.
1). Plan Ahead
Planning your shoot is a no brainer for getting better results, but how should you plan? Some things we do:
- Make sure our gear is packed and well equipped with good batteries (the less we have to swap them while shooting, the more time we actually spend shooting)
- Solidify a meeting time and location with your couple
- Think about where the light will be positioned when you arrive to shoot (remember: the sun rises in the East, and sets in the West).
- Use the free app Photographer’s Ephemeris to visualize this on both web and IOS
2). Arrive to Couple’s Sessions on Time
Working with that golden light only works if you are present for it.
While we are always prompt to arrive to sessions well in advance, this is something you may also need to relay to the people you are working with. Late arrivals happen (and are sometimes out of anyone’s control), but it’s important to give at least 15-30 minutes extra time to account for getting stuck in traffic or behind an accident.
3). Set Your White Balance Manually
One of the common pieces of “wisdom” we see on other photography website’s is the suggestion to just leave Auto White Balance (AWB) on. While this can be okay for a beginner photographer, it is actually quite detrimental to taking good looking photos in camera – especially during Golden Hour.
Why?
AWB is designed to produce an image exposure with color that is balanced. In environments and lighting situations where color and light is pretty balanced (equal cool tones + warm tones like in some modern reception halls), AWB will work really well to get good image color. However, when working in light like that from a sunset, where there is a lot of extra warmth (reds, yellows, oranges) – your camera will want to counter-balance this and introduce extra blues to make a more balanced image.
Our suggestion (and we cover this in more detail in one of our suggestions in our post 101 Digital Photography Tips) is to set your white balance manually to a color that makes sense. For most of our portrait work taken in-and-around Golden Hour, we select a white balance of between 5600 – 6200 Kelvin.
Not all cameras have the ability to select the individual Kelvin value, but give you the choice of selecting from options like “Cloudy”, “Daylight”, and so on. Generally, an option like “Cloudy” will fall into the range we are already using – so this is probably best for you too.
4). Use a Wide Aperture
In our experience shooting couples, wide apertures are incredibly valuable to produce quality images that show off the great colors in a more artistic way.
Typically, we suggest using f/3.2 and wider (as wide as f/1.0!) to produce the best couple’s portrait photography results at Golden Hour.
What’s the benefit of a wide aperture in this situation?
There are a few:
- More separation of the subjects from the background
- Interesting bokeh fractals and color diffusion (looks like a watercolor painting)
- At f/3.2 – you still get a lot of separation, but can photograph poses where one person is staggered behind the other one and still get them both in focus
- At wider apertures – you can leverage extra stops of light on prime lenses (ie: fixed focal length lenses) without introducing extra noise by bumping up the ISO. Towards the tail end of Golden Hour, this may be really beneficial as it gets much darker out.
5). Memorize Couple’s Posing Prompts for more Organic Results
If anything has changed the way we approach our couple’s photography, it’s been working on our posing. While finding actual poses that work within your style and what you want to convey as a portrait photographer can take some effort – prompts are a way to breathe life into a pose.
Basically, prompts are simple phrases that you can repeat session-after-session to get your couple to interact together. They are so simple on the surface, but finding the right ones that you feel comfortable using and that get your couples to interact organically is the way to go.
One prompt we go to again-and-again with many couples is: take turns drawing shapes on each other’s faces, the other person has to guess what shape it is!
When the couple is arranged well, the resulting images can be incredibly authentic – with some couples being more serious, and others laughing and being unable to take it seriously!
Golden Hour Lighting Tips & Special Techniques for Couples Photography
In this section, we’re going to cover the types of lighting you will encounter when shooting with Golden Hour light, as well as special techniques you can apply to creating images with a little more flare (no pun intended).
Front Lighting

Golden hour offers up a perfect storm of light scenarios in the form of front lighting.
Front lighting occurs when the couple is positioned facing the sun. This allows their faces to be washed out (in a good way) with warm tones. It is our favorite kind of natural lighting scenario because it is extremely flattering for the couple, and allows us to get a perfect exposure in our image – both of the couple and the background environment.
Every time we shoot during Golden Hour, we always make it a point to take some photos with this approach. We especially remember to get a few simple looking at the camera shots – because we know the result will be perfect for printing and sharing with mom-and-dad!
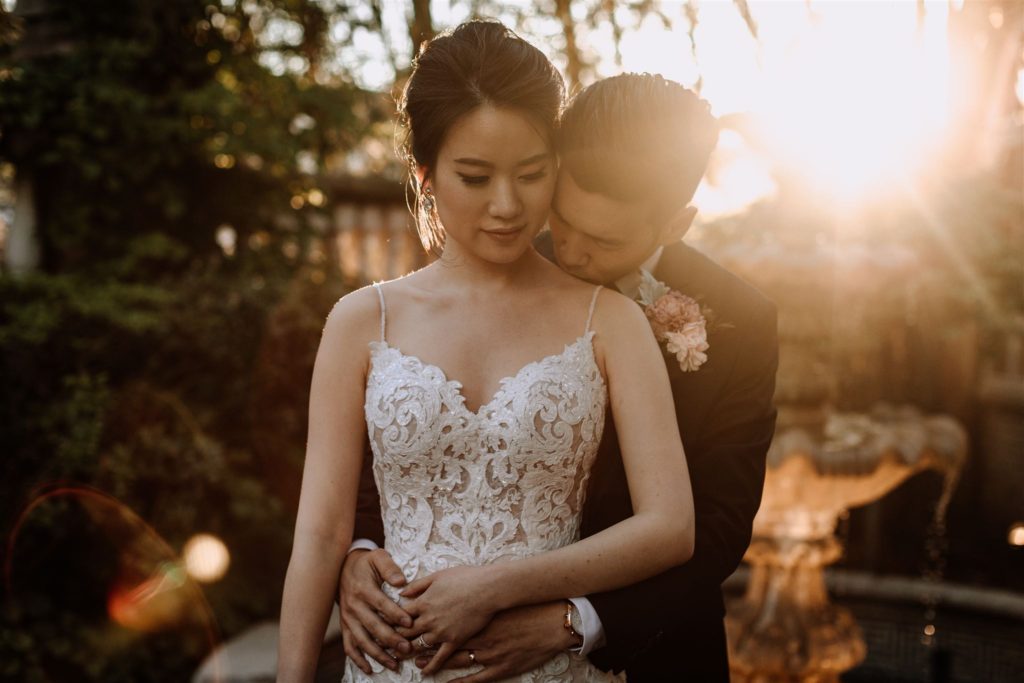
Back Lighting

Most people who dream of Golden Hour photos probably have the warm, rich, and bright look of backlit images in mind.
Back lighting occurs when the couple is positioned with the sun behind them (so – the sunlight is hitting their back!). This results in light that creeps around them producing a soft glow. Words like “dreamy” and “hazy” really identify the look of images taken with this approach.
The only downside of backlighting as a technique is that, in many cases, it can lead to blown out highlights (usually resulting in the sky going missing or looking a lot more white). This can work in some photography styles – but it’s worth keeping in mind. If you want to learn more about how to counteract this, we talk about it in the section “Artificial Lighting” below.
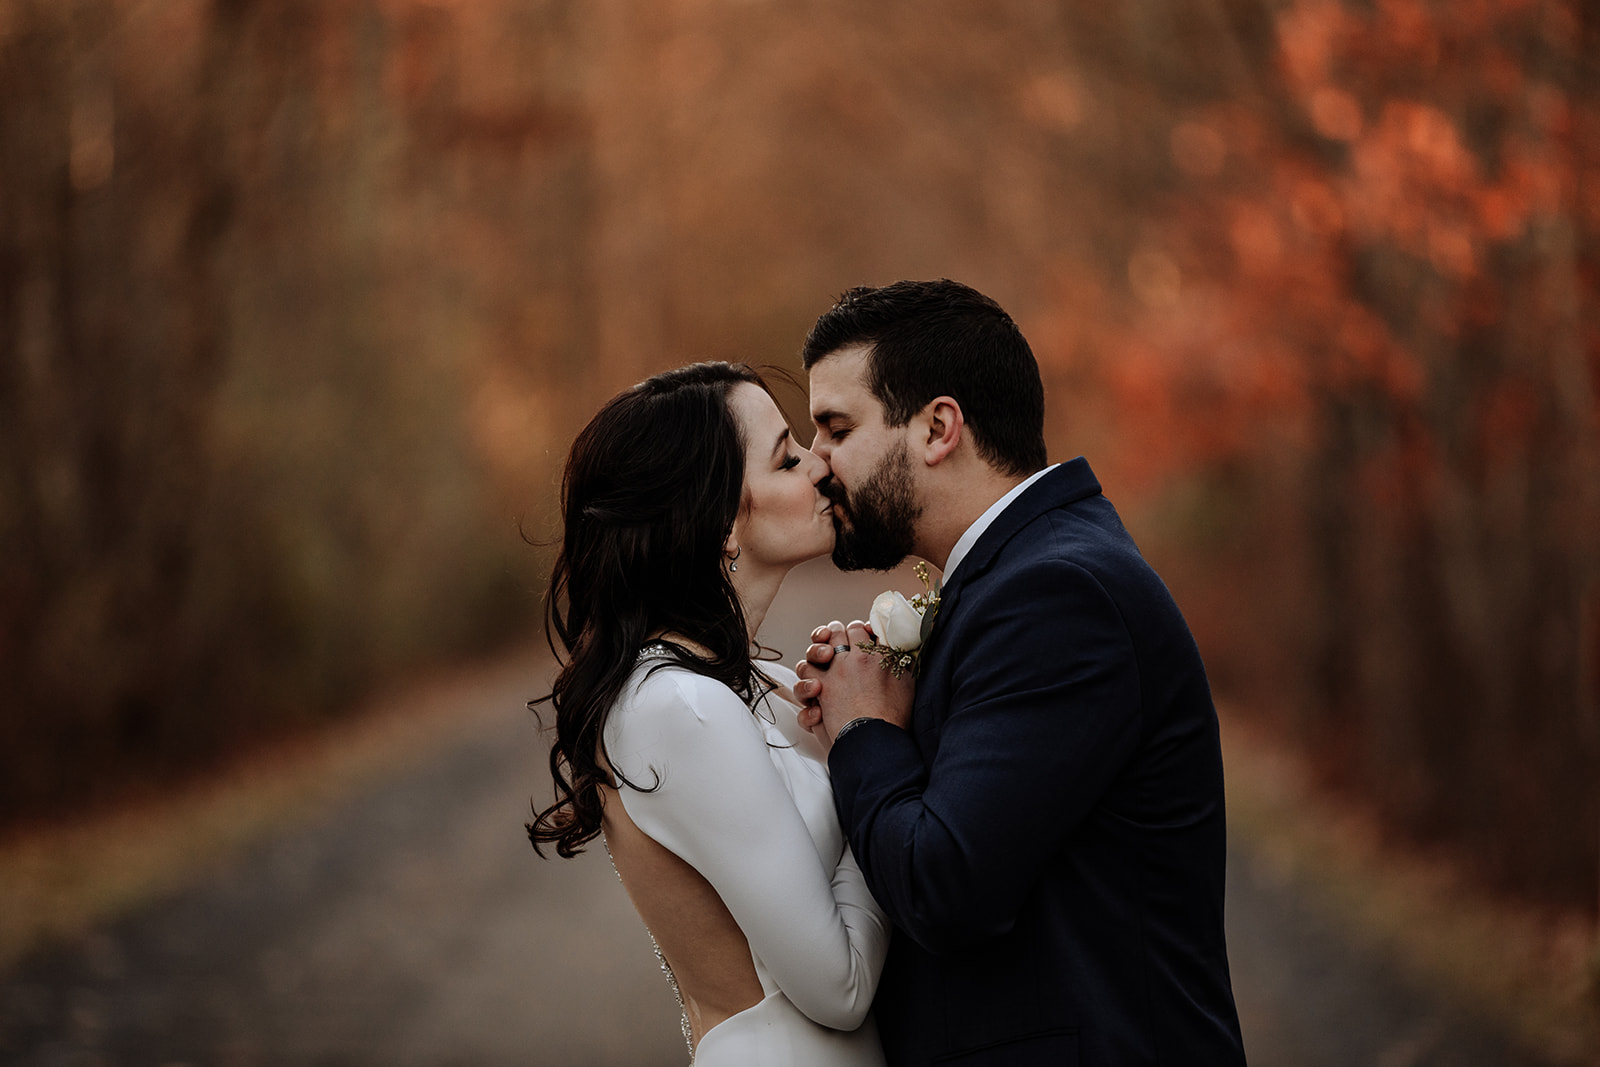
Rim Lighting

One of the more interesting natural lighting techniques is this one!
Rim lighting is essentially back lighting, but with a dark object in the background. In the wild, you’ll most commonly end up shooting with some trees or a building behind your subject, while the sun is peaking through. The result is a faint glow around your subjects, and a relatively balanced exposure in your image (because of the dark background matching your subject).
The added perk of rim lighting is that it is an effect that creates natural separation between the subject and the background because it makes them pop by outlining them in light against the dark backdrop.
The only difficulty in using rim lighting is being in an environment that allows for it. The sun needs to align with a dark backdrop that is also photogenic for portraits to be taken in front of.
Artificial Lighting
As you can see from what we’ve talked about in the naturally occurring lighting techniques you can apply to your portrait photography, there are a few that are great – but can lead to imperfect exposures. Whether this matters to you or not will depend on your photography style. But – we wanted to show you some simply solutions to get the right exposure yourself.
Artificial lighting is any light you are bringing with you to shoot portraits. Normally, this will be a flash photography setup – but using continuous lights is becoming pretty popular, too! You can read our post Strobe Lighting vs. Continuous Lighting: Which One is Best for Me?
Keeping things simple here: if you were wanting to shoot a couple with their backs facing the sun (back lighting) and still expose for the colorful sky, you would want to bring an off camera flash to your shoot. With the right combination of settings, you could illuminate your couple with the flash, get some of that backlit haze on display, and still bring out the natural color of the sky as well. This makes for some amazing photos when done well!
Sun Flares
Sun Flares are produced when sunlight hits your lens. A lot of times, these are not desired. They can even be counteracted by using a lens hood. However, in couple’s portrait photography – they can add a really cool effect that gives an image more “energy” (for a lack of better words). Used artistically, they are another tool for you – just don’t get too carried away!
Pro tip: different angles to the sun will impact how your sun flares look. Watch how the light is moving through the viewfinder and snap away when it feels just right!
Silhouettes
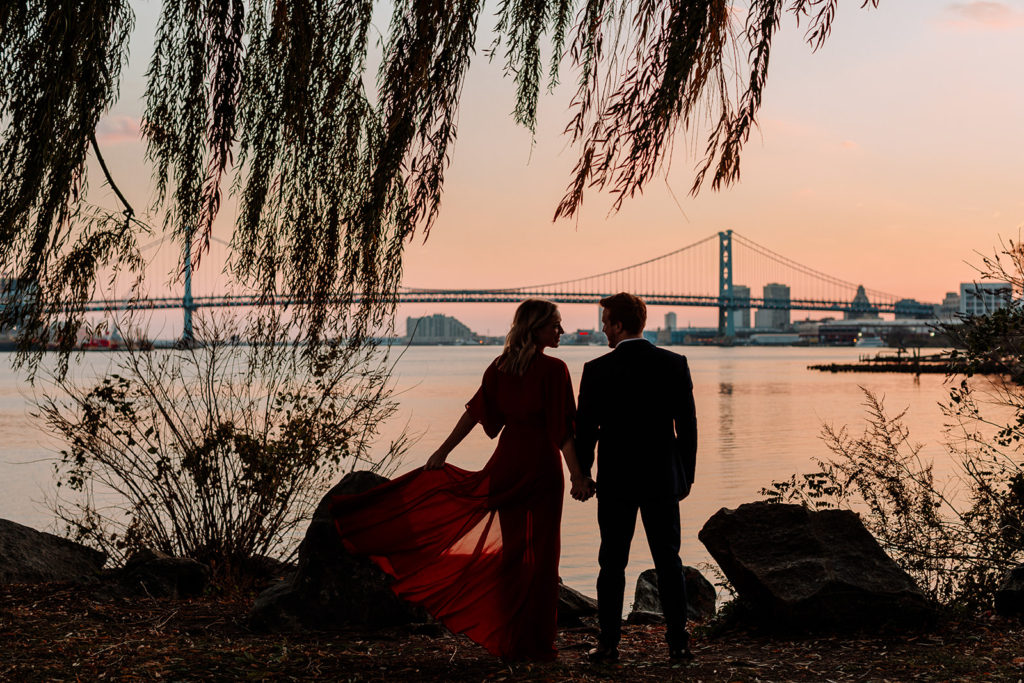
One of our favorite “artistic” shots to take during Golden Hour is the classic silhouette.
Silhouettes occur in photography when your exposure is set up to make the couple dark, and the surrounding environment brighter. As such, they only really work when the couple is facing away from a brighter background.
For example – in the image sample we shot (seen above), we achieved a silhouette effect by shooting our couple against the brighter city backdrop. We increased our shutter speeds + f-stops until the couple was dark, and the background was properly exposed. In this particular scene, we can see the shape of the couple is silhouetted, as well as some surrounding foreground and mid-ground objects (like the tree + branches).
Mirrors

Mirrors include a range of tools like a literal mirror that you’d look at yourself in, a cell phone reflection, and the ever popular quartz crystal prism to reflect and refract light.
While you can absolutely use these types of accessories at any time of the day – we have found they work particularly well to compliment Golden Hour portraits.
One of the best features about using things like these is that they allow you to manipulate the light and the resulting images in fairly abstract ways. The effects are unique and very difficult (if not impossible) to replicate in a photo editing software later on.
The Ring of Fire

The Ring of Fire is an incredible effect that combines the use of a small copper pipe with a low sun. This effect is absolutely magical – and it’s one that continues to amaze our own clients when we make these types of images and show them on our camera screens.
If you want to create stunning portraits like this next time you’re out shooting, be sure to pick up a super cheap copper pipe coupling, place it in front of your camera lens (should have the sun facing towards your camera for best results), and snap away.
Conclusion
Creating amazing couple’s portraits during Golden Hour is pretty easy to do. Whether you are a beginner or seasoned pro, we hope our thoughts on shooting during this magical time of day will help you create some of your first awesome portraits like this or build on your current skill set.