How to Create a Wedding Timeline for Photography
We have been photographing weddings for over 10 years now. In this time, we’ve learned a whole lot.
While honing your actual photography skills is important, maybe even more important for wedding photographers is being able to provide structure for your clients so they can know what to expect from their photo experience on the wedding day.
One of the essential tools to help achieve this is the wedding timeline for photography.
Why Wedding Photography Timelines are Important
Before we give our tips for creating a timeline yourself, it’s important to talk about why they matter in the first place.
A few reasons they are valuable for us include:
- They provide structure
- They help set expectations
- They help people know where they need to be, and when
- They ease anxiety
We’re sure you could think of a few other reasons why a timeline could be valuable, too (feel free to comment with your thoughts at the end of this post!)
Let’s break down these 4 reasons real quick…
Provide Structure
Wedding days can be pretty chaotic – even with a timeline. There are a lot of moving parts, many people and personalities…it can all seem pretty crazy and overwhelming at times.
A timeline can be a simple way to lay out the wedding day in a structured way.
Set Expectations
One of the most important aspects of being a wedding photographer and running a photography business is learning how to set expectations with your clients.
Sometimes this means helping them to understand why every shot won’t look like it was taken during sunset, and that you can’t replicate photos they’ve seen on Pinterest.
In order to get the shots they need (and the ones you want), having a timeline helps to slot all of this in effectively and let the couple know in advanced what is expected from them.
If they want sunset shots, they need to be willing to go out at a specific time during Golden Hour for portraits – even if this means missing out on cocktail hour.
Making this clear before the wedding is an essential way to set expectations.
Arrival Timing
One of the more tangible results that comes from putting together a good wedding timeline is that it is useful for everyone in the family + bridal party who need to participate, too!
When we schedule family formals and bridal party shots, it enables the bride & groom to discuss with their family and friends before the wedding to let them know when they will be needed. This also helps dictate when these people need to be dressed and ready as well.
Ease Anxiety
Maybe the single most important reason why you should put together a wedding timeline is because it will ease anxiety – for both you and the couple.
We often meet with our couples before the wedding, and it’s always apparent that they are feeling some level of stress as they are getting closer and closer to their big day. We always want to reassure them that things will turn out fine – and one way to do this is by providing a timeline.
A wedding timeline in this instance becomes a tool we can use to help clients visualize their wedding day. They’ve done all this planning, and have this external pressure likely coming from their families – it’s the least we can do to help ease some of the anxieties they may be feeling.
What makes a good wedding timeline?
A good wedding timeline for photography should provide detail about the particular events happening throughout the day, and what is expected from people to make for good photography.
With this in mind, when at all possible, your timeline should also include buffer room – this means extra time factored in if something prior takes longer than expected. We’ve learned this the hard way as we consistently see hair and makeup preparations running longer than initially expected (sometimes even an hour later).
It really is a simple, but important, thing.
8 Steps for Creating the Best Wedding Timeline for Your Clients
 Now, we’re going to walk you through our steps for putting together a wedding timeline.
Our method has been very useful in helping us put this together, and we expect it will help you out if your stumped for getting a great timeline together.
1). Send out a pre-wedding questionnaire to collect needed info from your clients.
Before you can really start putting together the timeline, you need to have all the information your client has beforehand. It is, after all, their wedding!
A questionnaire is the easiest way to collect this info and have it all in one location. There are a few ways to do this that we’ve used over the years, so pick the one that fits your workflow the best:
- – EASY: Make the questionnaire in a Word document, send to your client to fill out, and have them send back to you via email.
- – EASIER: Create a form on your website, send the link to your client to fill out, and have it generate to your email.
- – EASIEST: Create a form and automate it being sent by using a CRM platform like Honeybook (which we use). With this method, the questionnaire can be scheduled to send out automatically to your client to fill in, and you can be notified in the platform or via email when its complete.
2). Review the questionnaire responses, and ask questions to clarify anything as needed.
Once your client has filled out their questionnaire, you will need to review everything they’ve written down.
Sometimes, what they have is sufficient enough to put together the timeline – other times, you will need to follow up with them to clarify things.
How you follow up is likely going to be determined by how many questions you have. Usually we can resolve things via email quickly, while other times we might jump on a call or meet in person to sort things out.
3). Take the information provided in the questionnaire and start plugging into the timeline.
When the content you have is sufficient, start plugging what you know into the timeline.
One of the key questions you should be asking on your questionnaire is what your clients planned timing of certain events will be throughout the day.
For example, if they know they will start getting ready at 11am, a good starting time will be around then. If the ceremony is expected to be at 3pm, this is something that will (more than likely) be locked in and unchangeable.
4). Use Google Maps to determine how long it will take you to get to and from different locations on the day.
Google Maps is your friend. It’s going to be very important to make sure you know how long it will take to get from one location to the next on the wedding day.
Some weddings take place at a single location, and this makes things nice and easy as you only need to be prepared for the drive time to get to the venue.
Other weddings end up taking places at multiple locations, such as a hotel for preparations, a church for the ceremony, and a reception venue. Knowing the amount of time it takes to get from one place to the next is hugely important.
5). Leave buffer room when available.
A successful timeline will leave extra time to get the shots needed. Sometimes this isn’t possible, and in these cases it needs to be made clear to the client that they need to be prompt to make things happen correctly.
In our experience, we try to leave at least 15-30 minutes of buffer time during the getting ready portion of the day, as well as in the bridal party and family portraits sections. The latter are some of the most important shots of the day that can be negatively impacted if you don’t have enough time.
If you are doing a lot of driving from one location to the next, also give buffer room in case there is traffic, you get stuck behind an accident, etc.
6). Identify the most important parts of the day for you and your clients.
Because every couple is different, the shots they care about most can vary.
Usually bride & groom portraits tend to sit at the top of the list, but it may be the case that getting a shot with grandpa (who is running a little late to family formals) is even more important.
On the day of the wedding, having this knowledge can help you with resetting expectations. It can also help you better determine where you may need to make cuts if needed.
In the above scenario concerning grandpa, some possible outcomes could be:
- wait for grandpa to arrive for family formals (possibly taking away some bride & groom portrait time)
- or get a shot with him later at reception.
Both are reasonable options in our mind, and working with your client with the knowledge that this picture is particularly important to them will help.
7). Be clear about your start and stop times.
Early on in our wedding photography business, we made the mistake of offering “full day coverage.” As you can guess, this really doesn’t mean much, and it forces your hand to work as many hours as the wedding day will last. In our experience, this has meant working upwards of 14 hours + travel.
In our new packages, we’ve since moved to a 5 hour, 8 hour, and 10 hour blocks. Additional hours are available, but they cost a good chunk of money ($200/hr).
If your client has booked you for an 8 hour day, your timeline should reflect this. You should note your arrival and departure times. We personally usually try to arrive about 30 minutes in advance to scope out the venue and say “hello,” but limit our work hours to what was agreed upon. Having this in writing helps to further solidify this so your client knows what to expect – and helps jog their memory as they might not even remember how long they booked you for considering wedding photography can be booked 1-2 years in advance!
8). If possible, schedule outdoor portraits around Golden Hour.
The evening Golden Hour begins 1 hour before sunset. In order to find out when this optimal portrait time will be, do a quick Google search of the following:
“Month, Day, Year Sunset Time”
In practice, this would look like the following example:
“April 1st 2020 Sunset Time”
Golden Hour will begin an hour before the time you get from this search result. If you are shooting in a non-local area, you will also want to include the location such as:
“April 1st 2020 Sunset Time in Philadelphia, PA”
Golden Hour is a portrait photographers best friend as it provides the softest light of the day, and often comes along with more drama as a result of the sunset colors.
Last Thoughts
With a finished timeline in hand, wedding photography becomes a whole lot easier for everyone.
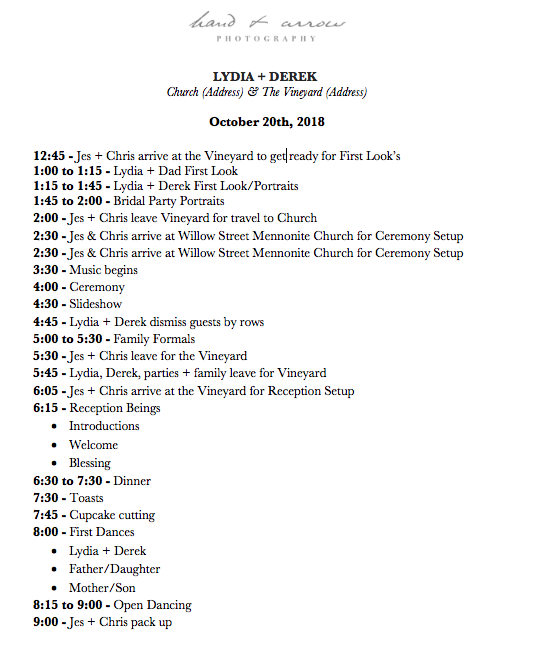
We’ve attached below an example timeline from a past weddings (with names and other personal information changed) to help you get started.
Example Wedding Day Timeline Template: