Tutorial: Black and White Photography Edits Made Easy
How would you feel if you could see the world in black and white?
Hands down – black and white photography is one of our favorite styles. We often talk about how great it would be if we could photograph an entire wedding like this.
In our minds, there is a very cinematic quality that takes us back to early black and white film – something we like to revisit here and there for our infamous “black and white date nights” where we’d watch movies like The Seventh Seal and The Mist (B&W edition). It’s maybe a little nerdy of us, but also beautiful in it’s own way because this style is very atmospheric.
In this post, we’re going to talk about how to produce great black and white photos. We’ll show you our steps for getting a great looking photo in camera, and how to edit your photos into black and white using an editing software program.
Black and White Photography vs. Color Photography
Seeing the world in grayscale is vastly different than seeing it in color. Black and white pictures always bring some specific experiences with them that is impossible to replicate in color like:
- More contrast
- A more cinematic, romantic, and/or eerie vibe
- Higher levels of emotion
- More minimalism in tones
In the modern age where we have digital cameras at our disposal, we’re no longer forced to choose between color or black and white images. We are not limited by the type of film we are using in this way.
If you happen to be using a film camera, props to you. Your choice of color or black & white will be more permanent – but that is some of the charm of film photography!
Ultimately, there is certainly a time and place for both styles of photography – and we believe that while some styles like washed out warmth of Sepia filters will continue to become less trendy, black and white photography has some serious lasting power.
Black and white imagery has a consistently likeable aesthetic, and has continued to remain popular since the first photograph was taken in 1826.
Black and White Photography: Through the Camera Lens
 Black and white photography begins when you are taking a picture.
Most digital cameras have options to shoot directly in black & white – which may give you a more immediate sense of what you’re photographing, but it’s actually something we recommend against!
The reason for this is because, by shooting in RAW file format with regular colored images, you will be able to edit your photos in post production to the perfect B&W look you are looking for.
This will allow you to retain the color version of the image, while ultimately getting the black and white result you want.
Black and White Photography is…Easier?
The great thing about seeing the world in black and white is that it tends to be more forgiving.
This makes a black and white approach great for beginner photographers at times – as it’s easier to make an image look good.
Having shot countless images over the past few decades – both for our personal use and professionally for clients – we’ve come across many occasions where we may have done something wrong like poorly positioning a subject and have been able to “save” an image by turning into a black and white. This is an amusing trick of the trade.
While on the surface, photography is made a little easier as a result of the limited color palette, often the best black and white photographs are the result of the photographer choosing their shots very intentionally.
As we have grown as photographers, we’ve been able to envision what a scene would look like in black and white while out shooting. At times, we may even take a shot knowing full well we won’t care for it too much in color but will LOVE it after we’ve had the chance to apply a black and white photo edit on it.
5 Things to Look for When Taking a Black and White Photo
 Whether you are shooting directly in black and white, or going to convert the image later by using Lightroom, Photoshop, or another photo editing program – this list of things should be at the forefront of your mind.
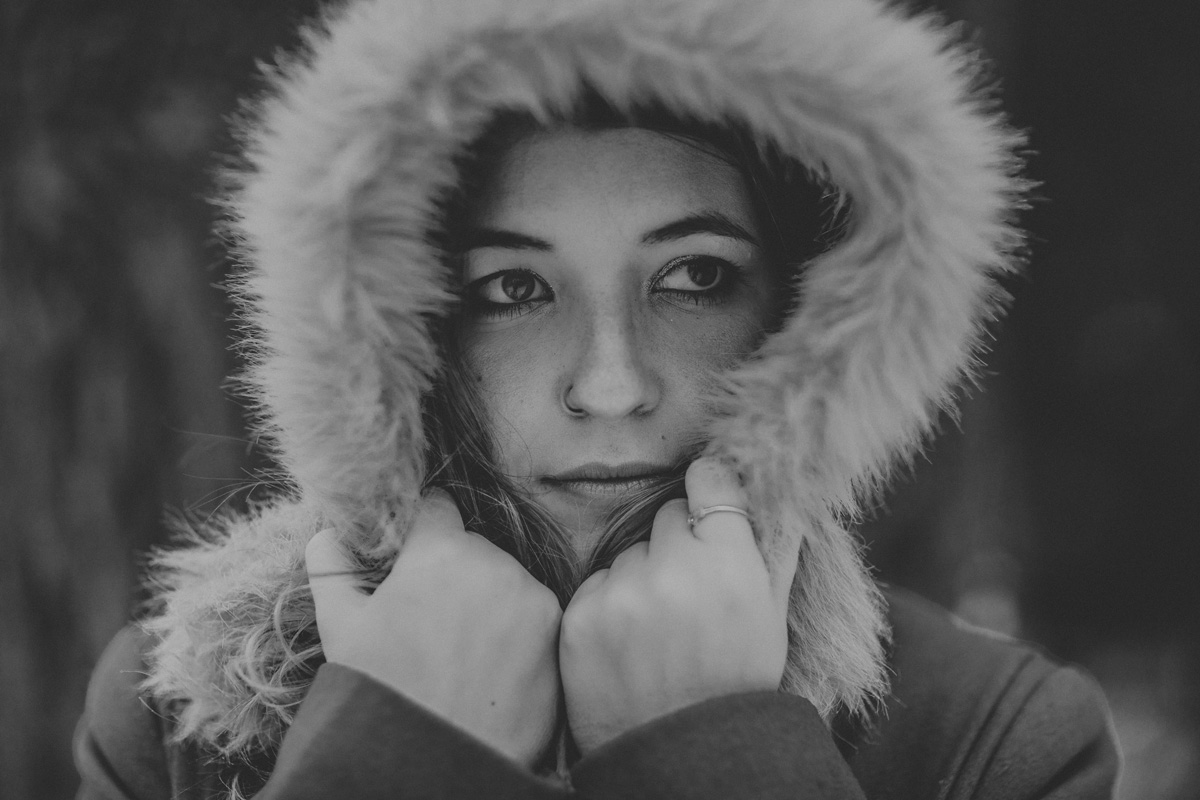
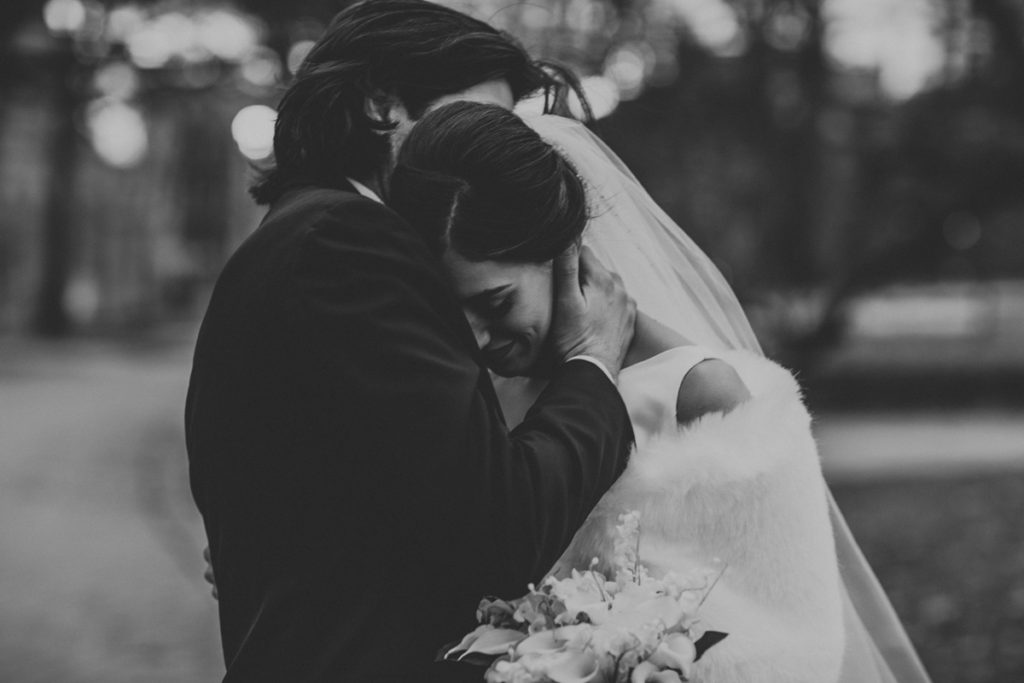
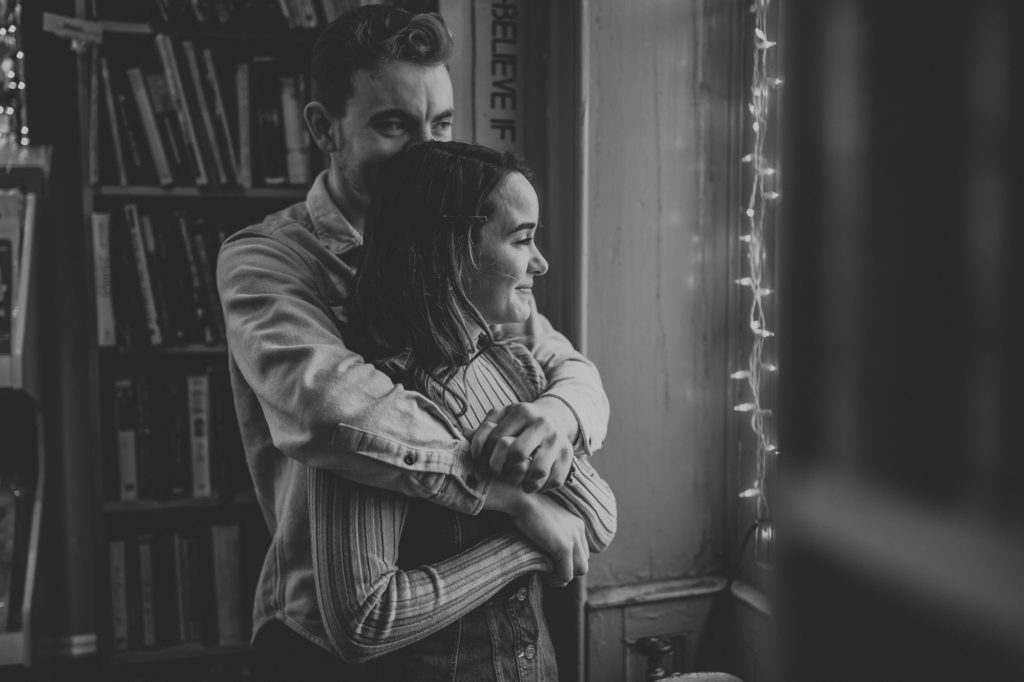
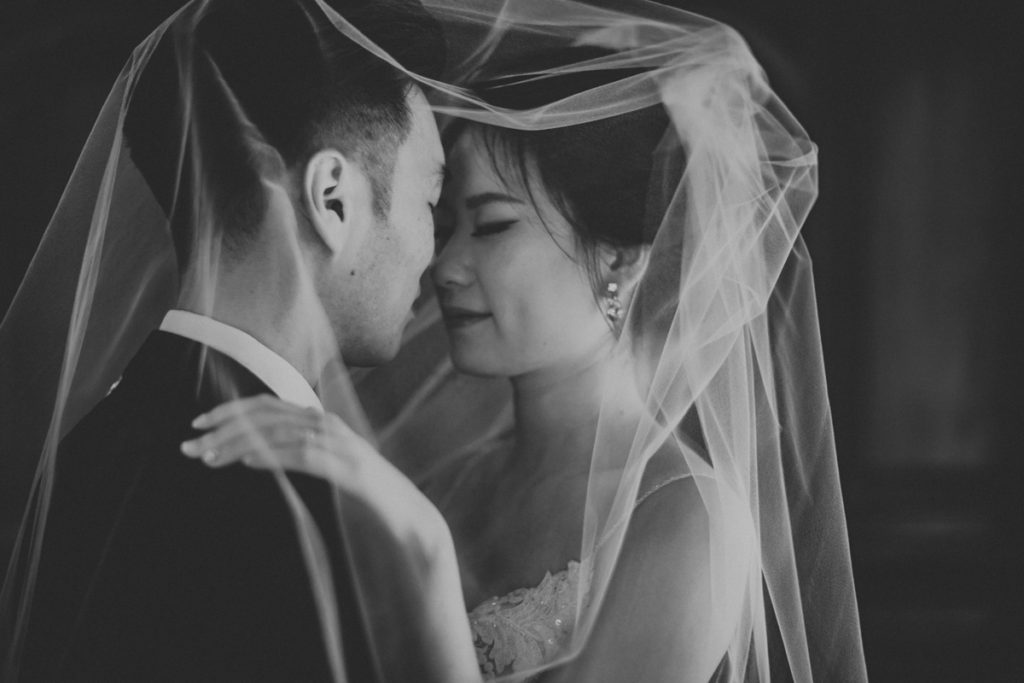
1). Look for emotional intensity
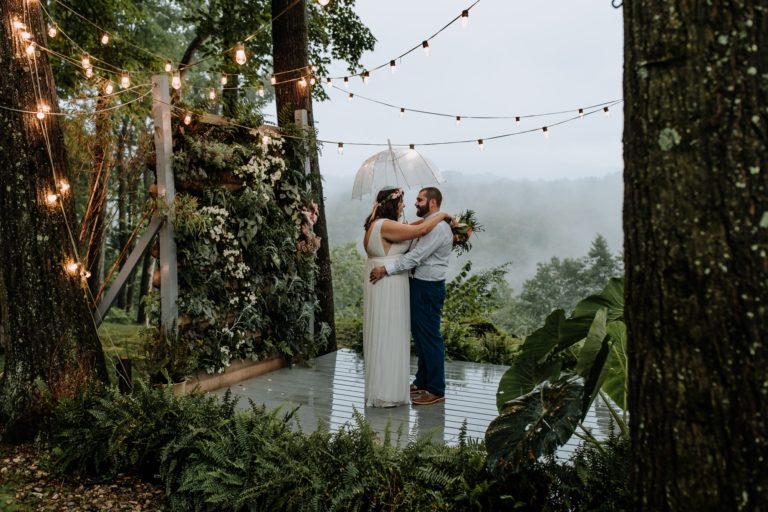
The best black and white photographs we have taken, and have seen by other photographers, often put on display serious emotions. The simplicity of this photo style allows our minds to remove all of the clutter that color can bring to our thoughts, and instead replace it with unhindered focus on what we are actually seeing.
Emotions like sadness and anger translate very well to this format. Having a tear running down a bride face while seeing her groom is a beautiful and intense thing.
In the same way, happiness and joy can also come through as well and be elevated by the black and white color scheme.
While this may seem easiest to think about in the context of portraits of people, you should also consider your emotional response to any subject you have in front of you. For example, we’ve converted many landscape photos to black and white because they made us feel something – and taking into consideration your own thoughts (and those a viewer might have) is equally important.
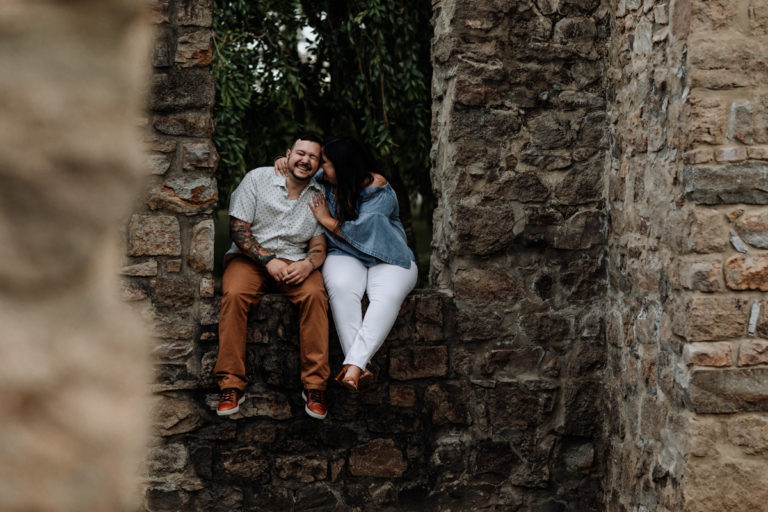
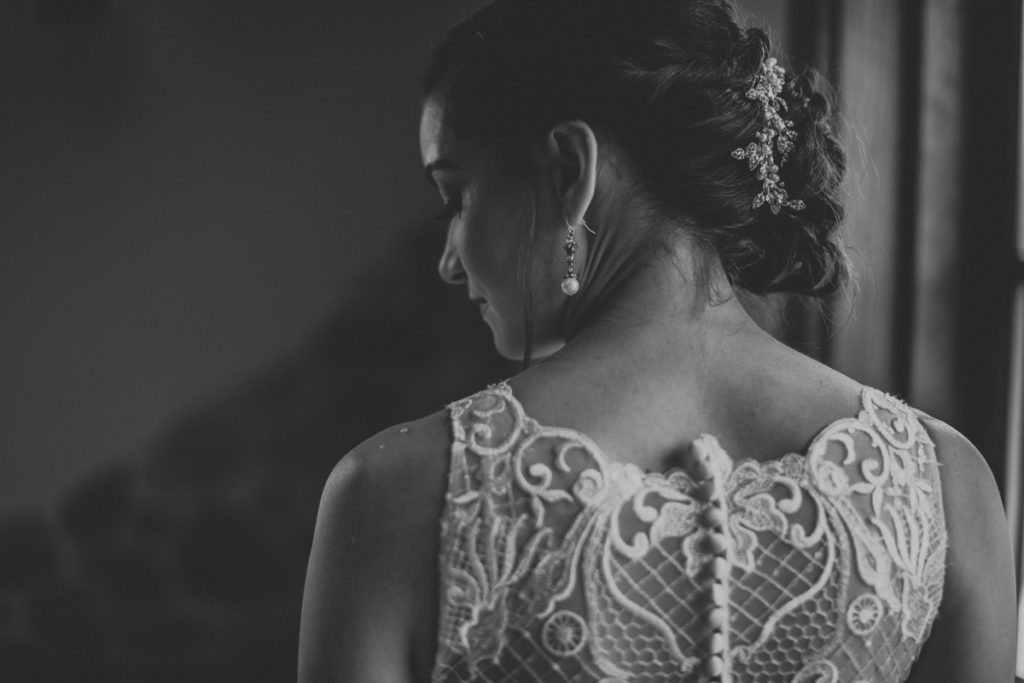
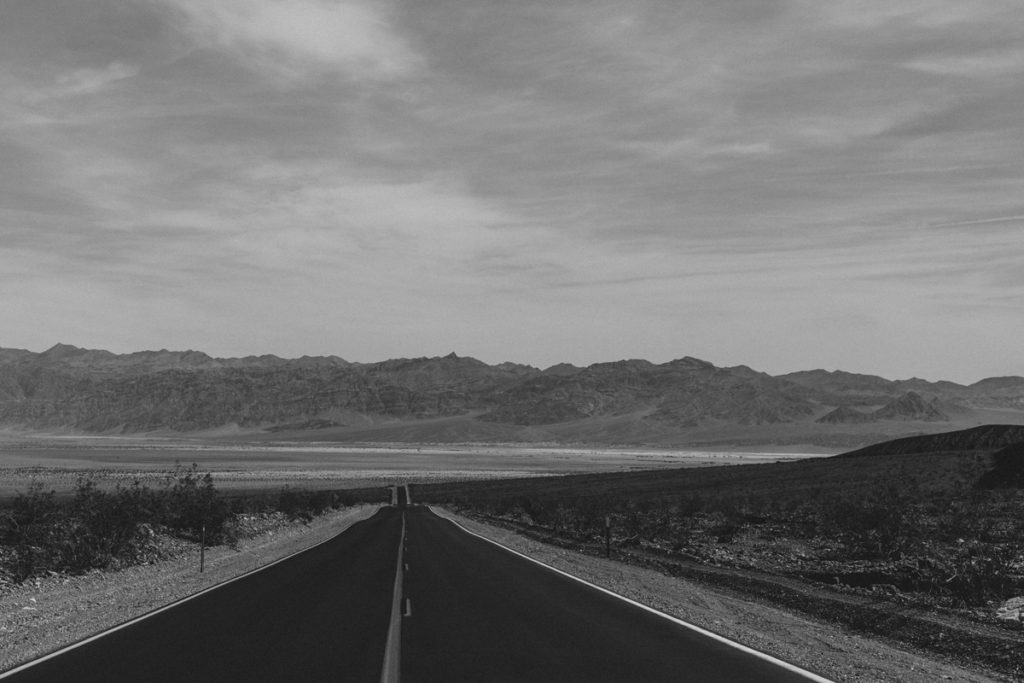
2). Find stark contrast in your scene
One of the essential components of black and white photography is being able to use the light to create depth. Now, there are many tools at a photographer’s disposal to do this – one being using a wide or narrow aperture in camera. However, depth can also be created more organically by simply positioning your subject appropriately in or out of the light.
A favorite example that we like to think about when providing education on black and white photography is this: you’re taking a portrait photograph indoors…
In most environments like this, the lighting will be fairly bland and uninteresting. By moving your subject near a window and lighting them from the side, you instantly create a more powerful image. On display you’ll have an intense source of natural light – coming from outside the window and shining through. You can illuminate the subject’s faces on one side, and there will be contrast as the other half of their face will be cast in shadow.
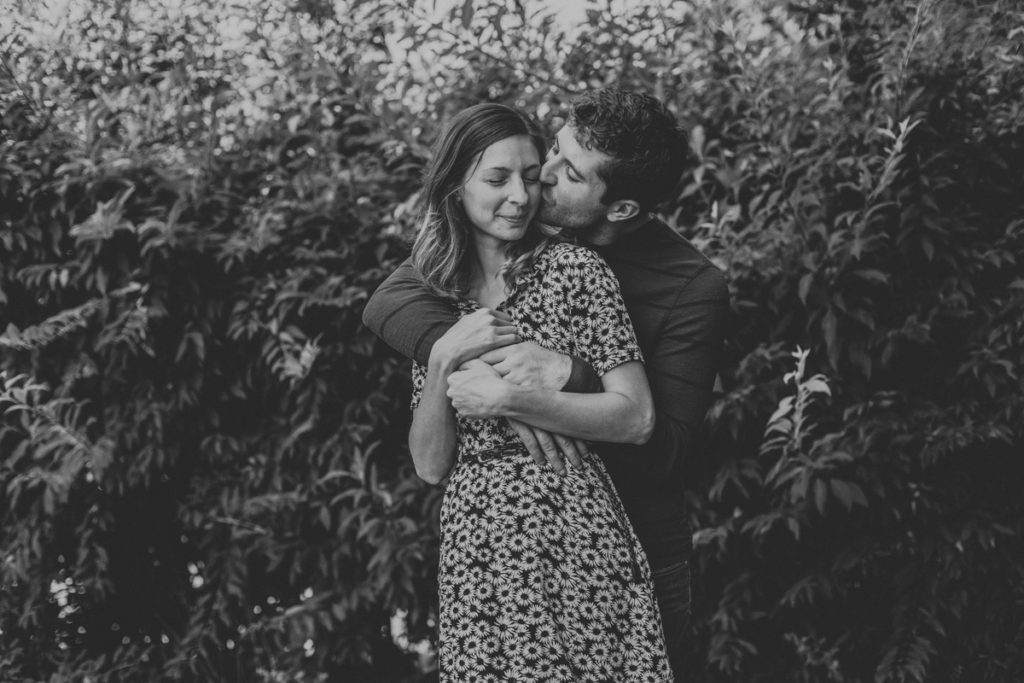
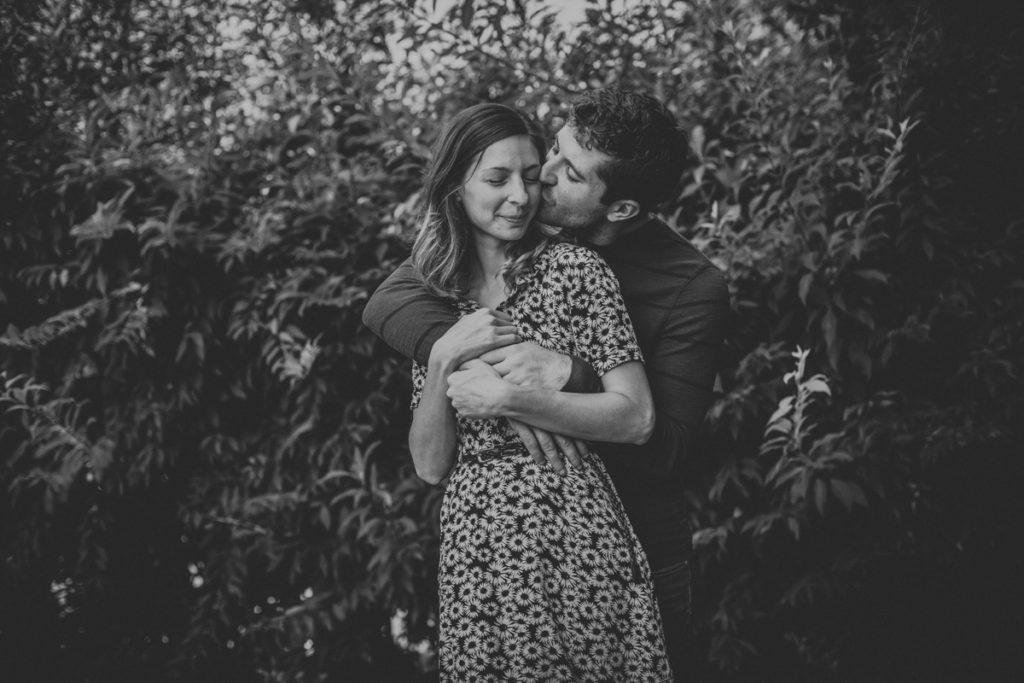
Below we’ve included a couple sample black and white photos we have taken. Can you see how contrast is helping to enhance these pictures?
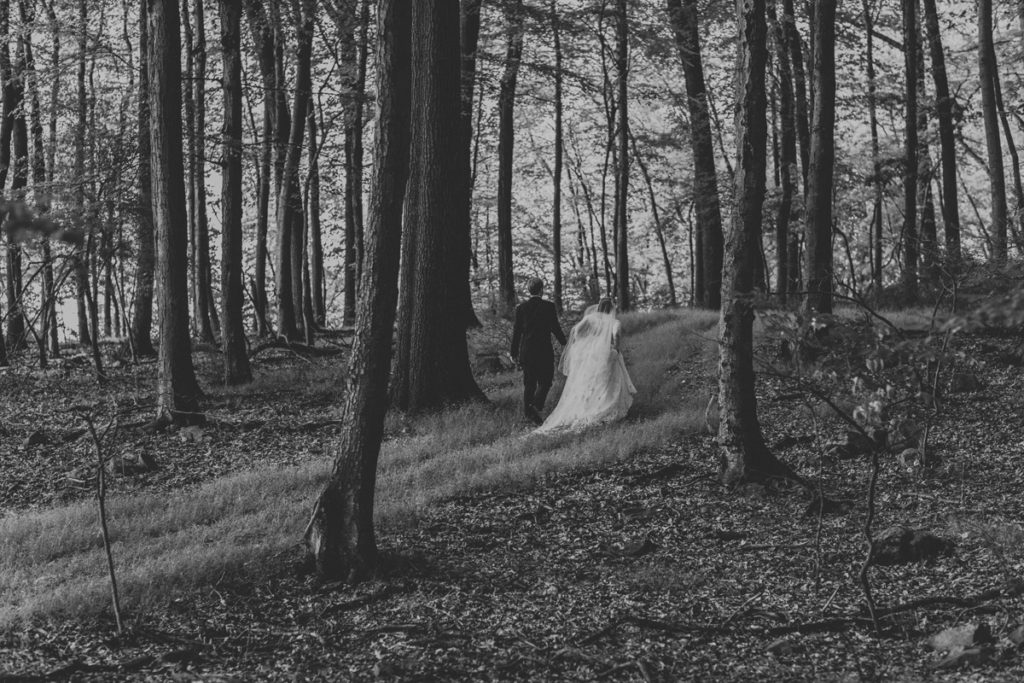
In addition, emphasis is given much more to the actual light and the lack thereof. While this is the case in any type of photography – it’s this quality of contrast that really comes to the forefront in a B&W image as you can hopefully see.
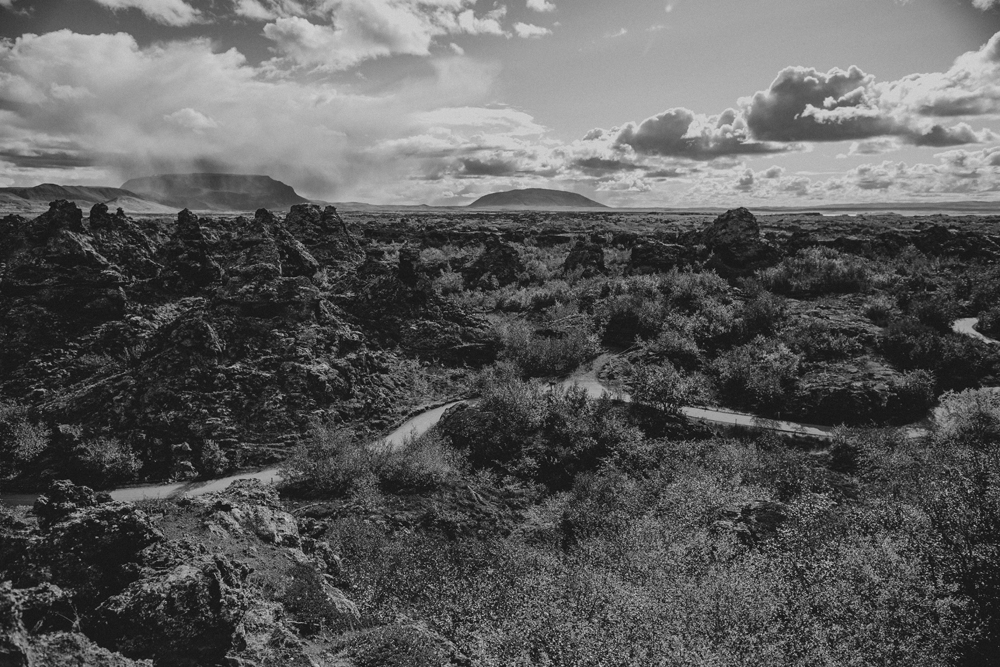
3). Be minimalistic in your approach
While not true in 100% of cases, we often find that minimalism is the best approach for making great black and white photos.
In one sense, we are referring to the environment. It should be uncluttered and simple. Having random objects all over will, at least, feel chaotic and disorganized – and won’t suit your photo unless those are emotions you’re looking to convey.
In another sense, your choice of a black and white photo subject is also important. Sometimes, as photographers we have a tendency to overthink what we should be photographing. In reality, there are so many simple subjects just waiting to be photographed – and these are often some of the greatest ones beginning for a black and white photo conversion.
4). Pay attention to the colors in the environment
One of the biggest mistakes you could make when taking a black and white photograph is to think the colors don’t matter.
Black and white images work off of a grayscale continuum – meaning you will see many variations in “color” ranging from pure black to pure white. The many shades of grey in the middle is what will help to give your photos extra depth, and the tones present will be a direct result of the colors (and lighting) in your picture.
With black and white photo editing in mind, we often will clump colors together in our minds. For example, when shooting out in the woods – we know that our adjustments to the green colors will impact all of the grass and foliage, while tweaks to the oranges will normally impact skin tones. Having pops of color (even if you don’t like the color or think it works in real life) will give you more freedom and control to manipulate the look of the photo later on.
We will show you how this works in the next part of our post by showing off some of our own black and white photography editing examples!
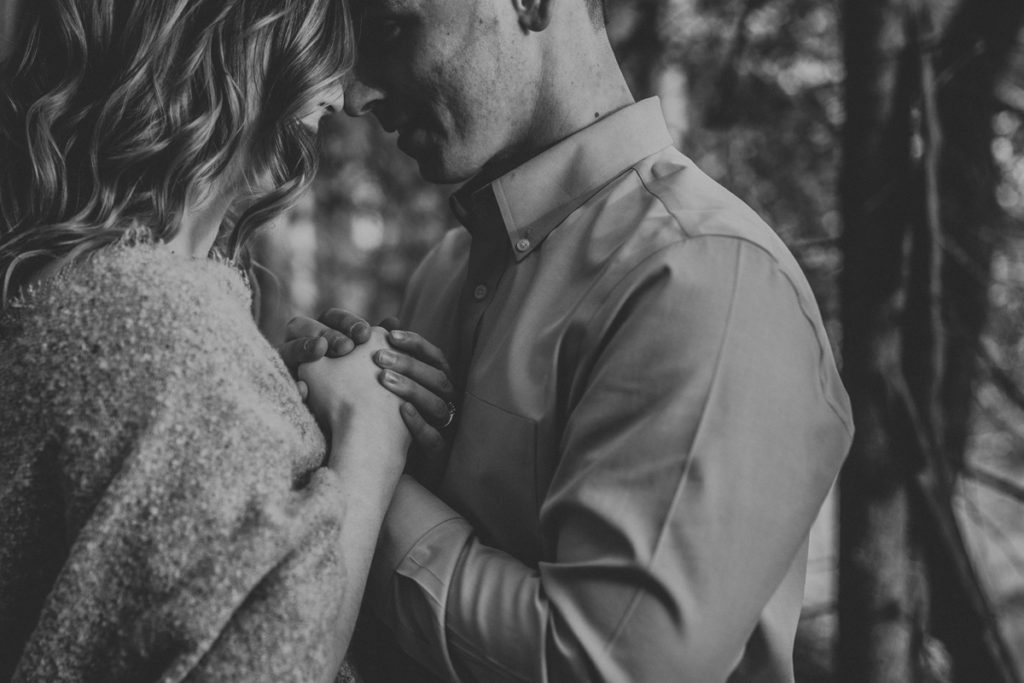
5). Have a reason for creating a black and white photo
Having a reason for wanting to capture a still in black and white will give your photography more purpose.
While, no doubt, some great photography is made arbitrarily – as photographers it’s much easier to connect with our subject matter. It helps us produce art that we can truly care about and be proud of.
Our concentration is heavily on photographing couples and weddings, and our purpose for transferring some images into B&W multi-faceted. Some of the things we think about when taking these types of photos:
- We want to showcase raw emotions like love, beauty, and joy. These are intangible things that feel very real in our imagery – and this is enhanced in certain scenes by limiting our color palette.
- We want our images to have a modern edge. At times, we do consider how our photos will be used. It’s easy to imagine that a couple would print out a picture of themselves. Showcasing these images as hanging wall art is a way to keep decorations around the home simple and modern – something we apply to our own personal “at home” aesthetic.
As you can see, our decisions are not particularly complex – but they are often intentional.
Of course, we’d be lying if we didn’t make happy little mistakes (thanks Bob Ross!) once in a while as we go through our photos and just experiment with a black and white filter.
For more advice to get a great black and white photograph, pick up a copy of The Photographer’s Black and White Handbook: Making and Processing Stunning Digital Black and White Photos. This is an AMAZING book on the subject written by award-winning expert photographer Harold Davis that is an easy read, has practical advice, and has the added benefit of being a great one to keep on your coffee table as a conversation starter.
11 Black and White Photography Editing Tips
 Now that you have created an image that will be suitable to make into black and white – the real fun begins. Editing our images into black and white is (maybe weirdly) one of our favorite things to do when it comes to post processing. It’s a lot easier than airbrushing a portrait or cleaning up a messy background by using a clone stamp tool.
To achieve a black and white photo edit, you must first begin by using an editing software suite. We’ll assume you already have one on your computer (or phone/tablet). If not, the photography industry standard is Adobe Lightroom and Photoshop – both of which are suitable for producing B&W images with ease. These are not the only programs out there – and if you are using another one, these tips will still be applicable.
For the purpose of our demonstrations below, we are editing our images in Lightroom. Some of the specific tools that we will showcase are from that program – but there will, more than likely, be a comparable tool in whatever program you are using.
1). Convert the Image to Black and White
Every photo editing software will include the basic functionality of making an image black and white.
In Lightroom, the simplest way to make this conversion to any image is to look for the Basic -> Treatment -> Black & White option.

Using this method, you will retain all adjustments you have made to colors, tones, etc. already, and simply turn on the black and white photography filter.
While this is the basic approach, you will not be satisfied with the result most of the time. Your conversion will require a good deal of tweaking to arrive at your final edited product.
The best way to simplify this process is to use black and white photo editing presets.
In Lightroom and Photoshop, the programs come with some free presets you can apply, though through our experience we consider the results to be pretty bland as well. The solution we’ve gone with is to purchase black and white presets put together by experienced photographers to make for a more efficient workflow and more beautiful images – in a quick and easy manner.
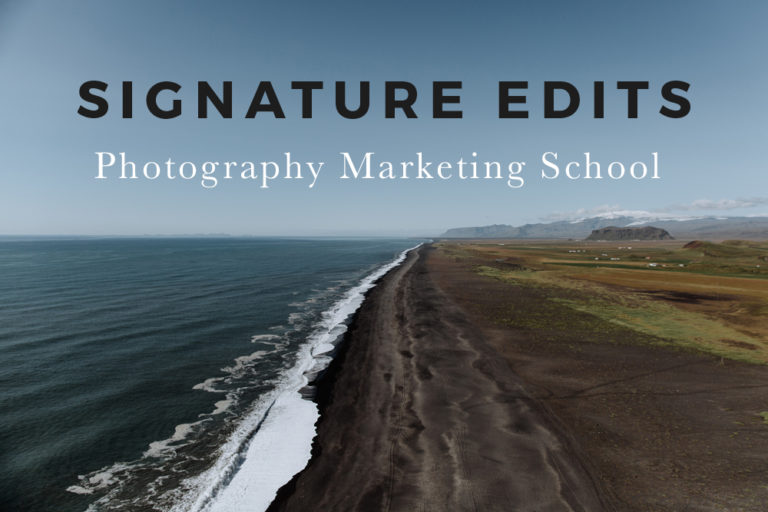
Our preferred black and white photography presets for Lightroom is the Signature Edit’s Genesis Collection. This pack includes some color edit options as well as 2 great B&W presets. We will be showing off some before-and-after edits throughout this post using these presets.
By using presets to edit your images, you will save yourself a lot of time to get a great result. Presets don’t mean you won’t have to do any tweaking – but it will keep this to the bare minimum.
2). Review the Histogram
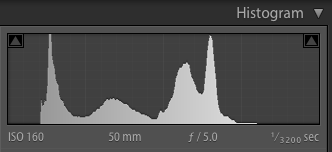
The histogram is a visual tool that can be referenced to identify the tones in your image. On most cameras, a histogram graph is built in while you’re on the go. Additionally, any reputable photo editing program will also include a histogram to review during your post production phase.
The key elements the histogram identifies:
- Blacks
- Shadows
- Mid Tones
- Highlights
- Whites
This is useful for any type of photo editing – but especially valuable when editing black and white images.
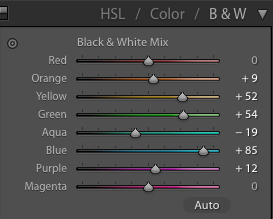
3). Adjust Color Sliders for More Control
One of the most impactful black and white photo editing tips we discovered early on was just how much color impacts the image.
In some scenes, your color adjustments will make significant changes.
If you took a photo in a grassy field, tweaking the greens/yellows will translate into a huge part of the scene (the grass) changing to be blacker or whiter.
A portrait photo taken in front of a brick building will have the same result as you make adjustments to the oranges/reds – which will end up impacting the brick background as well as the skin tone of the subject.
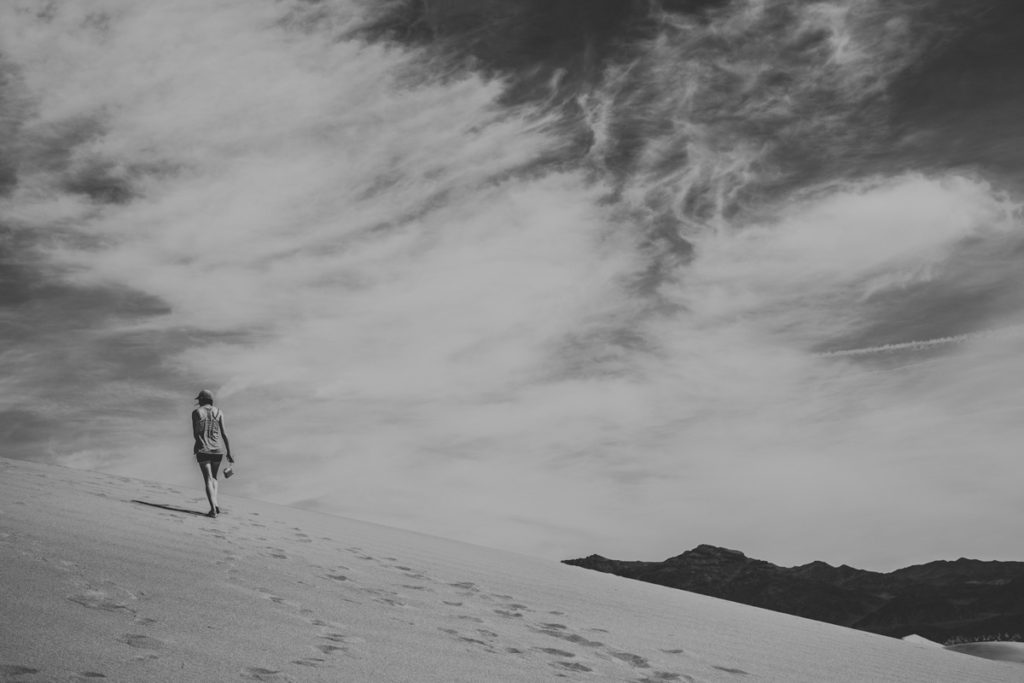
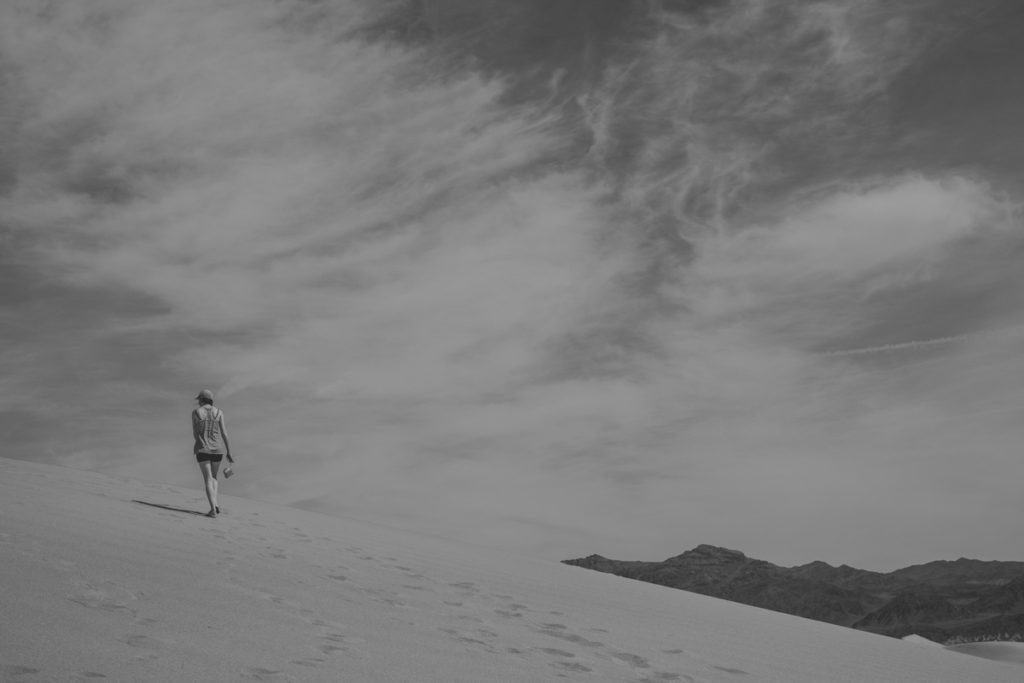
Below you can see an example of how making adjustments to the color sliders alone impact the look of an image:

In the above example, the only adjustments made were to the color sliders.
Photo #1 (Original Edit) is the result when the black and white photography preset was applied.
As you can see in the screenshot from Lightroom below, the color sliders are fairly neutral in their positioning. The image in this state has a lot of contrast between the darker tones (background) and lighter tones (foreground subject).
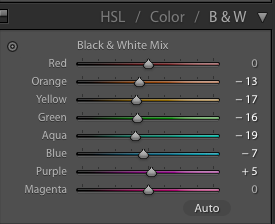
Photo #2 (Edit Adjustment) is the result after increasing some of the color sliders – specifically the Orange, Yellows, Blues, Purples and Greens.
These colors were tweaked because they comprised the majority of the background as these are the tones that make up grass outside. By only increasing the color sliders, we make HUGE changes to the look of the image. In this case, it creates a lighter and softer looking picture.
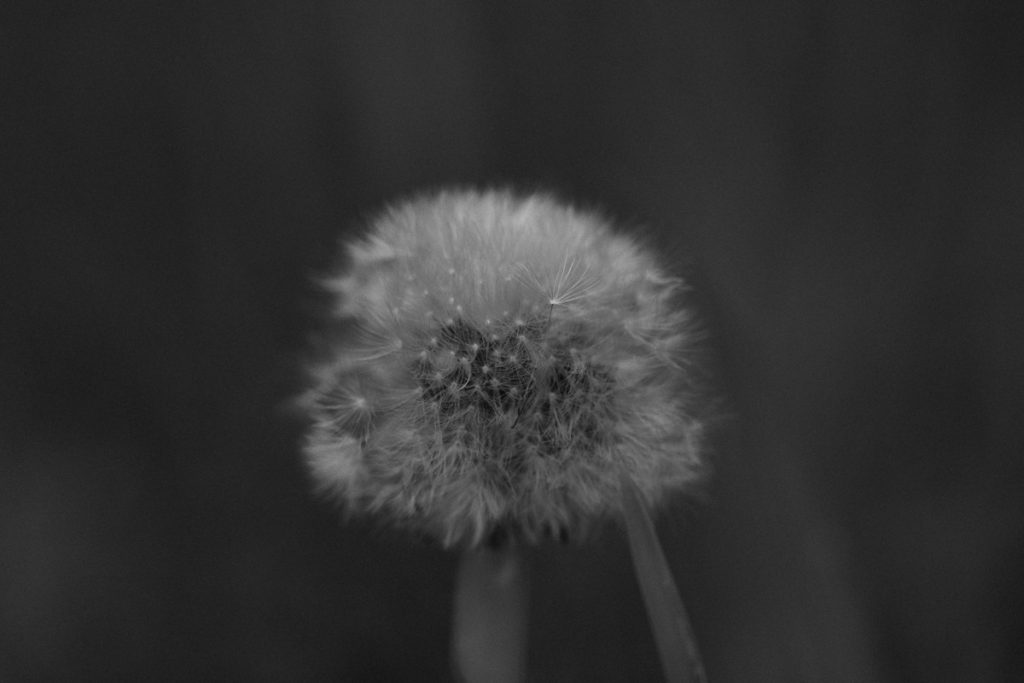
4). Leverage Contrast & Clarity for More Depth and Detail
Contrast and Clarity are two features on display in any photograph. These things can be controlled in camera by selecting settings that pair with your intended look. For example, if you want more clarity in your image, you should consider using higher f/stops (the specific point will depend on your subject). Landscape photographers will often shoot as high as f/16 to get everything in focus.
If you need help getting the right settings and learning more about taking great pictures in general, check out our mega-article 101 Digital Photography Tips – A Guide to Taking Great Photos.
Of course, our focus (no pun intended!) here in on photo editing. In photo editing programs like Lightroom and Photoshop, Contrast and Clarity will display as sliders than can be adjusted to manipulate your image further. This results in artificial changes to the look of the image in these ways.
For black and white photo edits, having more-or-less of contrast and clarity can really enhance your shot.
For intimate displays of affection that we often get when taking couples photography, we will sometimes decrease the clarity to soften the image. This softness is something we appreciate when looking to invoke a romantic mood.
On the other hand, when editing a shot of a wedding ring close up (taken with a macro lens), we will increase clarity AND contrast in order to make the ring pop from it’s environment. Depending on the specific image, we may apply this to the whole image, or we will use the Brush Tool to make selective adjustments to a specific area (such as on the ring itself).
5). More Blacks = Brighter Whites
In the name of getting a solid black and white edit, many photographers and photo retouchers will have one simple rule: by having more blacks, it will make your whites standout more and POP!
Whether your scene naturally has this type of contrast, or you have to introduce it by bringing the blacks down in your photo editing program – the effect is beautiful and rich.
6). Use the Tone Curve for Great Results
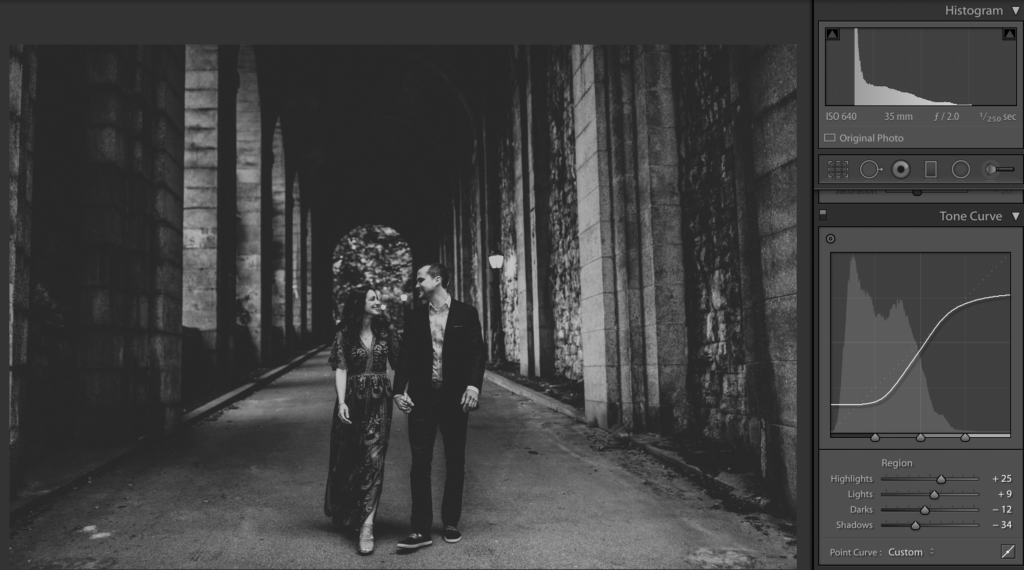 The tone curve is a fantastic visual tool you can use in Lightroom to control the depth of your images.
You can manipulate the curve by dragging it around (your image will change as you do this) OR you can simply make adjustments to the Highlights, Lights, Darks, and Shadows directly by using the slider bars.
One of the black and white photography editing tips we’ve come up with over years of making these tweaks is to go with a light S-Curve shape as seen in the image above.
This produces a lot of drama and depth in the image by letting the darker tones (Darks/Shadows) to be “darker” and the lighter tones (Lights/Highlights) to be lighter. The image results in some true blacks and true whites – which helps contrast with all of the remaining grey tones in between.
7). Use Light Vignetting to Draw the Eye to the Subject
Most modern photographers would agree that vignettes are dated and a little cheesy. When used to an extreme like they once were in the 80’s and 90’s – we definitely would agree.
However, more recently we’ve started to use vignettes in a range of photography from portraits to landscapes and – to our surprise – we actually like it.
The key to nailing a great vignette is to use it lightly and have a reason for using it.
You should understand how a vignette effect works: your photograph will normally be in a rectangular shape considering the standard photograph aspect ration is 3:2 (common on 35mm film cameras and modern DSLR’s alike). A vignette adds a curved effect – normally black or white – in the corner of the frame. As a result, the use of a vignette will draw your eyes away from the edges of an image and towards the center. Traditionally, this has been used to bring more attention to a portrait subject.
In much of our photography, we often look for “natural vignettes” when we are shooting. These are often natural framing devices we can use in the foreground (sometimes as simple as picking a flower and holding it in front of the lens).
More than that, though, is using vignetting as a post processing effect. It often seems to work best when an image already has a lot of darker spots in the corners of the image – so when used lightly, it can add further drama and enhance the focus on a subject.
See below for a before-and-after image (with us on full display) example of using vignetting effectively in your black and white photography edits:
Which edit do you prefer? With or without the vignette?
8). Crop Images to Maximize Your Composition
If you happen to already have an image with the perfect composition already, then this tip will not apply. In most cases, though, our photography efforts can benefit from some cropping to provide a more focused end result.
One of the simplest photo editing tricks that anyone wanting to alter there images (no matter the skill level) can do is crop a picture.
We crop our images to remove unneeded information. Frequently, we take portraits in crowded spaces – like in the middle of Philadelphia – and often the amount of people, cars, and other things going on can be distracting. While one solution is to use tighter focal length lenses like an 85mm, this isn’t always our preference. In this case, cropping can be done to bring the focus back to our portrait subject – and remove all the excess baggage in a shot.
It’s a simple refinement that makes a big impression.
9). Have Some “True Blacks” and “True Whites”
Having a “black and white image” that is just comprised of grey tones isn’t going to look that appealing. It will be flat, looked washed out, and just lack the depth a great black and white photo should have.
Resolving this issue is very easy to do by ensuring you are including some true black and true white tones in your image. You can check for this by using the histogram that we mentioned earlier, but most of the time you should be able to pick up on it just by looking at your image.
We talked about Ansel Adams and his film post processing technique in our article How Do You Take Amazing Pictures? that allowed him to create a very distinct black and white photography style that was vivid and rich. It’s work like this that really showcases what B&W photography is capable of.
10). Add Grain Sparingly for a Film Look
Because black and white photography naturally lends a very cinematic quality to your images, it’s easy to see why adding some grain could add another layer of depth.
In our experience, grain is an effect that can be overdone, but when used sparingly – can benefit a photo.
There are, of course, some photographers who wonder why anyone would want to add grain – as normally we’re trying to counteract this by keeping our ISO settings low. For sure, we get that mindset, and admit grain isn’t for everyone or even meant for every black and white photo edit – but we keep it as one extra tool on our photo editors tool belt.
The vast majority of our black and white edits include some grain. Most of the time, it isn’t really even that noticeable unless you are viewing an image in full screen mode – and even then might not be too visible unless viewing the high resolution version. It’s this type of subtlety that we prefer.
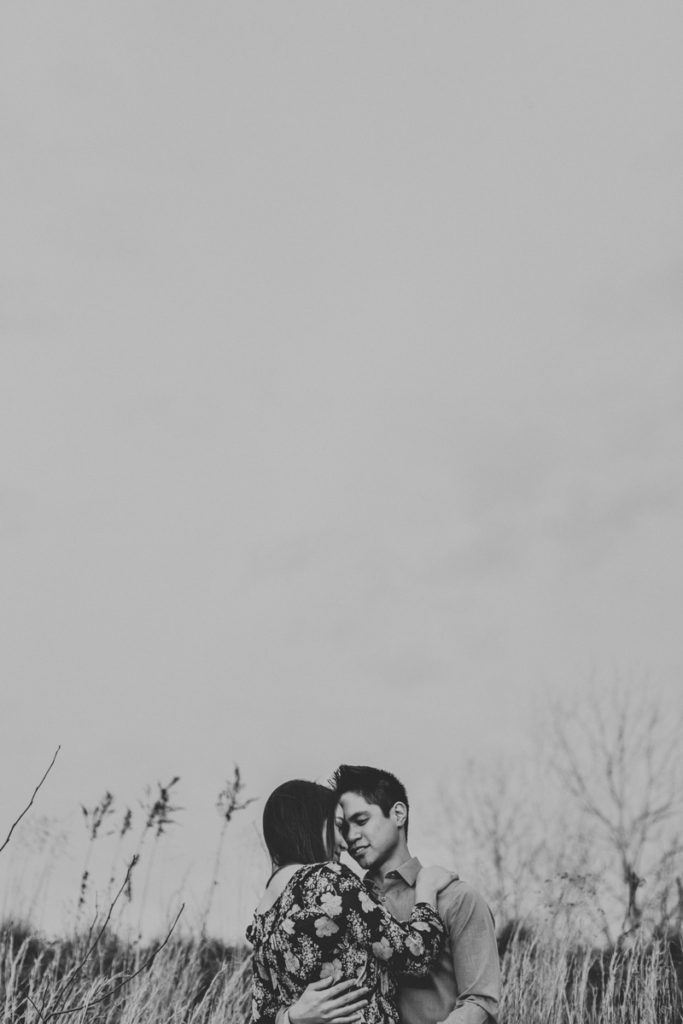
11). Use Negative Space
We’ve taken enough art classes in our time to have learned the value of negative space. When applied to any type of visual art style – painting, drawing, home decor, graphic design, cinematography, and photography (and more!) – there is inherent value in the space where there is nothing just as much as the parts of a composition where there are things taking up space.
Seeing the benefit of negative space is easiest when looking at very minimalistic photo compositions. One of our favorites from a recent engagement session we had features empty white sky in about 80% of the frame. This is juxtaposed with our couple and a little bit of the surrounding landscape – and makes for a very dramatic looking shot.
Conclusion
Black and white photography is so many things…timeless, modern, edgy, moody, cinematic, romantic, haunting…you could pick an adjective and it will probably fit.
By removing color from an image, you have the potential to really enhance it by showcasing stark contrast. You bring the focus much more to the subject than all the distractions our eyes are often drawn to in color images.
In this post, we showed you how you can create beautiful black and white photos yourself through a combination of in-camera and post processing techniques. By leveraging a good eye for composition, the “right” light, black and white photo presets, and our editing tips – you will be able to make creative and stunning B&W photos with ease.
If you have any questions or feel something is missing in this post, drop us a line in the comments below!