MileIQ – Mileage Tracking App – A Review After 2 Years of Use
It’s getting to be the end of year here, and it’s around this time that we start to really take a look at all that we’ve done. As small business owners, this has been a hugely challenging and rewarding year for us – we’ve seen a lot of growth in our business, received a lot of great feedback from our clients, and are coming up on the slow winter season where we’ll spend a good amount of time getting caught up on some things we’ve put off for a while.
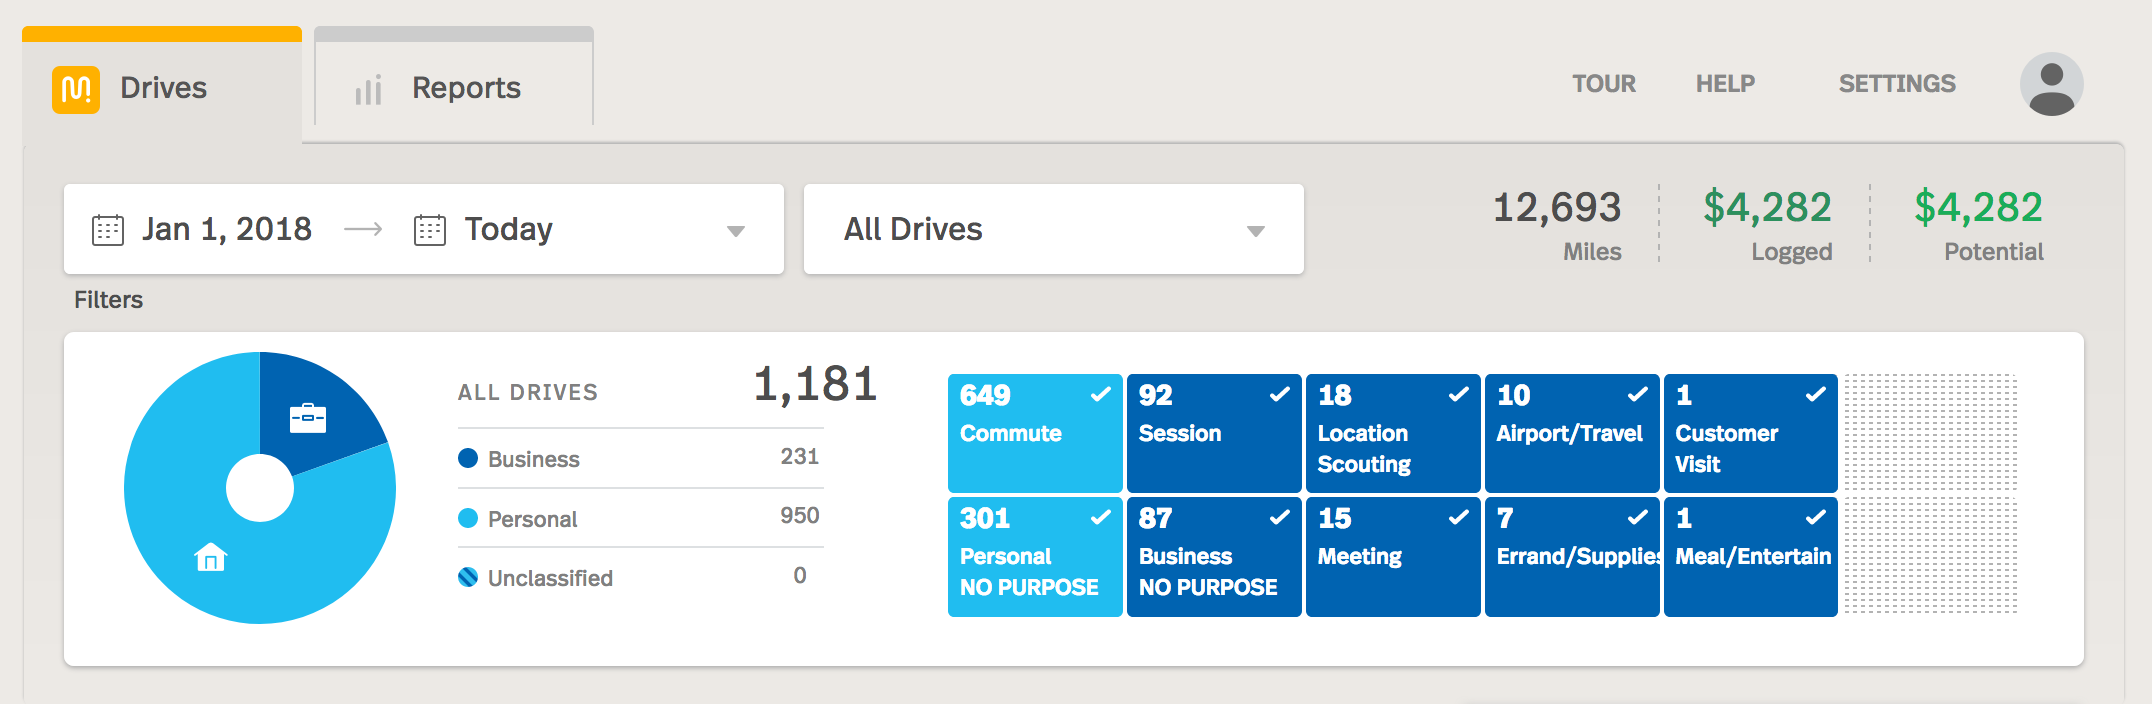
As a part of this reflection, it’s interesting for us to pay a visit to our MileIQ account.
As of this exact moment, we can quickly check and see that we’ve driven 12,693 miles this year – and have $4,282 logged as mileage for our business. Given the federal mileage rate for 2018 is 54.5 cents per mile, you can see we’ve done a huge amount of driving for our business. Without proper tracking of your mileage, this can be a really big tax write off you are missing out on at the end of the year – for us, it makes a real difference.
Why You Need to Track Your Mileage
As a small business owner, tracking your mileage is the easiest way to get a tax write off for the traveling you do.
There are other options available to you, but these require you to keep track of a lot of receipts, and often end up netting you with a lower tax deduction.
For us, mileage tracking is the only option we’d consider.
It’s very important to us because our job (wedding photographers) requires business travel virtually every time we step out of our house.
-
Going to a shoot? It’s business travel.
-
Going to the store to buy office supplies? It’s business travel.
-
Going to meet with a client at a local coffee shop? It’s business travel.
-
Going to the airport to fly somewhere for business? It’s business travel…
If you travel a lot in any way for your business, every mile could end up translate into significant savings come tax time. And, if you are like us, you’d probably agree that it’s nice to not have to give the government any more money than we have too 🙂
Why MileIQ is the Best Option for Mileage Tracking

Two years ago when we started our photography business, we began to learn about what was required to track our mileage.
It turns out, for every vehicle we wanted use for business, we would need to track both personal and business mileage – and keep a well maintained log of all our drives that is compliant with IRS requirements.
On the surface, this seemed easy enough – just keep a notebook in our car and every time we get in it, keep a log of our odometer readings, where we’re going, and our reason. In practice, this is a real pain in the ***. It’s very time consuming, and if you forget even one time, it can be difficult to fill in the blanks.
As you might imagine, we scratched the pen-and-paper method real quick. After this realization, we set out to find a more simplified way to track our mileage. In reality, there are many mileage tracking software and apps out there – we tried a handful of them to find one that would be a good fit for us, both in terms of usability and cost.
MileIQ ended up fitting the bill for us. One of the big selling points was the ability to use the platform for free up to 40 drives per month. Early on in our business, when we only had 1 or 2 sessions a month, this was a great way to begin tracking our drives without having to spend a cent.
As we’ve grown in the past 2 years, our business travel has increased significantly, and this is why we ended up upgrading to the paid plan of $59.99 a year. In the scheme of things, this is one of the few business purchases we have made that actually pays for itself.
MileIQ reduces the headache of needing to track our mileage by hand, and has allowed us to track over $4,000 in business mileage expenses that will be applied as a tax write off.
Already convinced? You can sign up for the free version of MileIQ here, and if you decide to upgrade to a paid plan, you can receive 20% off by using this link.
Need more information about how MileIQ works? Read on!!
How to Use MileIQ – A Starter Guide
MileIQ is one of the simplest services we’ve used. Of course, this should be expected given it’s main purpose in life is to document our mileage.
If you’re completely fresh to this whole concept of mileage tracking, despite the simplicity of this tool, it can still feel a little intimidating as you get used to it. If this is you, we put together a start up guide here to help you get acquainted with the most important features MileIQ has to offer.
Update Your Settings
Once you’ve signed up for MileIQ, you will want to go into your Settings to customize a few things right off the bat. This will include adding your vehicle (name, make, model, year). If you have more than one car that you plan to use for business purposes, you can add multiple here.
The most important element to jot down before you begin using MileIQ is your current odometer reading. By filling this in correctly at the start, it will allow MileIQ to track what your current mileage reading is based on your drives.
This is important because if you were to be audited by the IRS (let’s hope not, but that’s why correct mileage tracking is so essential!), one thing they would be looking at is your mileage log. If they saw you were logging more miles than you’ve actually driven, this could be a sign of tax fraud.
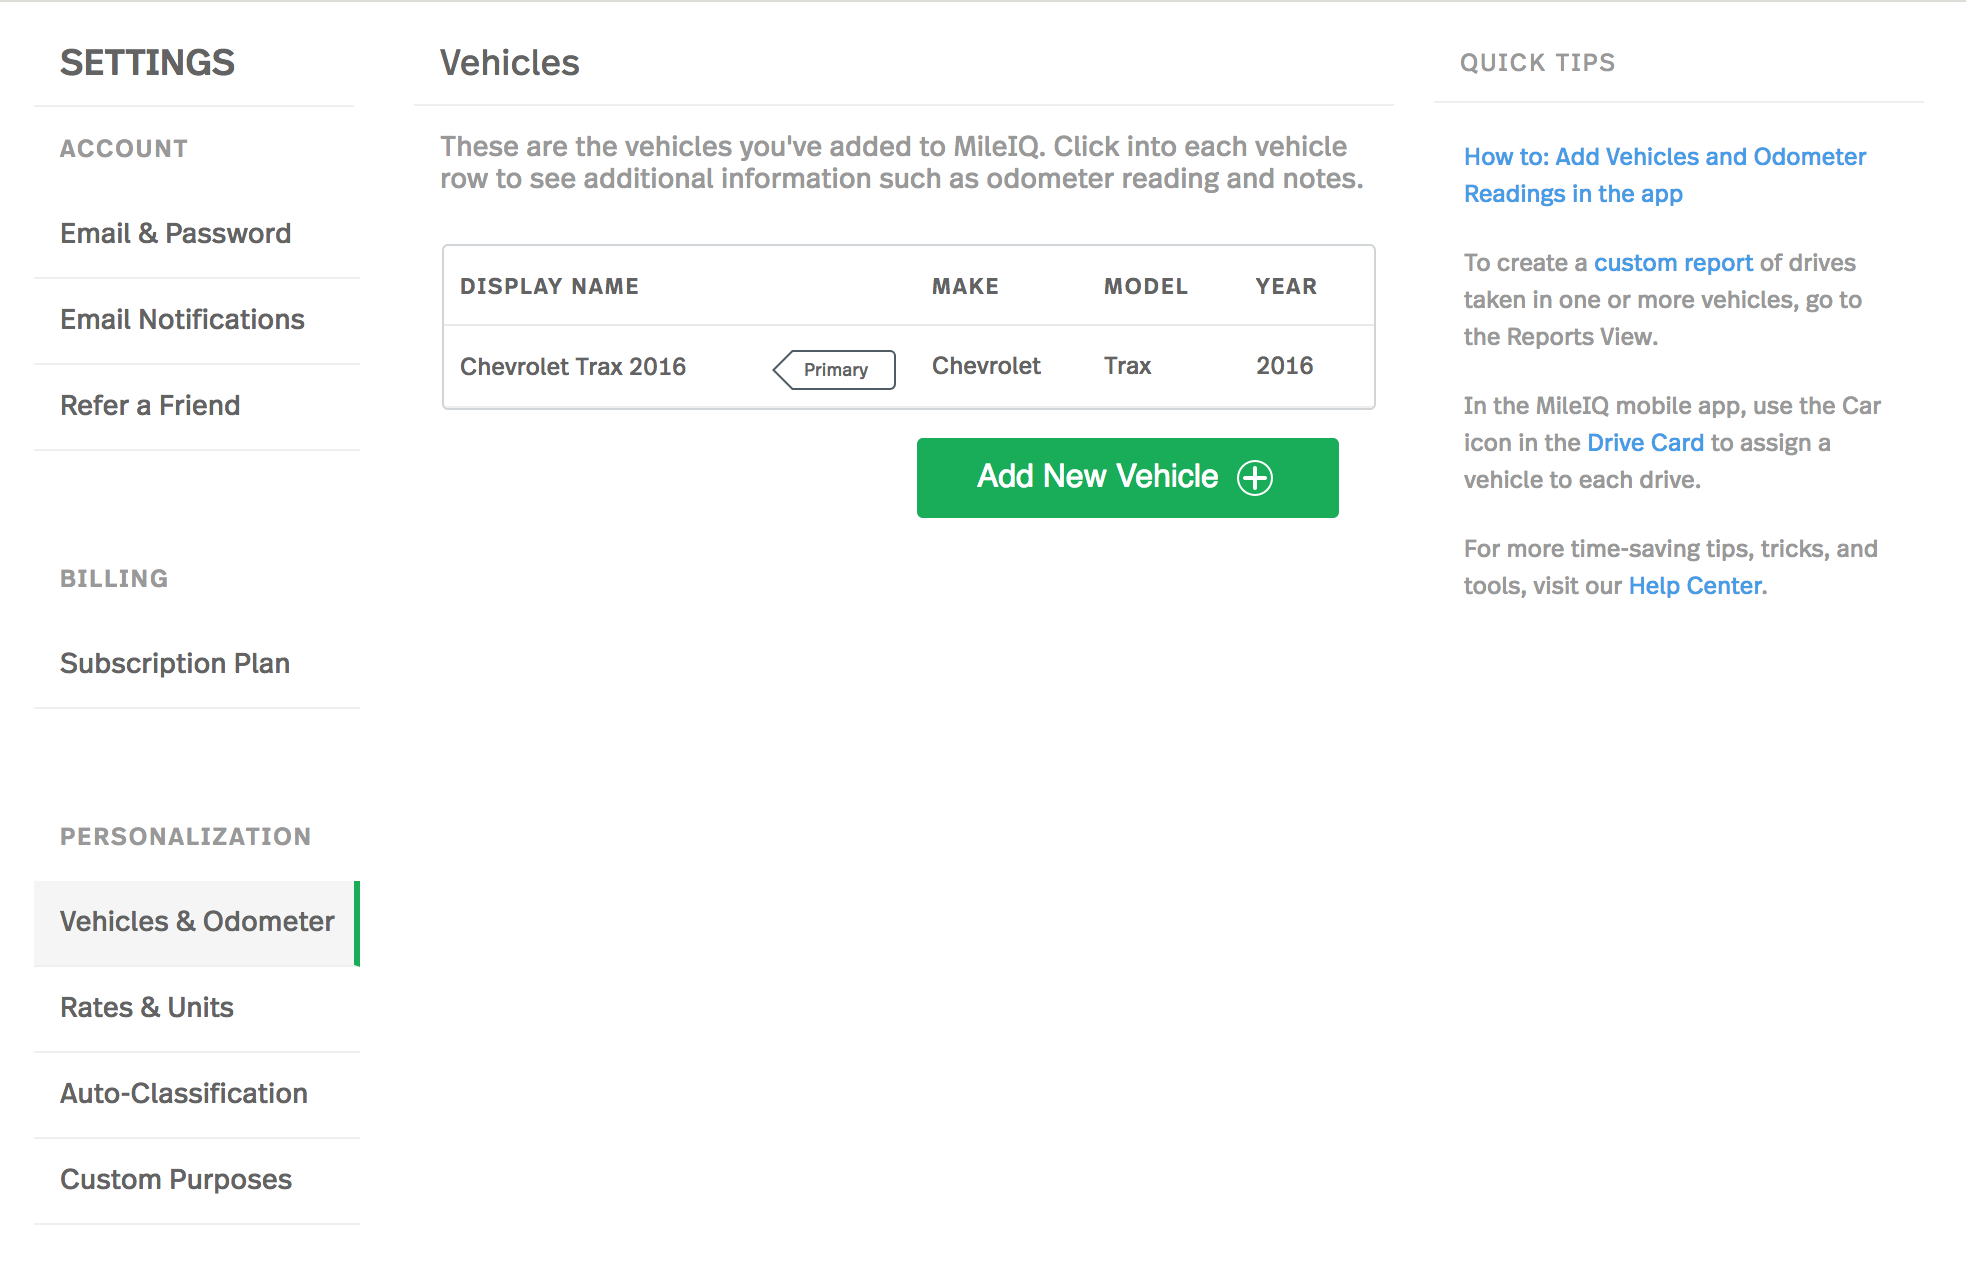
Once your vehicle is set up, just a few more little things to check on:
Under “Rates & Units,” you can see the current standard federal mileage rates and make adjustments to how your mileage is tracked. You likely won’t need to tweak anything here if you are in the United States, it’s moreso available for European users who want to convert from miles to kilometers.
Moving on, under “Auto-Classification,” this is actually a really valuable feature that comes along with MileIQ. In general, one thing you will need to do from time to time is classify your drives as personal or business (more on that in a minute) – but since most of us make the same drives over and over again, you can enable MileIQ to automatically classify these types of drives so it’s one less thing for you to think about. This is really valuable for things like your daily commute, drives to the store, and so on.
If you have set working hours, you can also set it up so any drives taken from 9 – 5 (you set your specific timeframe) would be classified as business, and all other drives classified as personal.

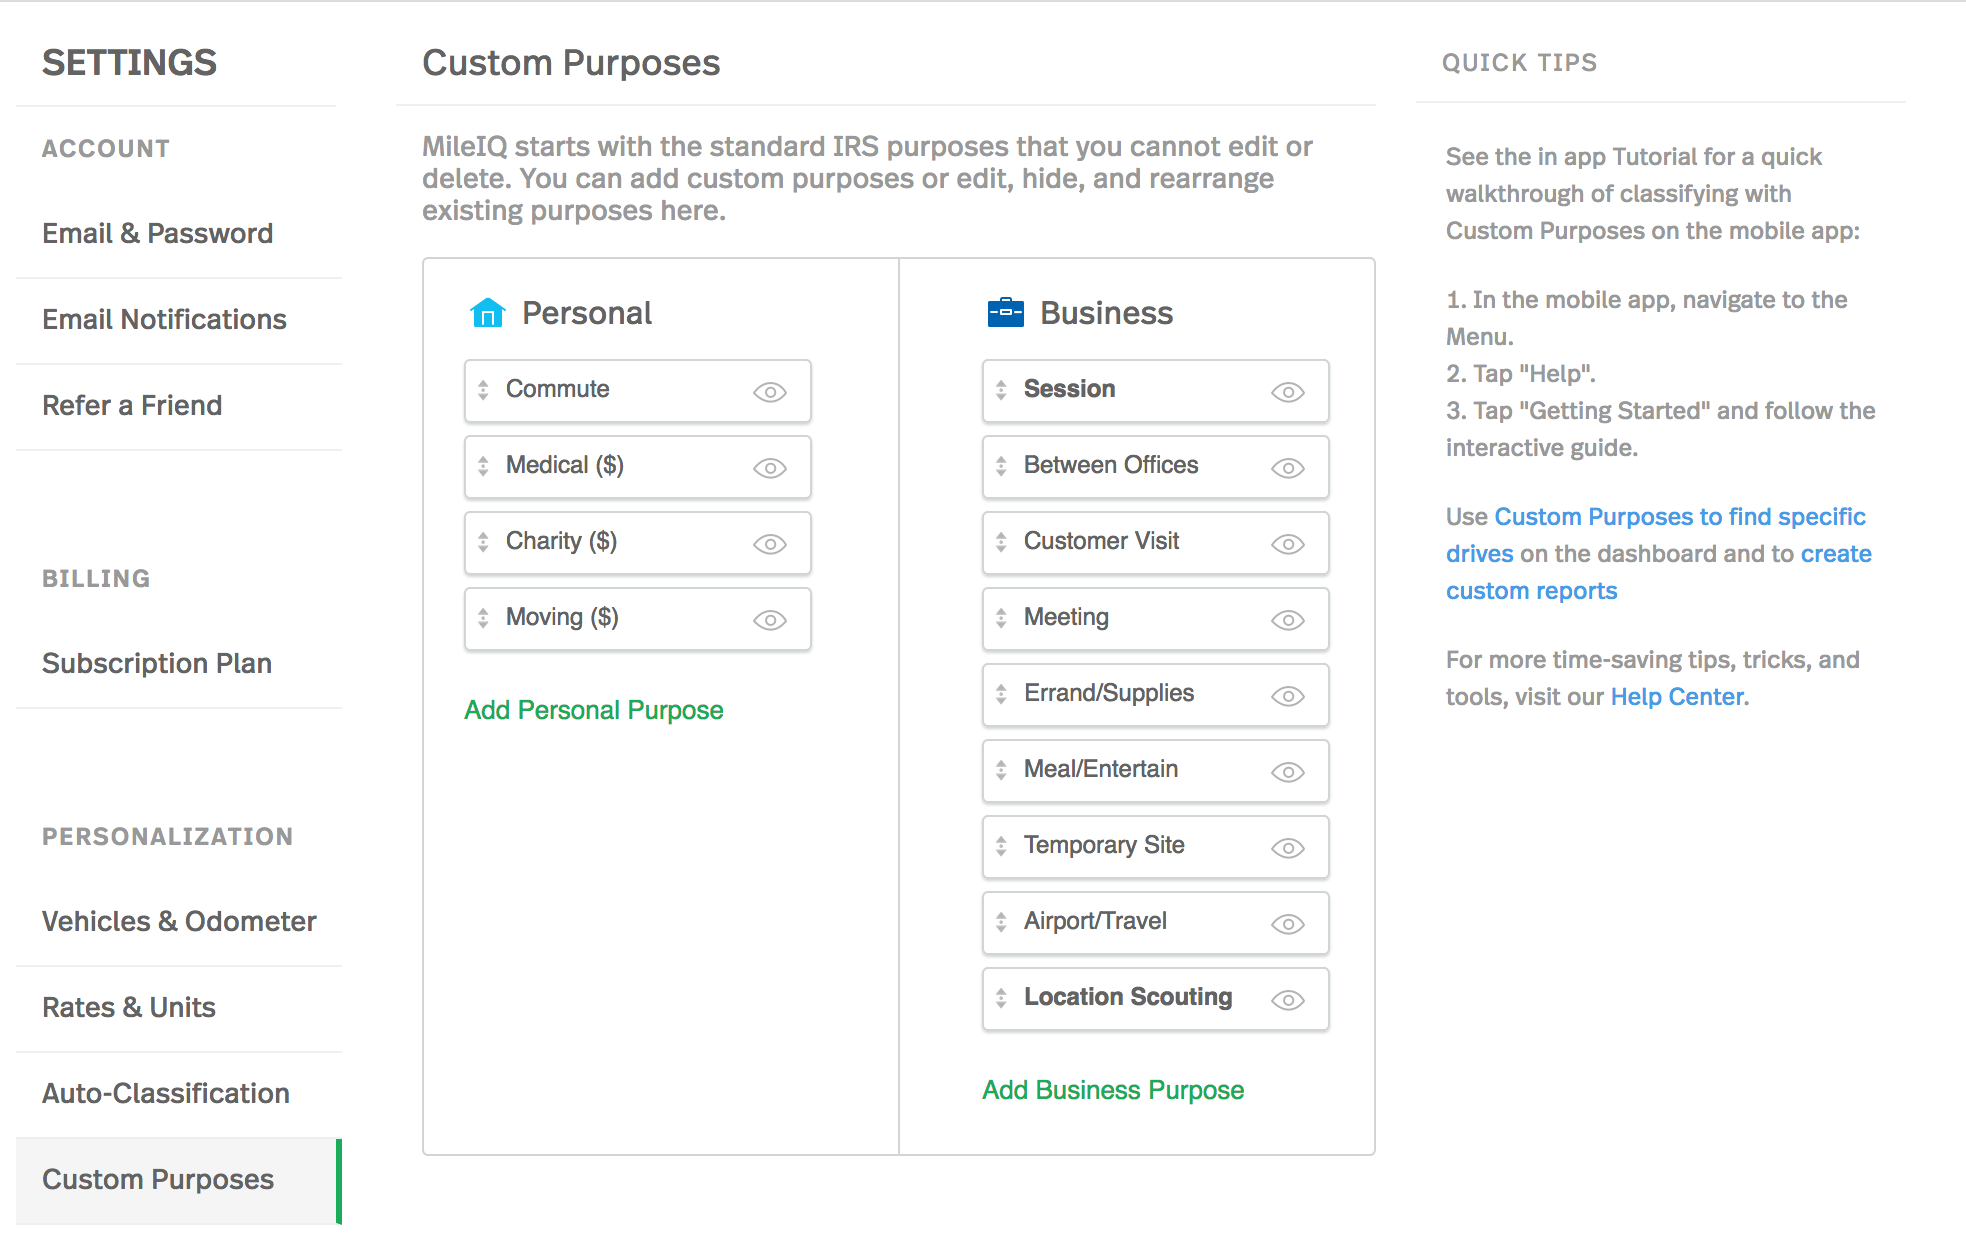
The last thing to check out for your initial set up is the “Custom Purposes” section. This comes pre-populated with some standard options, but you can expand the fields to cover specific things you may be doing. Ultimately, when you select Personal or Business categorization for your drives – you can also be more specific in your classification. This benefits your audit trail for IRS purposes.
Some of the common Business Purposes we use include “Session” (referring to photography sessions), “Meeting” (used when we meet with prospective clients at a coffee shop in town), “Errand/Supplies” (for when we run to the store for supplies), “Airport/Travel” (for when we drive to an airport and leave our car there). You can tweak this to your specific uses.
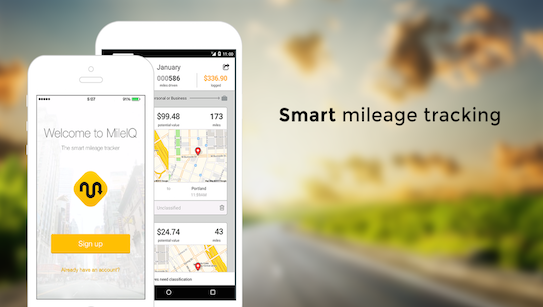
Set Up the MileIQ App
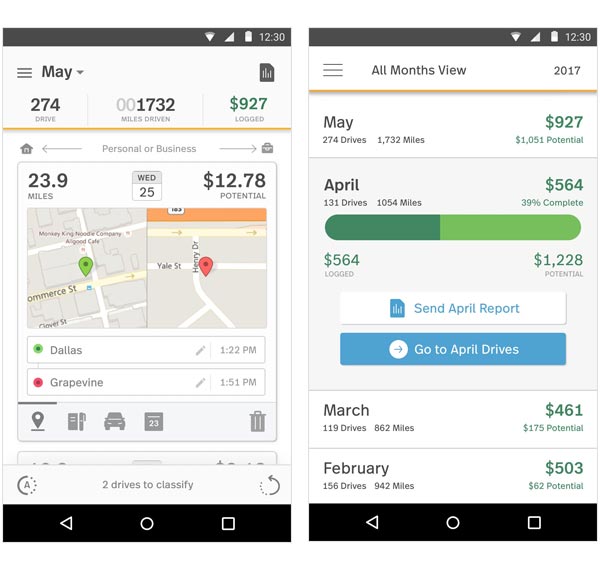
The next step (if you haven’t done this already) is to set up the MileIQ app on your phone.
It is available on IOS and Android devices.
The reason why you want MileIQ on your phone is so you can take advantage of it’s auto-tracking functionality.
In practice, a person could use MileIQ like the old pen-and-paper method we discussed earlier in this article – but that would not be a good idea (at all). The auto-tracking is what allows you to have every drive automatically display in your log, and you can go weeks without even checking in on it if you wanted too as a result.
Getting this set up is as simple as downloading the app, signing in to your account, and hitting “Yes” to accept the auto-tracking of your drives.
Logging Your Drives
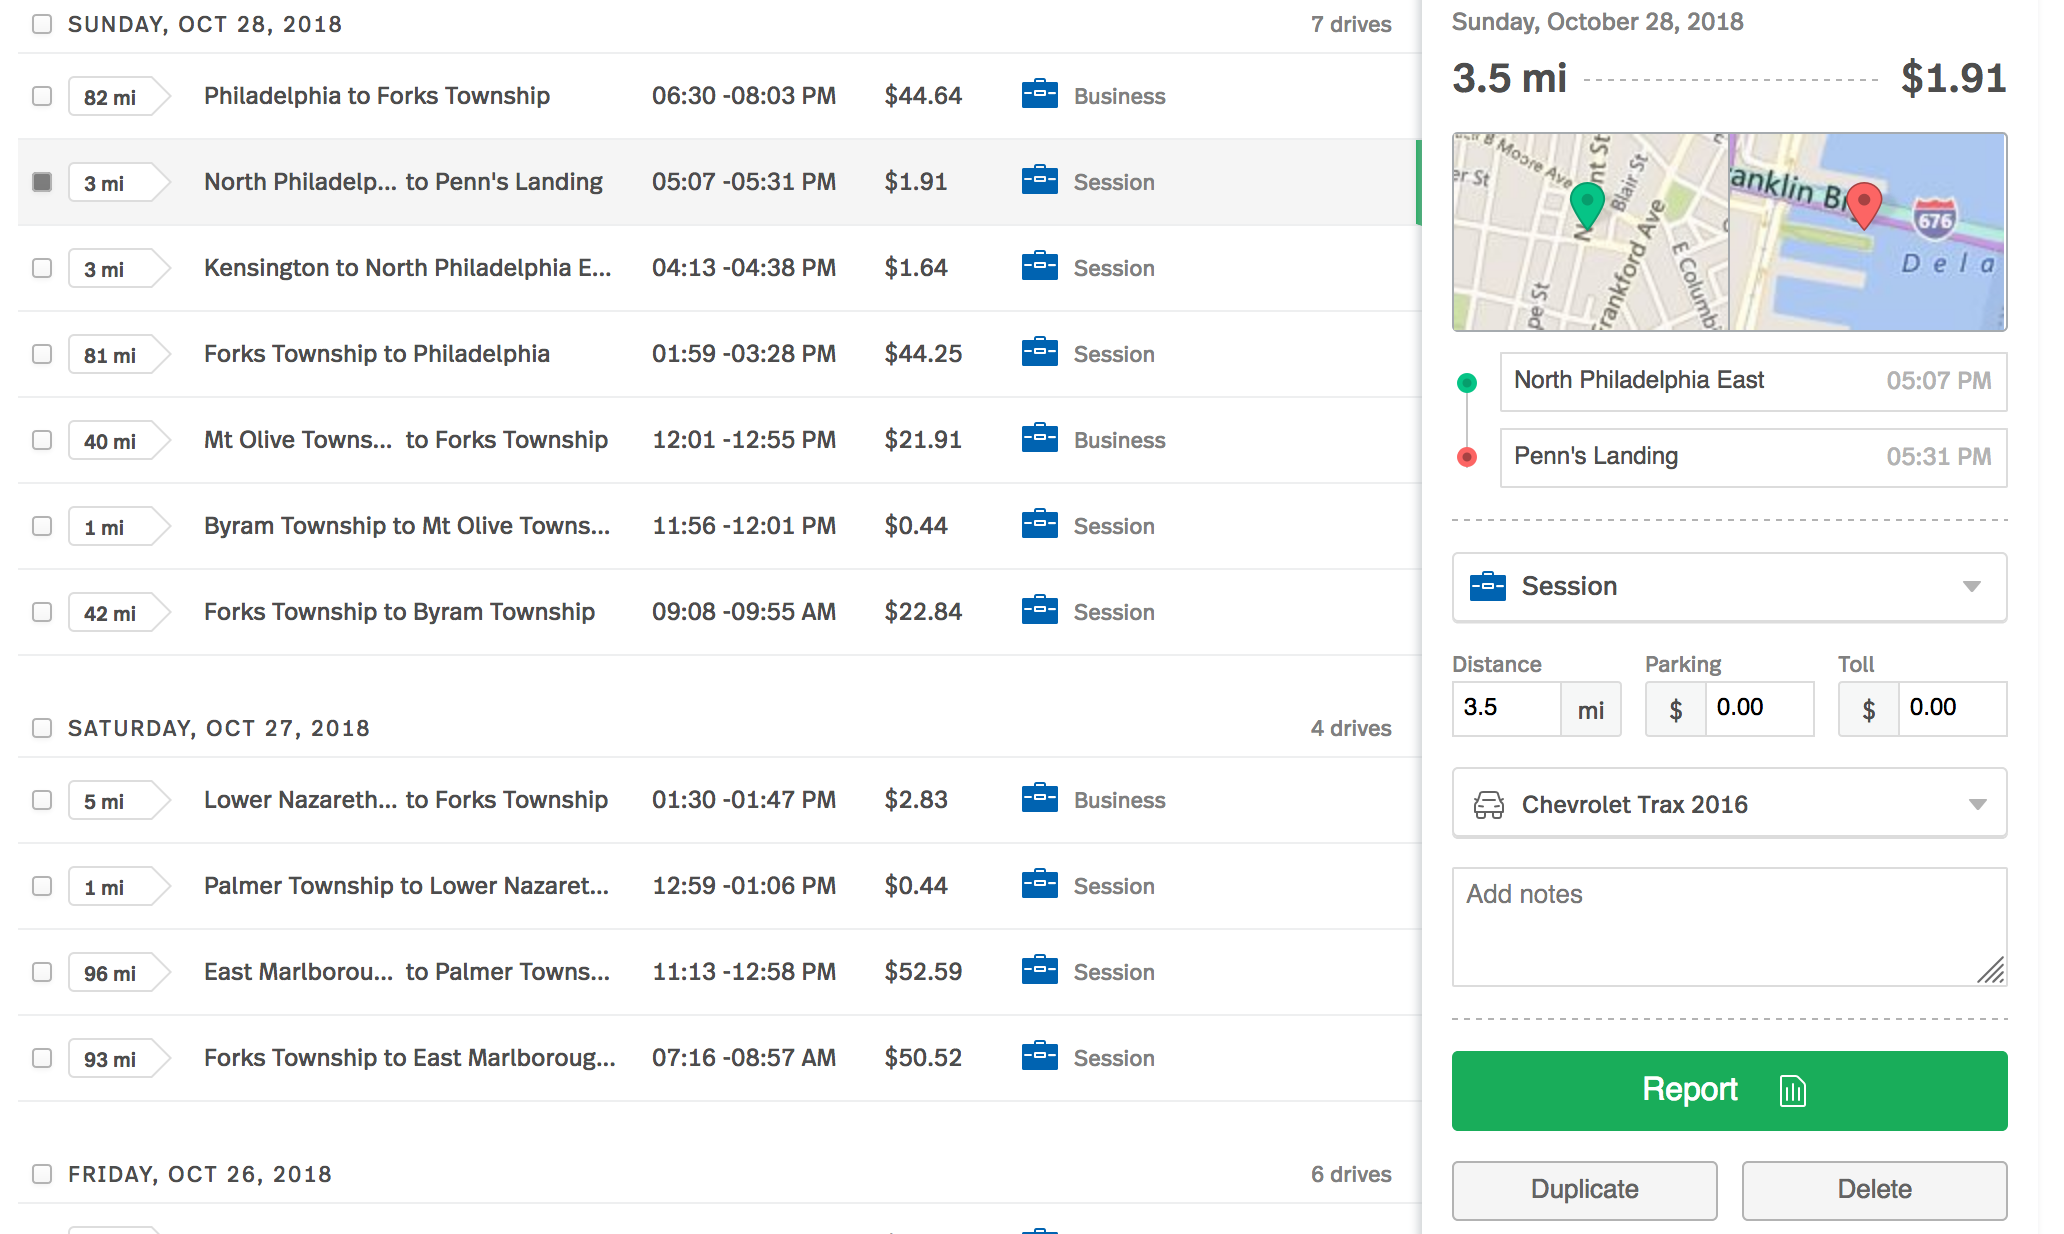
You can log your drives either through the mobile app or on a desktop computer. Regardless of your choice, the end result is the same.
You will see a list of your drives broken out by date. Some of the key features to look at include:
-
Number of miles driven
-
Location
-
Timestamps
-
Potential tax savings
-
Drive classification
By using the checkboxes next to each drive logged, you can click these to make changes in bulk as well.
With at least one checkbox highlighted, simply select the drive classification. If using more than one car, you will want to update your vehicle option if needed as well.
That’s it!! It’s not a complicated app to use once you use it a few times. With it set up to auto-track your mileage, all you need to do is pop in from time to time to classify drives.
MileIQ Reporting – Essential for Tax Season
So, now you’ve spent the year logging your mileage.
The benefit you receive from doing this all year comes to fruition at tax season.
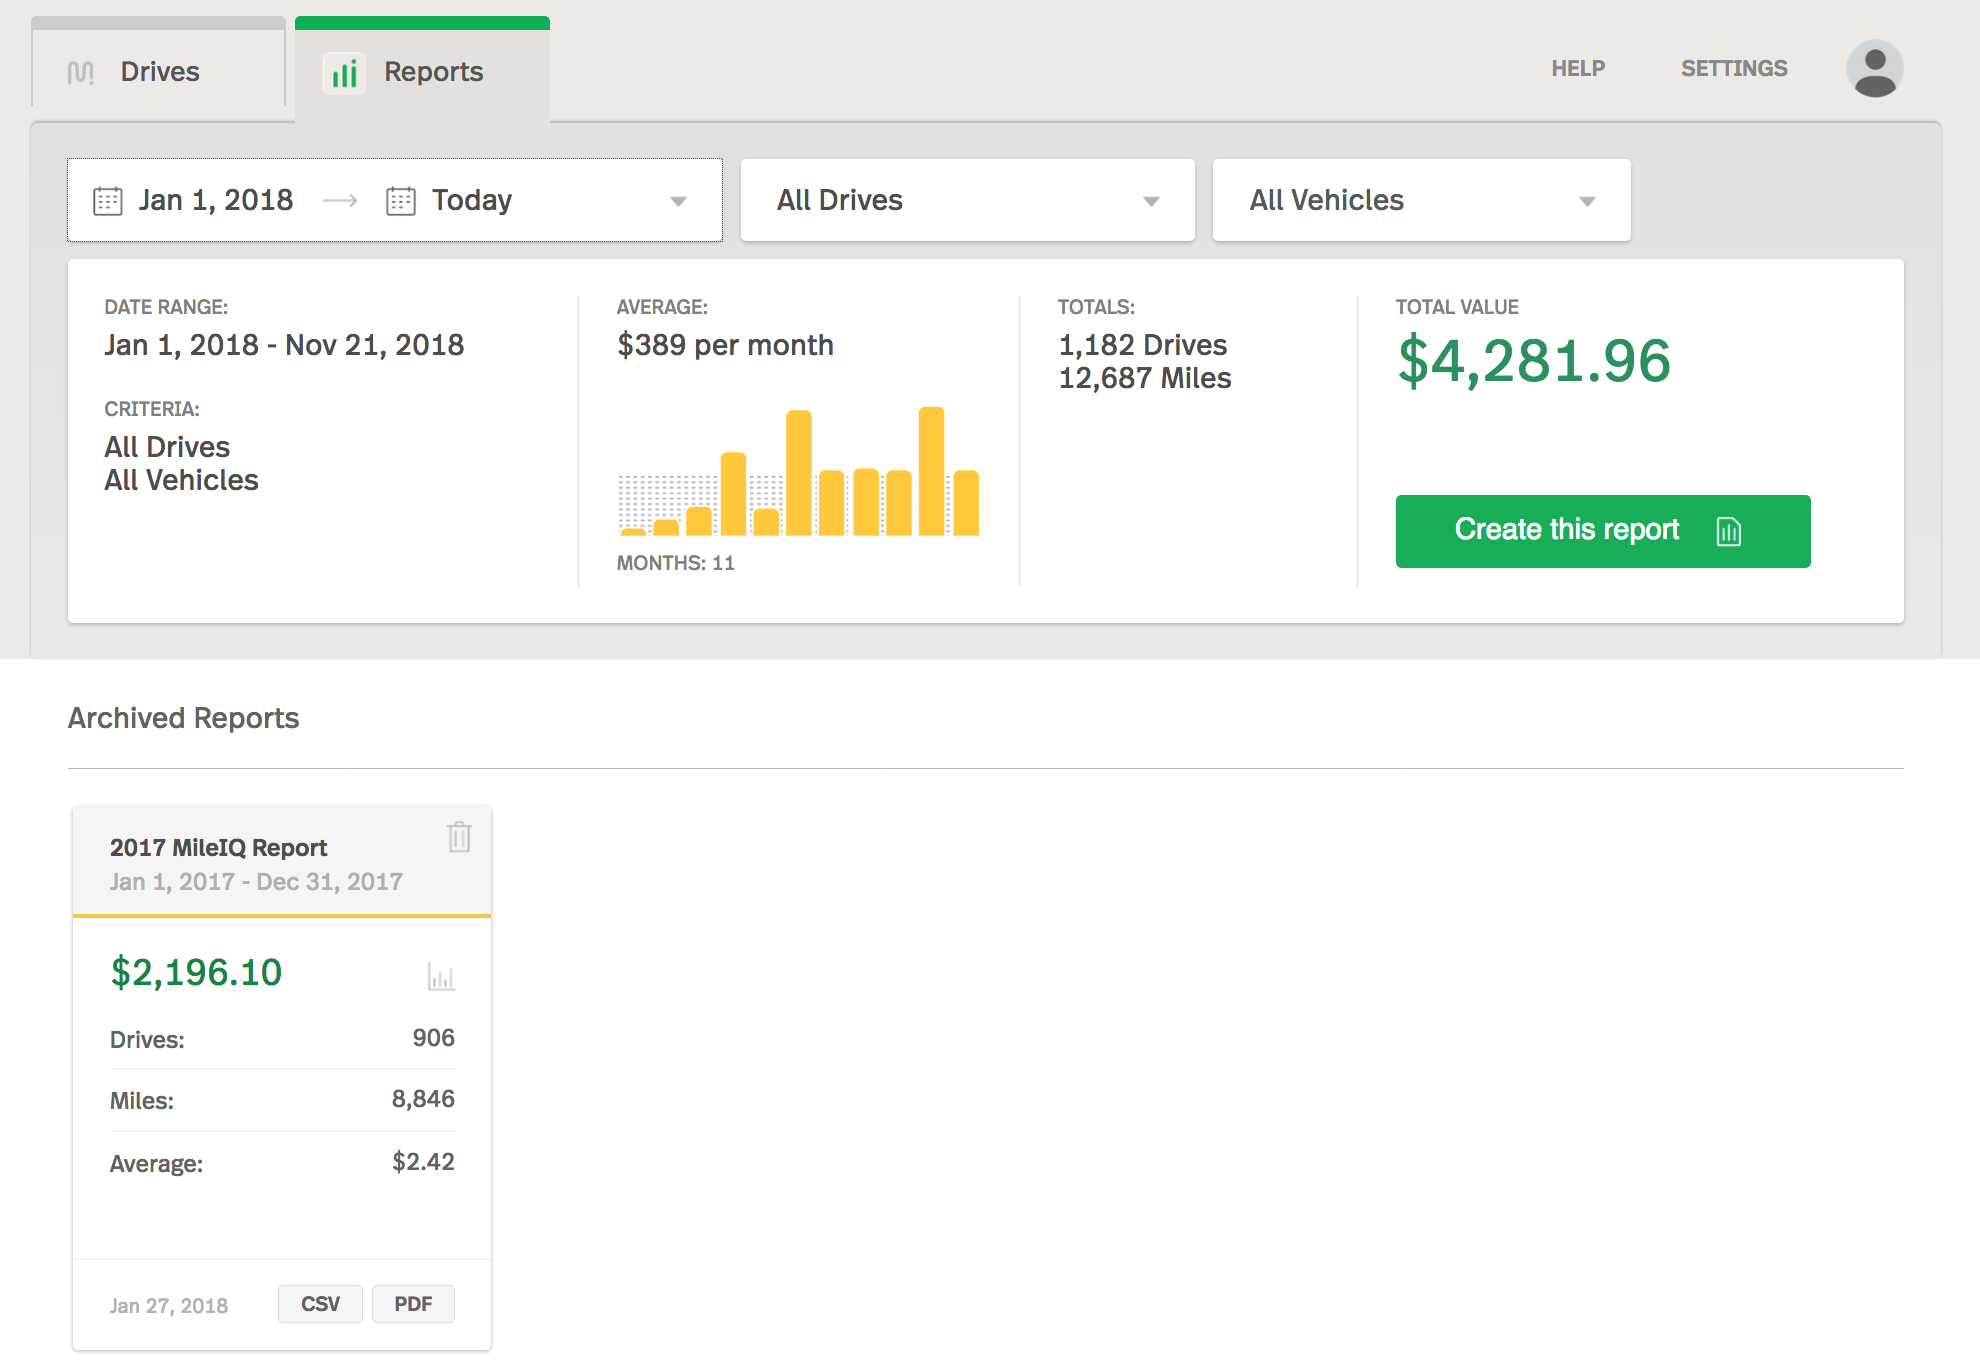
MileIQ makes reporting simple enough – just go to the “Reports” tab, set the time period (normally would be done for your business’ fiscal year), and click “Create this report” to export. It can be downloaded in both .csv and .pdf file formats.
As you can see in the screenshot below from our account, we generated a report back in 2017 to provide to our accountant – with tax savings then of $2,196.10. This year (2018) has not ended yet, but as of right now (November 21st, 2018) – we’ve already accrued $4,281.96 in savings. By the end of the year, we’re expecting this to be closer to $5,000 because of some large drives we have to close out the year.
MileIQ is the Right Tool for Mileage Tracking
As you can see from our experience using MileIQ over the past 2 years, it really is a platform that makes tracking mileage easy to do. Doing it any other way, especially by pen-and-paper, is really a waste of time and energy.
If you’re liking how MileIQ looks and feel it will positively impact your ability to track your mileage, sign up today! Remember, you can use MileIQ for free as long as you want for up to 40 drives a month. If you need to log even more, upgrade to a paid plan and you can receive 20% off your first year by using this link.
Have any questions about MileIQ? Feel free to ask away in the comment section below and we can help you out!