HoneyBook for Photographers: Workflow From Inquiry to Booking (and Beyond!)
In this article, I’m going to be sharing a deep dive into Honeybook for Photographers – specifically looking at how you can use this CRM system to support your new lead and client facing workflows. I’m a long time user of Honeybook as I shared in my in depth Honeybook review recently.
Now, to get started, when I first opened my photography business, there was not much of a workflow in place…
I tracked early projects with spreadsheets and Word documents (or just in my head…poorly). Contracts were printed, mailed, or signed during in-person meetings. Clients paid with cash or checks. Important details were spread across emails, handwritten notes, and whatever document I happened to create for that particular job.
This was sort of manageable when I only had a few clients. But as the business grew, it became increasingly obvious that I needed a better system.
I have now used HoneyBook for roughly the past decade. My wife and I have photographed hundreds of weddings, along with hundreds more engagements, portraits, and family sessions. Virtually all of those projects, plus hundreds of incoming leads each year, have been managed through by us using HoneyBook in some form.
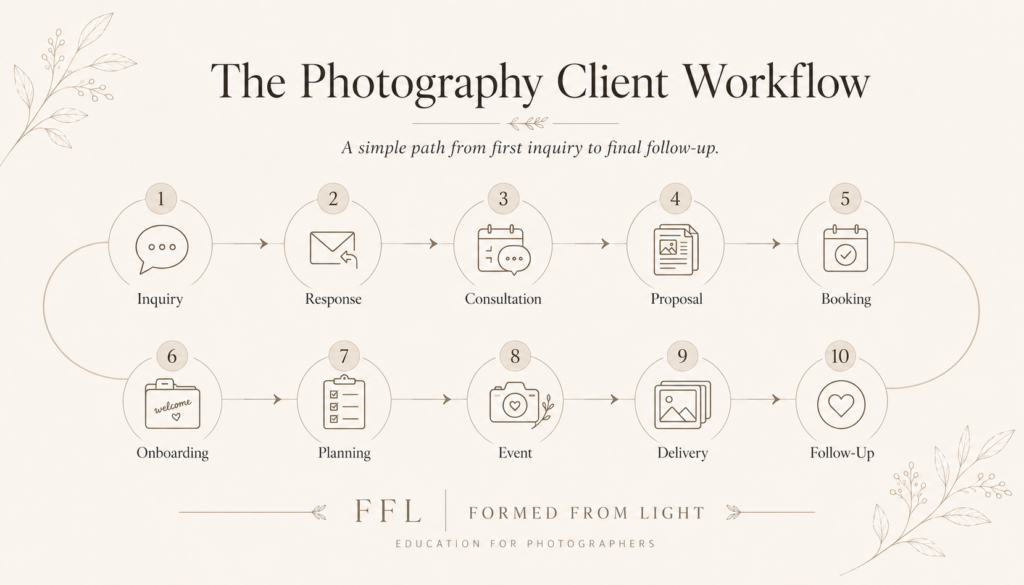
This guide walks through my current HoneyBook workflow for photographers from the moment someone submits an inquiry through booking, planning, payment, and post-project follow-up.
Keep in mind, it is not the only way to configure HoneyBook. Your workflow should reflect your services, sales process, and client experience that you want to offer (as well as your preferences for organizing it all). Still, seeing how the pieces operate within a real photography business can give you a much clearer starting point than simply opening an account and trying to configure every feature at once – especially if you just recently started a photography business or struggle with figuring out this organization for yourself.
Now, let’s dive in!
My HoneyBook for Photographers Workflow at a Glance
At a high level, this is what happens when someone inquires with our photography business:
- The prospective client submits a HoneyBook contact form on our website.
- HoneyBook automatically creates a new project in our workspace with info from that form.
- An automated acknowledgement email is sent immediately. I set this up with email templates and using Honeybook Automations.
- I then personally review and qualify the lead.
- I send a more specific response and our pricing information if I’m available.
- The lead enters an automated follow-up sequence (they’ll receive if they don’t get back to me and schedule a consult).
- Interested prospects schedule a consultation through HoneyBook. I use the Honeybook scheduler to make this easier.
- I conduct the consultation and answer questions, usually over the phone or video chat.
- If they decide to move forward, I send a proposal containing services, contract, invoice, and payment schedule. All this is done in a few minutes using a Honeybook proposal template I built.
- The client signs the contract and pays the initial retainer (yay!).
- The project moves from the opportunity pipeline into the active-client workflow for easier tracking.
- A welcome email sequence begins.
- Planning emails, questionnaires, and payment reminders are sent at the appropriate times.
- The session or wedding takes place and I do my job!
- Sneak peeks and the final gallery are delivered.
- Post-project communication continues through review requests, album offers, print information, or future-session opportunities.
It’s important to recognize that some of these steps here are automated. Some are manual. Many use a combination of both. That distinction matters as a successful photography workflow is not one where every human interaction has been eliminated. It is one where routine actions happen reliably so you can focus more attention on the conversations and decisions that actually need you.
The key point, as it relates to this article on using Honeybook for photographers, is understanding that the vast majority of this workflow is built within Honeybook’s ecosystem.
A Word of Warning: What to Do Before Building Your HoneyBook Workflow
One of the biggest mistakes I made early on was trying to figure out my business processes while simultaneously building them inside HoneyBook.
Here’s the deal – HoneyBook provides tools for creating forms, files, emails, questionnaires, contracts, invoices, and automations…you name it. But, it doesn’t decide what those materials should say or how your business should operate…
Before building too much inside the platform, define the underlying process somewhere simpler.
A text document is actually enough for this!
Write down things like:
- What happens when someone inquires
- What information you need from a lead
- How you determine availability and fit
- What your first personal response should include
- Whether you require a consultation
- When pricing is shared
- How often you follow up
- What clients must complete to book
- Which emails they receive after booking
- What information you collect before the event
- When payments are due
- What happens after delivery
This separates two different challenges in a way that makes it easier to tackle:
- The first challenge is designing a good business workflow.
- The second is configuring HoneyBook to execute that workflow.
When those two problems are treated as one, getting set up on the Honeybook platform (or any CRM for Photographers for that matter) can feel more complicated than it really is.

5 Steps to Building Out a Honeybook for Photographers Workflow
Step 1: Capture the Photography Inquiry
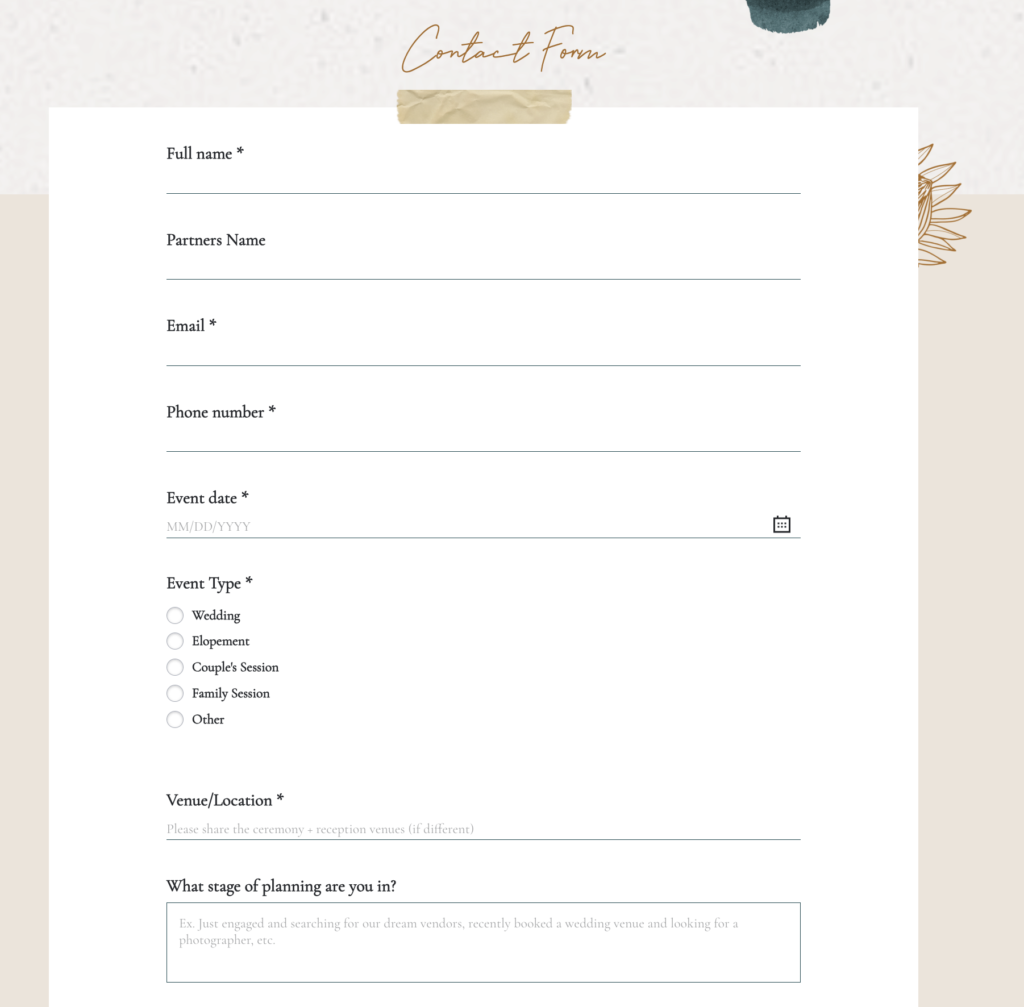
Most of our leads begin with a HoneyBook contact form embedded on the our website (which is Hand and Arrow Photography).
The form collects the foundational information I need to evaluate the inquiry. Depending on the service, that may include:
- Names
- Email address
- Phone number
- Wedding or session date
- Venue or location
- Photography service
- Estimated budget
- How they found us
- A message about what they are planning
When someone submits the form, HoneyBook automatically creates a project in my workspace. I also receive an email notification, but the important part is that the lead is now inside the system where I manage the rest of the sales process.
This is a major improvement over receiving unstructured messages through several different channels.
What happens next is the lead’s original answers, contact information, email communication, files, appointments, and future booking materials can all remain connected to the same project. In fact, a Honeybook project is automatically opened up once this form is submitted!
What I Would Set Up First
For a new HoneyBook user, the contact form is one of the first two features I would configure. This is the starting point for most workflows for really any photographer or service provider.
The other is a proposal template (which we’ll be covering in a bit here).
Those two pieces give you the basic ability to capture a lead and complete a booking. Everything else can be layered in gradually if needed.
Step 2: Send an Immediate Automated Response
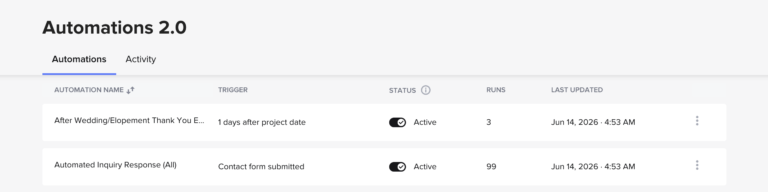
As soon as someone submits our contact form, HoneyBook opens up a new project for them (like I mentioned), and sends an automated inquiry response email. This is an email template I created and set up automations for using Honeybook’s Automation 2.0 functionality.
Keep in mind, this email is not intended to replace my actual inquiry response, but rather it supports it. It simply confirms that the message was received and establishes when the person can expect to hear from us personally.
That immediate response is valuable for a few reasons:
- It reassures the lead that the form worked.
- It creates a professional first touchpoint.
- It sets realistic response-time expectations.
- It gives me room to review the inquiry before replying.
- It prevents a prospective client from wondering whether they should contact another photographer immediately.
The email does not need to be complicated!
It can thank the person for reaching out, confirm that their information was received, explain when you normally respond, and possibly direct them toward a useful resource while they wait.
Free Automated Inquiry Response Email for Photographers
I created a free email template for photographers who want a starting point for this part of the workflow.
You can customize it for your brand and add it to HoneyBook as the first automated response triggered by a new inquiry! Easy!

Get a Free Automated Inquiry Response Email Template
Step 3: Review and Qualify the Lead Personally
The automated email handles acknowledgement and gives the lead something to do while they wait for the “real” response. The actual evaluation remains manual.
I review every new inquiry and consider the following things:
- Whether we are available (of course)
- Whether the location fits our travel policies
- Whether the requested service matches what we offer
- Whether their budget appears reasonably aligned
- Whether the project sounds like a good fit
- Whether they provided enough information to move forward
- Whether another conversation is needed before sharing a recommendation
For leads we are interested in, I send a personalized inquiry response. If we are unavailable, I also send a clear response rather than leaving the person waiting. Both of these emails have corresponding templates for the overall structure, but leave room for some customization as needed.
Availability, fit, travel, service recommendations, and the tone of someone’s inquiry can require judgment. This is also one of the first opportunities to create a real connection with the person!
Ultimately, having a template here can provide structure and make it easier to respond, but the final response should still reflect the specific inquiry.
Step 4: Share Pricing and Next Steps
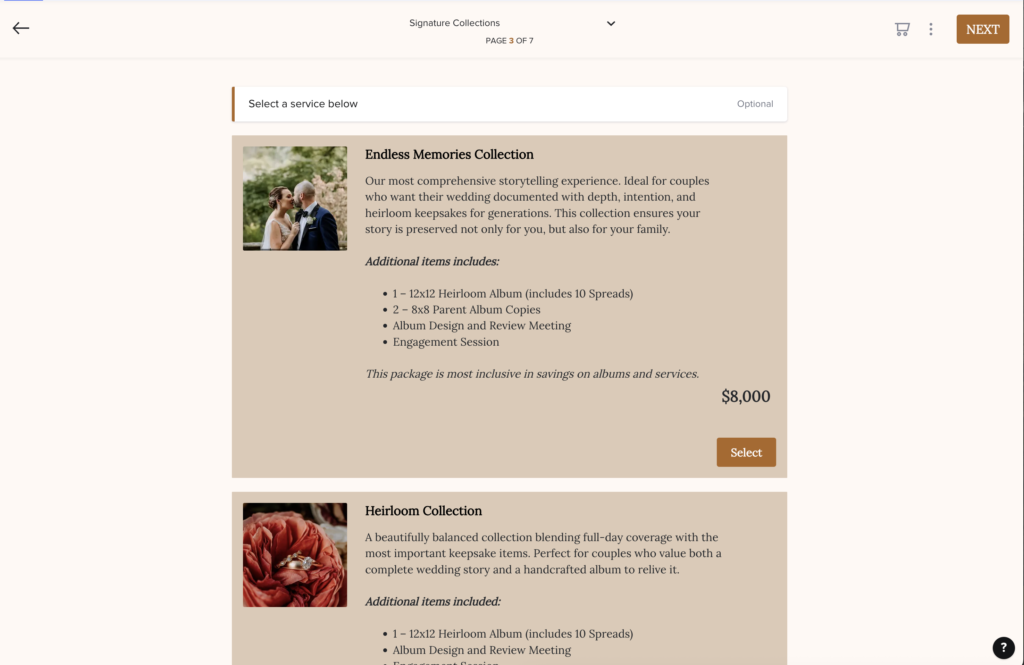
Our personal inquiry response includes a link to a pricing and service guide built as a HoneyBook Smart File.
I have separate versions for weddings, elopements, family photography, and other services (since I offer a range of things). This lets me present information that is relevant to the person rather than sending one enormous document covering everything we could possibly offer.
The wedding photography version includes:
- Information about us
- Examples of our photography
- What the client experience looks like
- Available collections
- Package details
- Common questions
- Next steps
- A built-in consultation scheduler
The goal here is not simply to send a price list…
A prospective client needs enough information to understand what working with us looks like, what they receive, and what action they should take next.
Smart Files allow me to combine that information with interactive elements. Someone can review the services and schedule a call without having to search through another email for the correct link.
It’s worth mentioning – this information could also be presented in different formats. A PDF guide built out in Canva, a private website link, etc. I’ve done all of these (and have had success using each method!), so it really comes down to how you want to deliver this information. Since I shifted over to using Honeybook for this, I’ve liked the seemless nature of it, as well as the way it integrates with other features (like being able to easily embed my call scheduling calendar right in the guide).
Keep Pricing Documents Focused
It is tempting to add every possible detail to a brochure. That can make the document harder to use.
Include enough information to help the person evaluate fit and move forward. Save highly specific planning information for after they book.
Step 5: Move the Lead Through a Sales Pipeline
My HoneyBook workspace has an opportunity pipeline specifically for prospective clients. I’ve customized this a little bit (something you can do in Honeybook!) to make it suit my organization needs better.
The current stages I use include:
- Inquiry
- Follow-ups
- Warm follow-ups
- New-client consultations
- Proposal sent
- Proposal signed
- Retainer paid

The wording is less important than the purpose of each stage.
At any moment, I should be able to open the pipeline and understand what needs attention at a high level.
Breaking these stages down so it’s easier to understand:
Inquiry
These are new leads that still need my review or personal response.
Follow-Ups
These leads have received an initial response but have not yet taken the next step. When they’re in this queue, they receive my follow up email sequences.
Warm Follow Ups
This is a custom stage I set up myself. I use this stage for people who have been communicative or shown clear interest but have not scheduled a consultation. It helps me triage my leads so I put more energy into staying on top of people who have already engaged with me in some way.
New Client Consultations
These prospects have scheduled a call and are moving more actively toward a decision. What’s nice about this is I also have an automation set up in Honeybook that automatically moves a project file to this queue when a lead schedules a consult with me (using my scheduler).
Proposal Sent
The person has received the documents necessary to book. They move here automatically!
Proposal Signed
The agreement is complete, but I may still be waiting on the initial payment. They also move here automatically.
Retainer Paid
Finally, the booking requirements have been completed and the person is ready to move into the current-client workflow.
Ultimately, a customized pipeline prevents leads from becoming buried inside an inbox. This is especially important as inquiry volume increases. With even a reasonable number of active leads, relying on memory becomes unreliable very quickly.
Step 6: Follow Up With Leads Who Do Not Respond
So I touched on following up in the last step, but at a high level, now I want to talk about it more in how it relates to my workflow in general and how I use Honeybook as a photographer to facilitate it.
Many photographers send one inquiry response and assume silence means rejection (“ghosting”).
My experience has been different.
I have had people schedule consultations after the first email, after several follow-ups, and after the final message in a sequence that ran for about a month.
People fail to respond for many reasons:
- They are comparing multiple photographers.
- They became distracted.
- They need to speak with a partner.
- Their plans are still developing.
- The email was buried.
- They intended to reply and forgot.
- They are interested but not ready to schedule a call.
A thoughtful follow-up gives them another opportunity to continue the conversation.
My lead follow-up workflow uses a project tag to initiate a sequence of emails spaced across several weeks. These emails do not simply repeat, “Are you still interested?”
They can provide useful information, clarify what happens next, answer common concerns, share social proof, or help the person think through their decision.
What I Automate
The timing and delivery of the email sequence can be automated within Honeybook.
What I Keep Personal
When someone responds, asks a question, or provides new information, I step back into the conversation personally.
Automation should support communication, not continue talking over someone after a real exchange has started.
Inquiry to Booking System for Photographers
The follow-up emails, consultation touchpoints, and booking communication used in a system like this still need to be written.
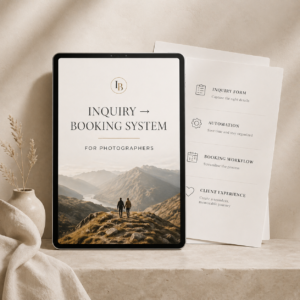
My Inquiry to Booking System provides a more complete framework for photographers who want help building that sales process rather than starting with a blank document.

Get the Inquiry to Booking System for Photographers
Step 7: Schedule the Consultation
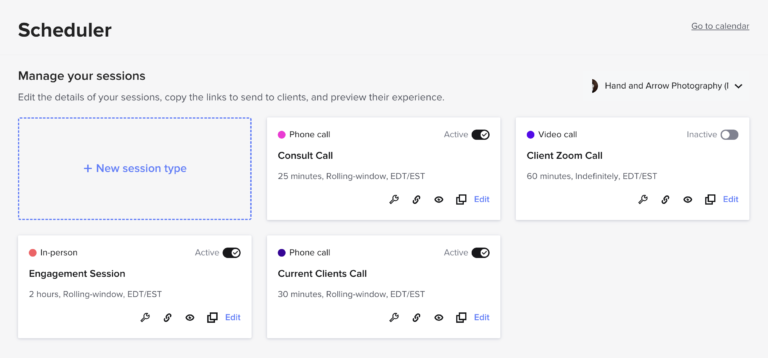
Interested leads can schedule a consultation through the HoneyBook scheduler embedded inside our pricing guide. You could also share a link to this scheduler in other contexts (email, on your website, in a Instagram DM, etc.).
I maintain a session type specifically for new-client calls. HoneyBook displays my available times, records the appointment, and sends scheduled reminders.
The appointment also appears on my HoneyBook calendar.
I sync that calendar with Google Calendar, which is where I manage much of our family and personal scheduling. This helps me see work and personal commitments together.
For example, if we have a family event planned, that time can be blocked from client scheduling. When a client books a session or consultation, I can also see that commitment while reviewing our family calendar.
I Still Send a Personal Confirmation
Automated reminders are useful (and can be easily configured in the Honeybook scheduler settings), but I also send a more personal message letting the lead know I saw the appointment and am looking forward to speaking with them.
That small step prevents the experience from feeling entirely machine-driven.
Step 8: Have the Consultation Call and Recommend the Right Service
The consultation itself happens outside of Honeybook – usually via the phone or a video call these days. For some photographers, you may also choose to meet in person like at a studio (if you have one). How you handle consults is up to you, of course! I have personally done all of these at different points in my photography career, but these days prefer phone for the simplicity of it.
This is where we learn more about what the person is planning, answer questions, discuss priorities, and determine which collection or service makes sense.
HoneyBook supports this stage by keeping the inquiry information and previous communication organized. I can review what the person originally submitted before getting on the call.
After the consultation, the lead may:
- Be ready for a proposal
- Need time to decide
- Request additional information
- Select a different collection
- Determine that we are not the right fit
Their position in the pipeline changes accordingly.
The Honeybook CRM keeps the opportunity organized. The actual sales conversation still depends on listening, judgment, and communication.
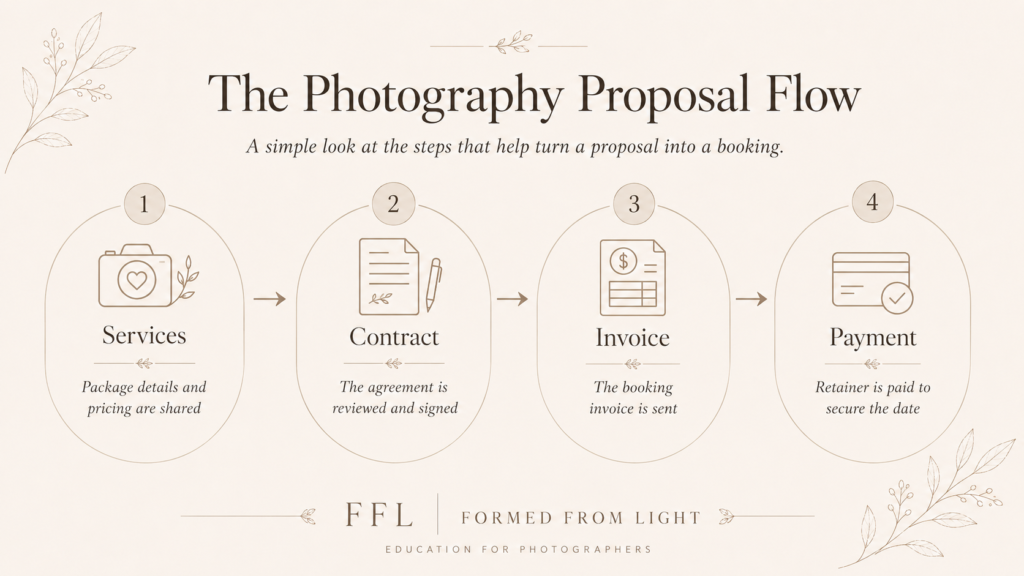
Step 9: Send the Proposal
Once someone confirms that they want to move forward, I prepare a HoneyBook proposal.
My photography service proposals generally combine:
- The selected photography services
- Optional add-ons where relevant
- The service agreement (contract)
- The invoice (or invoice schedule if multiple payments)
- The payment schedule
- The initial retainer
I maintain different proposal templates for weddings, elopements, and different portrait services.
These took time to set up initially. Now that the templates are built, I can usually prepare and send a proposal in a few minutes at most. And I must say, that speed matters. The ability to quickly send this information is one of the big reasons I recommend Honeybook for photographers.
When someone says they want to hire you, the booking process should be clear and easy. Waiting several days while you assemble separate documents creates unnecessary friction.
A combined proposal gives the client one connected path:
- Review the selected services.
- Sign the contract.
- Submit the initial payment.
- Complete the booking.
Easy!!
Use a Professional Contract
It’s important to note that as a part of this workflow, HoneyBook provides the file and signature tools. It does not replace the need for an appropriate agreement to be set up.
I highly recommend using a professionally prepared contract that fits your services and location, then build that language into the proposal. You could consult with a lawyer to draft one up for you, or consider purchasing a contract through a reputable resource like The Legal Paige.
Step 10: Confirm the Booking
For most of our wedding packages, I use a flat $1,000 initial retainer payment (something I strongly recommend!). The remaining balance is divided according to the invoice schedule, with the final payment due before the wedding.
Your initial payment amount and payment schedule may be different. The key is to define what officially completes the booking for you.
For us, that generally means:
- The contract is signed.
- The initial retainer is paid.
Once those actions are complete, the project is no longer treated as a lead…
HoneyBook can use the completed booking actions to initiate the next parts of the workflow. In my account, I also use tags to separate current clients from prospective clients and to activate certain communication sequences.
The project then moves out of the opportunity pipeline and into the appropriate planning category.

Step 11: Begin New Client Onboarding
The booking is not the end of the process. It is the beginning of the client relationship!
Once someone officially books, they receive what I call a “welcome week” sequence.
The exact emails depend on the service, but the sequence may include:
- A booking confirmation
- An overview of what happens next
- A wedding or session-planning guide
- A recommended-vendor list
- Information about future questionnaires
- Expectations for upcoming communication
- Album and print information
- Helpful planning resources
For a wedding client who may book one or two years in advance, these emails are especially important.
There can be a long stretch between signing the contract and the start of detailed planning. The welcome sequence keeps the client engaged, gives them useful material to explore, and reassures them that the process is organized.
How your onboarding process and “welcome” emails look can vary. For example, you could just use one email (totally fine). The key is doing something and having a good reason for why.
Automation Does Not Mean Impersonal
These emails are templated and automated, but the information is genuinely useful to my clients.
A good client experience does not require manually typing every message. It requires sending the right information at the right time in a way that feels thoughtful and clear.
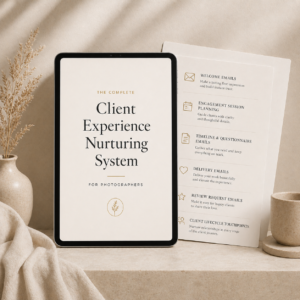
If you need help getting this right, that’s why I built the Client Nurturing System for Photographers. In this, you get access to email templates, text message templates, and supporting materials to help you set up an actual system that makes your client experience better and more consistent for every client you serve.

Get the Client Experience Nurturing System for Photographers
Step 12: Manage Planning and Questionnaires
What happens after onboarding depends heavily on the service and how far away the date is.
A portrait client may move into location and wardrobe planning almost immediately. A wedding client who booked 18 months ahead may not need detailed timeline work for quite some time. And of course, there’s going to be personal variation even between different photographers of the same type.
With that said, one thing that is pretty uniformly consistent for weddings and elopements (in particular) is using a planning questionnaire and creating a wedding timeline. In my business, one of the most important planning tools is the questionnaire I send approximately three months before the event.
It collects information about:
- Ceremony and reception times
- Locations
- Getting-ready plans
- Travel logistics
- Important people
- Wedding-party details
- Family-photo combinations
- Planned events
- Photography priorities
- Special circumstances
- Vendor information
- and more…
The responses remain stored within the HoneyBook project.
I use this information to create the photography timeline and organize the family-photo list. It also gives me a centralized reference if I need to revisit a detail closer to the wedding.
This is where the questionnaire becomes more than a form. It directly supports my ability to photograph the day well.

Step 13: Move Active Clients Through the Project Pipeline
The active-client side of my HoneyBook pipeline reflects the work we actually perform.
Current stages include:
- Session planning
- Session editing
- Elopement planning
- Wedding planning
- Timeline creation
- Wedding editing
- Album design
- Completed
These categories let me see how many projects are active in each area.
If several weddings are sitting in timeline creation, I know where my attention needs to go. If multiple projects have moved into album design, I can group that type of work together.
Your stages should match your services.
A newborn photographer might use inquiry, booked, questionnaire sent, session scheduled, editing, proofing, artwork appointment, order processing, and completed.
A headshot photographer may need a much shorter process.
Do not copy another photographer’s pipeline simply because it looks organized. Build one that answers the question:
What stage is this project currently in, and what needs to happen next?
Here’s a snapshot look at my Current Client pipeline view as a quick point of reference for how this looks in Honeybook itself:

Step 14: Manage Final Payments and Pre-Event Communication
Our final wedding payment is generally due two weeks before the event.
HoneyBook keeps the invoice and payment schedule attached to the project, allowing both us and the client to see what has been paid and what remains. The client can see this information anytime via their Honeybook Client Portal.
Online payment is one of the core reasons I originally adopted the platform.
In the earliest days of my business, clients sometimes mailed checks or arranged to pay in person. That process created delays and unnecessary obstacles (and probably lost me some business, too).
Making payment easier makes it easier to get paid. It’s that simple.
This matters even more for higher-priced photography services. Clients may want to spread the cost across several payments or use a credit card. A clear invoice schedule lets them understand the commitment from the beginning.
Before the event, communication becomes more personalized again. I may confirm the timeline, address last-minute changes, communicate with planners, and review the final details collected through the questionnaire.
Automated reminders support this stage too, but they don’t replace active planning.
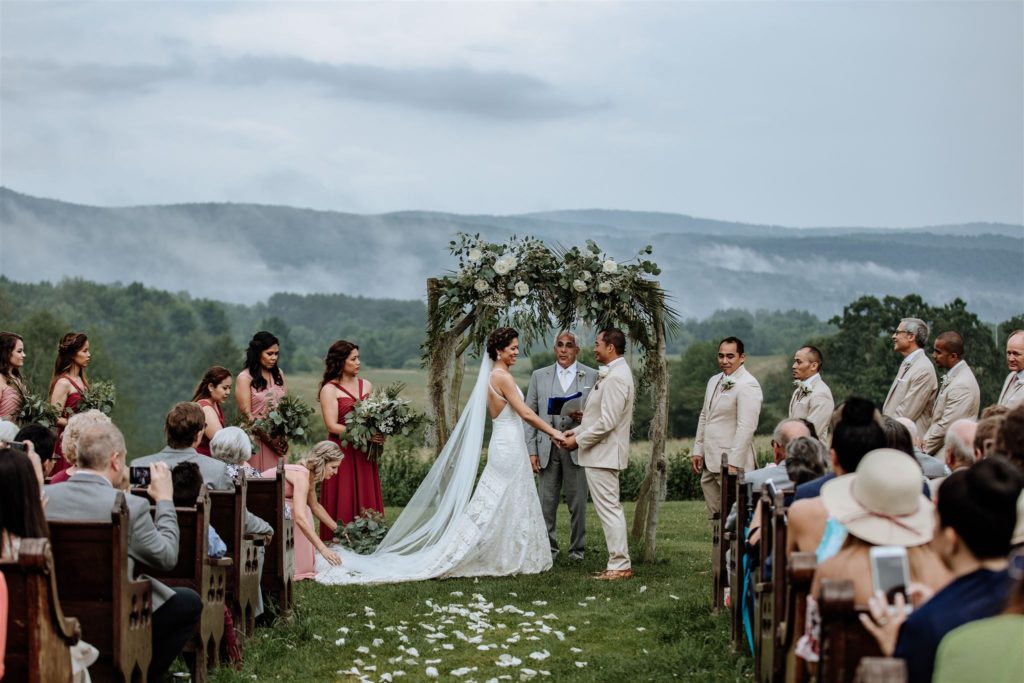
Step 15: Photograph the Session or Event
HoneyBook is primarily supporting the administrative side of the work.
By the time the wedding or session arrives, the objective is for the necessary information to already be organized:
- The agreement is complete.
- Payments are handled.
- Contact information is available.
- The schedule is clear.
- Important requests have been collected.
- Planning documents are stored in the project.
- Communication is easy to review.
A good workflow reduces the number of administrative problems that reach the actual photography day.
On the day of a wedding (or portrait session), I’ll typically pull up Honeybook on my phone to review some details shared via email, as well as a client’s questionnaire just to refresh myself. But then, I’m off to the races and get to do what I love, take the photos for them!
Step 16: Deliver Sneak Peeks and the Final Gallery
After the session or wedding, the project moves into the editing stage. These days, I handle this post production process by using Photo Mechanic to cull images quickly, then run the images through my custom Aftershoot profile to get base edits on the images, and do more thorough editing work in Lightroom (and occasional touchups in Photoshop).
HoneyBook is not where I host final image galleries (that award goes to Pic-Time), but I use its email tools and templates to manage the communication surrounding delivery.
Common touchpoints include:
- Sneak-peek notification
- Final-gallery delivery
- Download and backup guidance
- Print information
- Album next steps
- Review requests
Templates help ensure that clients receive complete instructions rather than a rushed message written from memory after every delivery.
The gallery itself may live elsewhere, but HoneyBook remains the communication and project record surrounding it.
Step 17: Continue Post-Project Follow-Up
The client relationship does not necessarily end when the gallery is delivered.
I use HoneyBook automations and tags to support simple post-project campaigns on a client-by-client basis.
These may include triggering more email communication like:
- Review requests
- Album information
- Print offers
- Anniversary-session suggestions
- Family-session reminders
- Referral communication
- General check-ins
I would not use HoneyBook as a replacement for a dedicated email-marketing platform. For example, I would not send a broad newsletter to my entire audience through it.
It can, however, support communication tied to an individual client project!
That distinction makes it useful as an extension of the client experience rather than a full mailing-list system.
Where Text Messages (SMS) Fits Into My Workflow
A good deal of my Honeybook workflow is built around email communications and corresponding resources that I’ve built on the platform, but I also send personal text messages to certain new inquiries, usually alongside the initial personal email.
For more conversational texting, I currently use Google Voice, where I have a business phone number set up.
HoneyBook can provide automated SMS reminders for certain actions and appointments, but that is different from using text messaging as a flexible, ongoing one-to-one client communication tool.
For me, the split is:
- HoneyBook manages the project, email workflow, reminders, and files.
- Google Voice supports direct personal texting (as well as making phone calls).
That may change as HoneyBook expands its messaging features (I’d actually love for them to support managing text messages directly through a client project file), but it reflects how I currently operate the workflow.
What I Automate and What I Keep Personal
The best HoneyBook workflow for photographers is not the one with the most automation.
Automation works best when the action is predictable, repeatable, and does not require personal judgment.
Actions I Commonly Automate in Honeybook
- Inquiry acknowledgement
- Follow up emails being sent out consistently
- Appointment reminders
- Welcome sequence delivery
- Project tagging
- Questionnaire delivery
- Certain payment reminders
- Long-term check-ins
- Post-project offers
Actions I Usually Handle Personally
- Evaluating a new inquiry
- Determining availability and fit
- Writing the specific inquiry response
- Answering client questions
- Conducting consultations
- Recommending a collection
- Resolving concerns
- Adjusting timelines
- Managing unusual project circumstances
- Handling meaningful planning conversations
A useful test is to ask:
Would the same action and message be appropriate for nearly every client in this situation?
If yes, it may be a strong automation candidate!
If the answer depends on what the person said, how they are feeling, or what is happening in their project, it probably needs personal attention.
6 Common HoneyBook Workflow Mistakes
1: Trying to Build Everything at Once
Like I started off this article mentioning, if you’re just getting started on Honeybook, it can be a mistake to try to set everything up all at once. You do not need a perfect, fully automated system before sending your first proposal.
Start with the core booking path:
- Contact form
- Inquiry response
- Proposal
- Contract
- Invoice
- Payment
Build the rest as you understand your needs more clearly!
Obviously, if you are really clear on what you want your workflow to be, then you can run a lot faster here!
2: Building Inside HoneyBook Before Defining the Process
One of my biggest pieces of advice for photographers wanting to get started with Honeybook (or any CRM for that matter) is to simply write the workflow you want to use outside the platform first.
It is much easier to edit a list of steps in a document than repeatedly rebuild files and automations while deciding how the business should operate.
In my experience, if you try to build your workflow AND set it up in Honeybook at the same time…you’re just going to end up more frustrated. Separate these actions and thank me later 🙂
3: Automating Personal Conversations
I am all for using automation in your photography business (and I use plenty of it), but here’s the thing – automation should make sure communication happens. It should not prevent you from noticing when a real conversation has begun!
Pause or adjust automated sequences when a lead replies.
And make special note of key points where automation might actually be detrimental to your client process. Sometimes, a personal touch can go a long way at a few pivotal moments.
4: Using Too Many Pipeline Stages
Every stage should help you make a decision or identify the next action. Ultimately, the pipeline is there to help you stay organized, so make sure it’s set up so you’ll actually use it.
5: Copying Another Photographer’s Workflow Exactly
In this article, I wanted to show a solid example of using Honeybook for photographers by giving an actual real world example from my own business. With that said, even though I have solid workflows that I’ve created for my business, I know things are rarely a one-size fits all solution.
This is true for many reasons.
For example, a wedding photographer, mini-session photographer, commercial studio, and luxury portrait photographer may all require different stages and workflows. And personal processes are sometimes just part of things, too.
So, use examples as a starting point, not as a rigid template.
6: Treating Setup as a One-Time Project
Ah, and finally…your workflow will change as your services, prices, policies, and client experience evolve. I still revise my HoneyBook systems pretty regularly after nearly a decade of use!
How the Workflow Changes by Photography Service
The same general structure can support many types of photography, but the details should change. Here’s some examples:
Wedding and Elopement Photography
These projects usually require the longest workflows and the most communication with clients.
They may include things like:
- Consultation
- Detailed proposal
- Multiple payments
- Engagement-session scheduling
- Long-term nurturing
- Vendor recommendations
- Wedding questionnaire
- Timeline creation
- Family-photo planning
- Album follow-up
Portrait and Family Photography
These projects often move faster.
The workflow may emphasize:
- Session selection
- Location planning
- Wardrobe guidance
- Shorter payment schedules
- Session questionnaires
- Gallery delivery
- Print or future-session follow-up
Mini Sessions
Mini sessions usually benefit from a more streamlined, higher-volume booking process.
You may want:
- A lead or booking form
- Session selection built right in
- Immediate contract and payment
- Automated preparation instructions
- Appointment reminders
- Standardized delivery communication
The more standardized the service, the more of the process can often be automated.
Higher-End, Lower-Volume Studios
Lower-volume studios may use more customized communication while still relying on HoneyBook to make sure the process is consistent.
This is similar to how our business operates. Automation handles timing and routine information, while personal communication remains central to sales and planning.
How Long Does HoneyBook Setup Take?
One of the most common questions I get from photographers considering using Honeybook is this one.
A basic setup can be completed in a day or two.
That could include:
- Branding settings
- Contact form
- Bank connection
- Calendar connection
- Basic proposal
- Contract
- Invoice and payment schedule
- Initial response email
A more complete system may take approximately two weeks or longer.
That expanded setup may include:
- Multiple pricing guides
- Service-specific proposals
- A full email-template library
- Questionnaires (sometimes multiple)
- Custom pipelines
- Consultation schedulers
- Follow-up sequences
- Welcome campaigns
- Advanced automations
- Client-experience resources
The largest variable is not usually your ability to click the right buttons.
It is whether the underlying materials already exist.
If you already have contracts, emails, questionnaires, services, and a defined process, configuration will be much faster. If you are creating all of that from scratch, setup naturally takes longer.
Is HoneyBook Worth Building Your Workflow Around?
For our photography business, it’s been a resounding – yes.
HoneyBook has become the central place where we manage inquiries, client communication, files, proposals, contracts, invoices, payments, questionnaires, appointments, and project stages.
Of course, it took some time to reach that point.
The platform did not provide the finished workflow. We had to determine what our process should be and then build the system around it.
Once established, though, the difference between the before and after has been significant (to say the least).
Before HoneyBook, the business was more fragmented and harder to manage. Today, I can see where leads are in the sales process, understand which projects need attention, send a proposal within minutes, and maintain consistent communication across hundreds of client relationships.
That is the value of a well-built HoneyBook workflow for photographers. It is not just about having digital contracts or automating a few emails. It is about creating a reliable structure that supports both sales and the client experience.
Try HoneyBook With Your Own Workflow
The best way to evaluate HoneyBook is to test it with a real process rather than browsing the dashboard without a plan.
During the Honeybook free trial, I would recommend building:
- One contact form
- One inquiry response
- One consultation scheduler
- One service or pricing file
- One proposal containing a contract and invoice
- One simple automation
- A short project pipeline
Then send the entire experience to yourself as a test client.
If you decide to join Honeybook and love how it supports your photography business, by joining through my referral link, you can receive 30% off any paid subscription.
Sign up for Honeybook to Get Started
Affiliate disclosure: I am a HoneyBook educator and referral partner. I may receive compensation if you become a paid member through my link, at no additional cost to you. My recommendation is based on approximately nine years of using HoneyBook within my own photography business.
Build the Communication Behind the Workflow
I hope this article has given you a great insight not only into Honeybook for Photographers, but creating an overarching workflow that applies to any photography business (regardless of the platform it’s built on).
Ultimately, HoneyBook can deliver your inquiry responses, follow-ups, welcome messages, questionnaires, client communication, and more. It’s made my life so much easier!
Still, the platform cannot decide what those emails should say or how each interaction should guide someone toward booking. If you’re needing help getting this right, I’d recommend checking out the workflow systems in our Shop to make this easier on yourself.