Pic-Time Review: Is It Still One of the Best Online Galleries for Photographers?
Pic-Time is an online gallery and sales platform for photographers that combines client photo delivery, print sales, marketing automations, slideshows, video, vendor sharing, art galleries, and other client-facing tools in one place.
At its simplest, Pic-Time gives photographers a polished way to deliver images to clients. At its best, it becomes a full gallery sales system that can help you make more from every finished gallery.
I’ve personally used Pic-Time in my photography business for around six years now. I switched from Pixieset to Pic-Time fairly early in my photography business, and the biggest reason was the online store. At the time, Pic-Time’s store felt better designed, more flexible, and more aligned with how I wanted clients to experience prints and products after receiving their galleries.
Of course, Pixieset has changed a lot since then, and so has Pic-Time. I don’t think the decision is as simple as “one is good and one is bad.” But I’ve continued to be happy with Pic-Time because it has fit the way I want gallery delivery, print sales, and client experience to work in my business.
If it’s not crystal clear yet, the thing that really made Pic-Time stand out to me was not just the gallery hosting. It was the store!
I wanted a platform that could host beautiful online galleries and also make it easier to sell prints, albums, and other physical products directly through those galleries. Over the years, that part of the platform has become one of the biggest reasons I continue to use it.
This Pic-Time review will walk through what it does well, where it fits in a photography business, what has changed with Pic-Time 2.0, how it compares to other online gallery platforms for photographers, and the few drawbacks I think photographers should know before signing up.
Quick Answer: Is Pic-Time Worth It?
Yes, I think Pic-Time is worth it for many working photographers, especially if you want more than a basic online gallery.
Pic-Time is best for photographers who want:
- Beautiful client galleries
- Online photo delivery
- Built-in print and product sales
- Automated email marketing for gallery sales
- Client download controls
- Gallery templates for repeat workflows
- Vendor sharing tools
- A platform that can potentially pay for itself through print sales
In my own business, Pic-Time is one of the few subscription tools where I feel like I get more value from it than I pay for. I mean that pretty literally…A gallery subscription feels a lot less painful when the store and automations help generate thousands of dollars in additional product revenue over time.
That said, Pic-Time is not perfect. I would not use it as my main blogging platform if SEO is a serious part of your business strategy (as an example). I also think some photographers may not care about the AI-forward features, and supplier or order issues can occasionally be frustrating when something goes wrong. I’ll be sharing more about all these things throughout this post.
My Short Recommendation
If you are a working photographer who delivers galleries regularly and wants to sell prints or other physical products, Pic-Time is one of the first platforms I would look at.
| Category | My Take |
| Best for | Wedding, elopement, portrait, family, event, and fine art photographers |
| Biggest strength | Gallery delivery + print sales + automations in one system |
| Biggest drawback | Setup takes time if you want to get the full value |
| Best plan for most working photographers | Professional or Advanced |
| Worth it for simple delivery only? | Maybe, but that is not where Pic-Time shines |
| Worth it for print sales? | Yes, especially if you configure the store and campaigns |
My practical recommendation is this: if you are only looking for the cheapest possible place to upload client photos, Pic-Time may be more than you need. But if you want your galleries to feel polished, support product sales, and become part of a more complete client experience, Pic-Time is absolutely worth considering.
Why I Switched to Pic-Time
When I switched from Pixieset to Pic-Time, I was not unhappy with every part of Pixieset. It did the basic job of delivering galleries, and for a lot of photographers, that may be enough.
But I wanted something that felt more aligned with where I wanted my business to go.
The store was the biggest difference maker for me at the time.
Pic-Time made it easier for clients to see products, imagine their images as printed pieces, and move from gallery viewing into purchasing. The experience felt more premium, and that mattered because I did not want the final delivery step to feel disconnected from the rest of the client experience.
That is still how I think about gallery platforms now.
A basic gallery tool can be enough if you only need to send files. But if you want the gallery to support your brand, your client experience, your print sales, and your vendor relationships, the platform matters more.
Pic-Time has continued to make sense for me because it fits that larger picture. It is not just a place to put images. It is part of how I deliver, present, sell, and share the finished work.
What Is Pic-Time?
Pic-Time is primarily an online photo gallery platform for photographers. In practical terms, it gives you a place to upload, organize, deliver, share, and sell images to clients.
The core use case is simple. You photograph a wedding, elopement, portrait session, or event. You edit the images. You upload them to Pic-Time. Then your client receives a polished online gallery where they can view, download, favorite, share, and purchase products.
Pic-Time has expanded well beyond simple gallery delivery, though. Current features include client galleries, a print store, AI-powered gallery search, video delivery, sales automations, slideshows, blogs, art galleries, a mobile app, vendor tools, integrations, and album-related workflows. There’s a whole lot!
That expansion matters because photographers are not just looking for “somewhere to put photos” anymore. Most of us need tools that fit into a bigger business workflow. Gallery delivery is still the foundation, but the real value comes from what happens after the gallery is delivered.
My Experience Using Pic-Time

I use Pic-Time in my own photography business (that I co-run with my wife) to deliver galleries for weddings, elopements, engagements, family sessions, and portrait work.
At this point, I’ve delivered hundreds of galleries through Pic-Time. That matters because my opinion is not based on clicking around a demo account or testing it for a weekend. It comes from actually using it repeatedly in a real client workflow, with real clients, real deadlines, real product orders, and the occasional issue that needs to be solved after the gallery is already live.
My typical workflow looks something like this:
- Client communication and booking happens through my CRM, HoneyBook.
- I photograph the wedding or session.
- I cull and edit the images.
- I export the final JPEGs.
- I upload the images to a templated Pic-Time gallery.
- I review the gallery settings, store, campaigns, and automations.
- I send the gallery link to the client.
- Pic-Time handles most print and product orders automatically through connected labs.
That last point is a big deal!
Most of the physical print orders that come through my galleries are automatically fulfilled by connected suppliers. I do not have to manually collect the order (if I don’t want to), send it to a lab, collect payment, track the order, and update the client. Pic-Time handles a lot of that in the background.
The exception in my business is higher-end albums. I sell more curated, hands-on albums through my own album process, using a supplier outside the Pic-Time ecosystem. Pic-Time can still support album sales and proofing, but my more premium album workflow currently happens through a more guided process.
That flexibility is one of the reasons I continue to use it. I like automation, but I do not want every part of my business forced into one rigid system. Pic-Time gives me enough automation to simplify lower-touch print orders, while still leaving room for a more personal album process where that makes sense.
Pic-Time Client Galleries
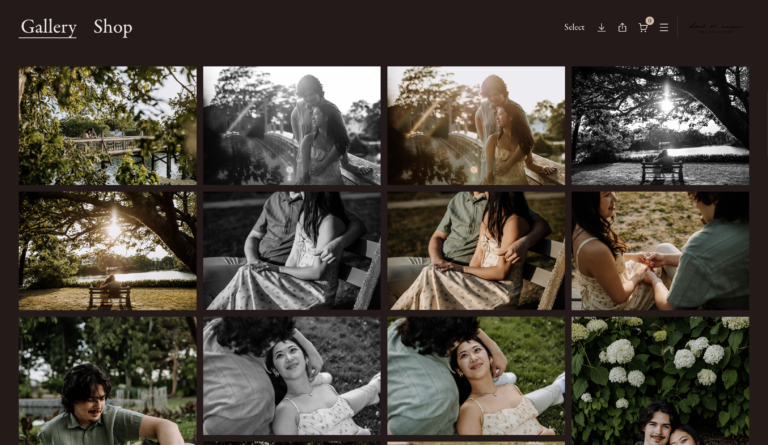
Client galleries are the core of Pic-Time.
This is the feature most photographers are probably looking for first.
You need a clean, professional, easy-to-use way to deliver photos to clients, and in my experience, Pic-Time does this really well.
The galleries look polished, clients have generally responded positively, and the backend is easy enough once you understand how the platform is structured. There is a little bit of a learning curve, mostly because Pic-Time has become more feature-rich over time, but it does not feel overly technical once your main settings are in place.
It’s important to highlight that the client experience matters more than we sometimes admit.
Your final gallery is often one of the last major touchpoints a client has with your brand. If it feels confusing, dated, or hard to use, that can affect how the entire experience is remembered. If it feels polished and intentional, it reinforces the feeling that they invested in something professional…
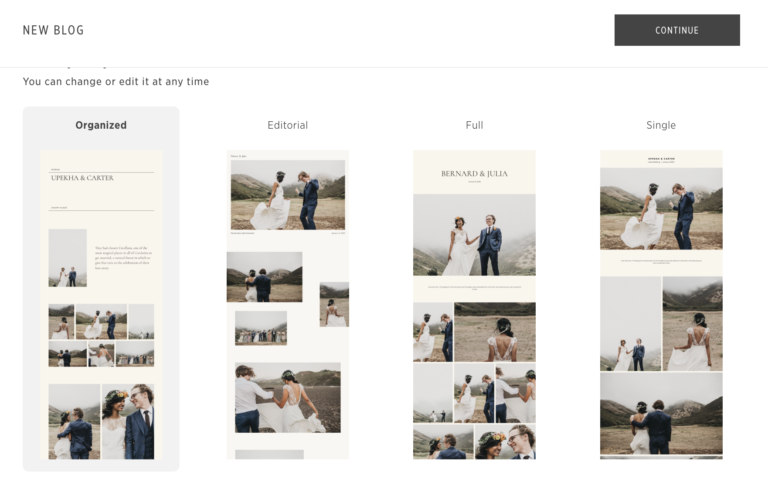
Gallery Templates
One of the features I use regularly is gallery templates.
I have templated galleries set up for different types of work, including weddings, elopements, engagement sessions, and family sessions. This lets me preconfigure things like:
- Gallery design
- Download settings
- Store settings
- Price lists
- Campaigns
- Automations
- Products shown to that type of client
This seems simple, but it makes the gallery setup process significantly faster. Instead of rebuilding every gallery from scratch, I can start with a template that already fits the type of client I am serving.
For a working photographer, that matters a lot. The more repeatable your delivery process becomes, the less mental energy you burn every time a gallery needs to go out. I do not want to rethink download settings, store structure, pricing, and product visibility every time I finish a wedding gallery. I want a reliable starting point that I can review, adjust if needed, and send…
Uploading and Organizing Galleries
Pic-Time has an uploader that helps with batch uploading images. This is especially useful for larger galleries, such as weddings, where you might be uploading hundreds or thousands of final images broken into different sections.
For example, a wedding gallery might include sections like:
- Getting ready
- First look
- Ceremony
- Family photos
- Wedding party
- Couple portraits
- Reception
- Dancing
The ability to upload a structured gallery efficiently is one of those workflow details that matters more in real life than it sounds on paper. When you are trying to get a full wedding gallery delivered, the last thing you want is a clunky upload process or a gallery structure that makes clients feel lost.
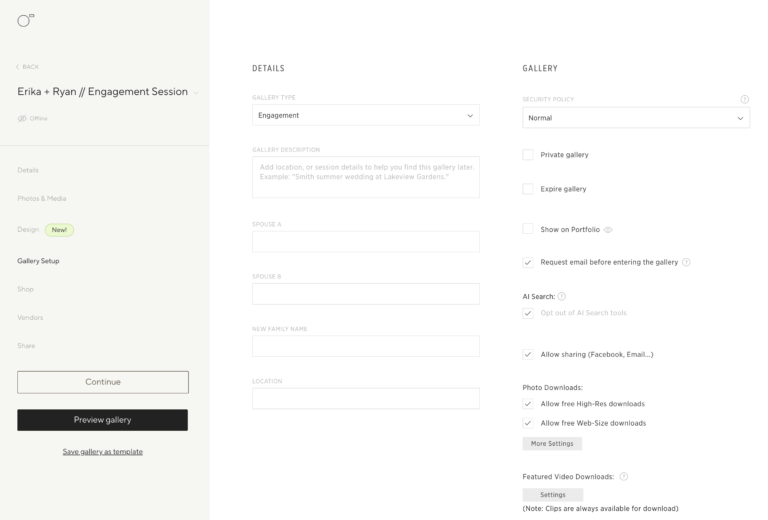
Gallery Settings and Client Controls
Inside each gallery, Pic-Time gives you a lot of control over the client experience.
You can manage things like:
- Gallery name
- Gallery date
- Cover photo
- Design and layout
- Privacy
- Expiration date
- Email collection
- Downloads
- Watermarks
- Store access
- AI search
- Automations
- Discounts
- Client selections
- Album proofing
This is where Pic-Time starts to feel more like a business system than a simple gallery host.
For example, you can decide whether clients can download web-size images, high-resolution images, or no images at all. You can offer downloads for free or charge for them depending on your business model.
You can also request emails before visitors enter a gallery (this is huge!). This can be useful for print sales because wedding galleries are often viewed by more than just the couple. Parents, siblings, aunts, uncles, and friends may all enter the gallery, and those people can become print buyers. It really allows you to seamlessly start doing proper email marketing right within the gallery itself!
That is one of the little things photographers sometimes overlook. Your client gallery is not just a delivery page. For weddings and portraits especially, it can become a small storefront for an entire network of people connected to the event.
Pic-Time Store and Print Sales
The Pic-Time store is the reason I originally became interested in the platform, and it remains one of the biggest reasons I recommend it!
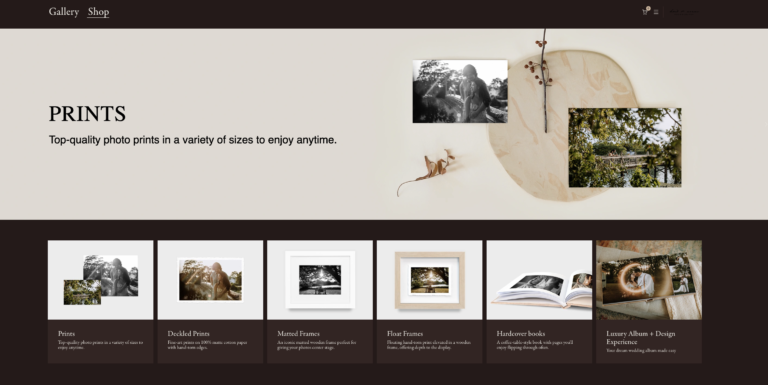
You can sell products such as:
- Prints
- Frames
- Calendars
- Cards
- Albums
- Magazines
- Folios
- Matted prints
- Ornaments
- Digital downloads
- Slideshows
- Videos
- Custom products
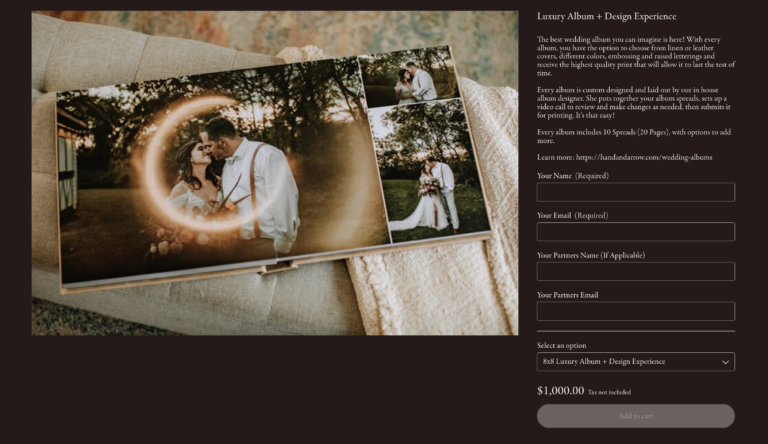
One of the strongest parts of the store is how visual it feels to the client. Products are presented in a way that helps clients imagine their own images as finished printed items. Pic-Time’s system pulls sample images and puts them in albums, frames, etc. to further help clients visualize their pictures printed out!
This matters because print sales are not just about having products available. If clients do not know the products exist, do not understand the value, or cannot imagine how they will look, they are less likely to buy…
In our business, Pic-Time has generated thousands of dollars in product revenue over time. I am not saying that every photographer will get the same result, because print sales depend on your audience, pricing, gallery traffic, product setup, and how much you actually use the sales tools. But for us, Pic-Time has more than justified its subscription cost because the store and automations create buying opportunities that would not happen if I were simply sending a download link.
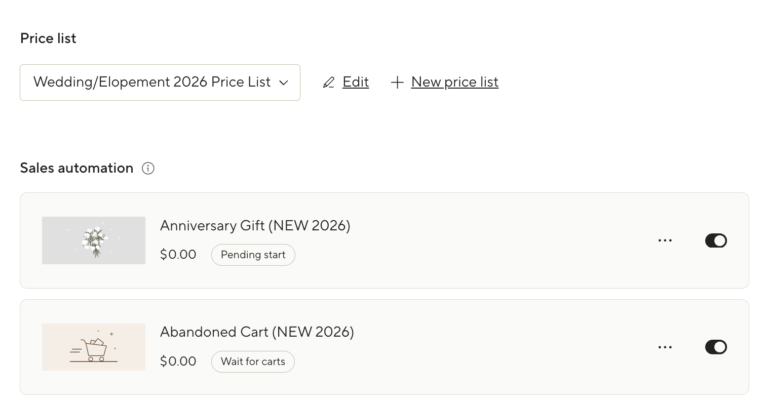
Price Lists
Pic-Time lets you create multiple price lists, which is especially useful if you photograph more than one type of session.
In my own business, I do not necessarily want the exact same products and price points shown to every client. Wedding clients, elopement clients, engagement clients, and family clients may all have slightly different needs.
For example:
- Wedding clients may be a better fit for albums, parent albums, framed prints, and large wall art.
- Family session clients may be a better fit for prints, frames, holiday cards, and smaller product bundles.
- Engagement clients may be a better fit for smaller wall prints, gift prints, or save-the-date-adjacent products.
Multiple price lists let you curate the store experience around the client type instead of showing everyone the same generic product catalog.
This is one of the things I would not skip during setup. You can technically use one broad price list for everything, but you lose some of the advantage of a platform like Pic-Time when you do that. The more intentionally the store matches the gallery, the more natural the buying experience feels.
Of course, your specific setup will vary depending on your goals and what kind of services you offer!
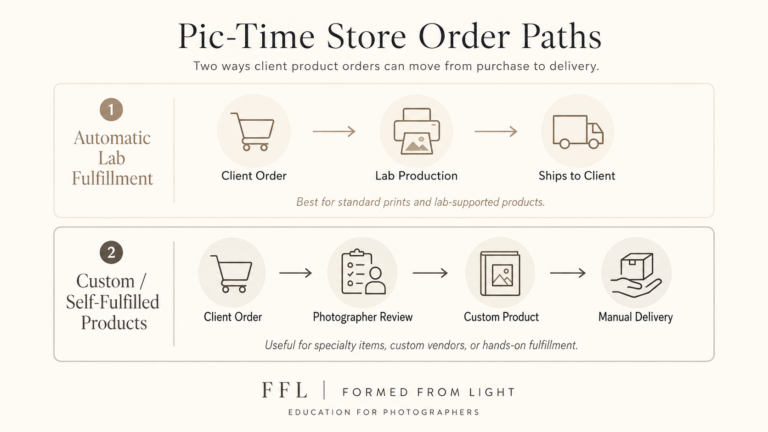
Self-Fulfillment and Custom Products
A major benefit of Pic-Time is that you can use automatic fulfillment or self-fulfillment depending on the product and your workflow.
Automatic fulfillment is ideal for lower-touch products like prints and standard products where you trust the lab and want orders to be handled in the background.
Self-fulfillment is useful when you want to sell something more custom.
In my business, this matters most with luxury albums. My album process is more hands-on, more curated, and uses a supplier outside of Pic-Time. I like that I can still make the sale through the gallery, but then move the client into my own album design and production process.
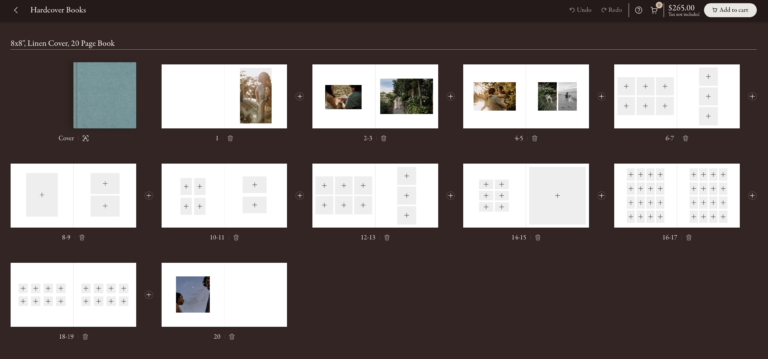
Albums and Product Sales
Pic-Time’s album tools are worth talking about especially because albums are one of the places where your sales approach really matters.
Pic-Time can support album sales and album proofing inside the gallery workflow. For some photographers, that may be perfect. A client can buy an album, design it themselves, make revisions, and place the order through the gallery system. That can work well if you want album sales to be more hands-off.
I have used variations of that approach before. In some cases, clients could buy an album and handle the design themselves in Pic-Time. In other cases, an album was included in a wedding package, I handled the first design or revision, and then the client could review things and place the final order.
Those workflows can be useful, but they are different from how I currently approach higher-end albums.
Over the past few years, my album process has become more high-touch. We currently use Fundy Designer for album design and work with a dedicated album supplier outside of Pic-Time. The process is closer to an album design service, where we create the first design, meet with the client, walk through revisions, and discuss upgrades or add-ons during that meeting.
This is often referred to as IPS, or in-person sales, though it can happen virtually too!
The important thing is that there is no single right way to sell albums. Pic-Time’s album features may be a great fit if you want a simpler, more self-guided album workflow. A separate album design and sales process may make more sense if you want something more curated, consultative, and premium.
For me, Pic-Time still plays an important role because it can support the sale and the gallery experience, even if my most premium album workflow happens partly outside the platform.
Pic-Time Automations and Email Marketing
This is where Pic-Time becomes especially valuable!
If you only upload a gallery and hope people buy prints, you may get some passive sales. But in my experience, print sales usually improve when there is actual marketing behind the store.
Some useful automation examples include:
- Abandoned cart emails
- Early bird offers
- Post-order promotions
- Anniversary offers
- Holiday campaigns
- Black Friday campaigns
- Gallery visitor boost campaigns
- Simple sale systems
- Free print incentives
The abandoned cart automation has been particularly useful in my business. If someone adds products to their cart but does not finish checking out, Pic-Time can send a follow-up offer that encourages them to complete the purchase.
This has made me sales that I likely would not have gotten otherwise.
That is the big-picture value of Pic-Time: the platform does not just store images. It helps turn finished galleries into ongoing revenue opportunities. For photographers who are already doing the work of delivering polished galleries, that can be a meaningful difference.
How I’d Use Pic-Time to Increase Print Sales
I’ll pretty often see questions pop up online from photographers new to Pic-Time (or other online gallery platforms) and they’ll ask…”how do you get print sales?” Often this comes associated with some experience of not making any money from prints…
The biggest thing I would emphasize about print sales is this: the first time clients hear about prints should not be when they happen to notice a shopping cart inside their online gallery.
Print sales instead come from marketing. Pic-Time gives you tools that make that marketing easier, but the tool itself is only part of the process.
The goal is not to be pushy. It is to make prints and albums feel like a natural part of the photography experience instead of an afterthought.
If I were helping a photographer use Pic-Time to increase print sales, I would focus on a few things:
- Talk about prints before gallery delivery.
- Make the store easy to understand.
- Use product categories that match the client type.
- Turn on abandoned cart automation.
- Use early gallery campaigns.
- Consider holiday or anniversary campaigns.
- Decide how hands-on you want albums to be.
That first point is the most important. You can talk about prints on your website, in your welcome guide, during consult calls, in planning emails, on social media, and in direct marketing emails to past clients. More touchpoints usually means more sales!
The store should also feel curated. I would rather show fewer products that make sense for the client than overwhelm them with everything possible. A wedding gallery, family gallery, and engagement gallery may all need slightly different product emphasis.
An early gallery campaign can help create momentum when clients are most excited about their images. Clients are opening the gallery, sharing it with family, posting images, and reliving the experience. That is often when print interest is highest.
A simple limited-time offer can help move people from “I should order something eventually” to “I should do this now.”
Then, after that initial excitement fades, anniversary campaigns, holiday campaigns, and abandoned cart emails can continue creating buying opportunities. This is where Pic-Time can be useful beyond the initial gallery delivery. A gallery can continue to generate value long after the client has downloaded their images.
Pic-Time 2.0 and the New Gallery Experience
Pic-Time 2.0 is one of the biggest changes to the platform and should be part of any current Pic-Time review as it just launched in mid-2026.
The newer gallery experience feels more immersive and more mobile-aware. That matters because many clients and gallery guests are opening galleries on their phones, not sitting down at a desktop computer to carefully browse through everything.
Some of the most useful updates include:
- A cleaner, more interactive gallery experience
- A rebuilt mobile interface
- Better client curation through Collections
- Improved search using faces and keywords
- Easier sharing and downloading
- A redesigned shopfront and checkout flow
The mobile updates are especially important. In reality, many clients and gallery guests are opening galleries in small pockets of time. They may be on the couch, at work, at a family gathering, or sharing images with relatives through text. If the mobile experience is clunky, that affects viewing, sharing, downloading, and purchasing.
I am continuing to test and send out new client galleries with templates built out in Pic-Time 2.0. Will update this more in the future to highlight even more personal experience using it!
Integrations That Matter
Pic-Time has native integrations with other software photographers may already be using such as CRMs and photo editing tools. I wanted to highlight this and a few examples as for workflow focused photographers, these integrations may (or may not) add value to your processes.
Personally, I don’t choose software only because it technically has a lot of integrations. What matters to me is whether those integrations reduce friction in the actual workflow.
Some integrations I think add the most value to Pic-Time users (if you are using those platforms yourself):
- HoneyBook
- Lightroom Classic
- Imagen AI
HoneyBook matters because that is where client communication, booking, contracts, invoices, and project details live in my business. If your CRM and gallery platform can connect more cleanly, that reduces the number of loose pieces you are managing across a client’s experience.
The Lightroom plugin is also useful because it connects more directly to the way many photographers already organize, export, and deliver images. When you are dealing with large galleries, especially weddings, shaving off repetitive upload and organization steps can make the delivery process feel less clunky.
Imagen AI may matter if you are using it as part of your culling or editing workflow. I do not think every photographer needs every AI tool available, but I do think photography workflows are becoming more connected. Culling, editing, gallery delivery, print sales, and client communication are not isolated parts of the business anymore.
Like I said, for myself, integrations are not the main reason I use Pic-Time. The store and client experience are still the bigger reasons. But when you are delivering hundreds of galleries over time, small workflow improvements start to matter more than they seem like they should!
5 Other Pic-Time Features Worth Knowing About
Pic-Time includes several additional tools that may or may not matter depending on how you work.
I do not think every photographer needs to care equally about every feature here. This is one of the places where Pic-Time can start to feel big. Some tools may become part of your actual workflow, while others may just be nice to have in the background.
Vendor Network
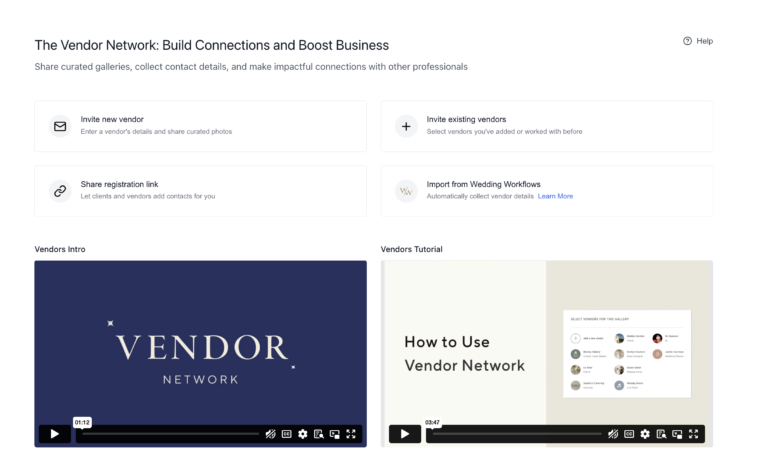
Pic-Time’s vendor network can be useful for wedding photographers who regularly share images with venues, planners, florists, DJs, videographers, hair and makeup artists, rental companies, and other creative partners.
I’ve personally been using this more and more to simplify how I go about sending out galleries to other vendors. One of my favorite aspects of this is that, not only can I send out the gallery to these people, but I can also attach usage terms to it – which helps me sort of check of a more “legal” and licensing point without making it weird or awkward.
In my own business, I am happy for vendors to use images for reasonable promotional purposes, such as sharing on Instagram, Facebook, or their website, as long as they credit or link back where appropriate. But that is different from someone using an image in a large ad campaign, magazine, billboard, or commercial context.
A lot of photographers do not fully realize the value of the copyrights and licensing rights they have in their images. Vendor sharing tools like this create a more professional process instead of just handing out a download link and hoping everyone does the right thing.
Slideshows
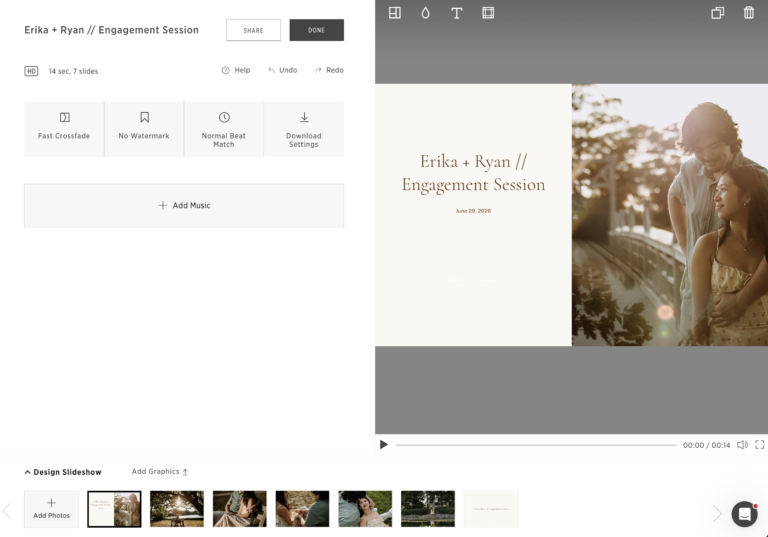
Slideshows can be useful if you want a more emotional delivery experience or an additional product to offer clients.
For wedding photographers especially, slideshows can give clients a more curated way to revisit the day instead of simply scrolling through hundreds of images. This can also connect naturally to album and print sales because the client is experiencing the images emotionally before they are asked to think about products.
I do not currently build my entire sales process around slideshow reveals, but I understand why some photographers do. The more guided the experience is, the easier it can be for clients to see their images as something worth preserving, not just files to download.
The fact you can create slideshows quickly in Pic-Time right from the gallery page itself, even adding some basic video editing and music overlay capabilities, is really cool for the photographers this really stands out to!
Video
Pic-Time supports video delivery, with video storage varying by plan and additional video storage available separately.
For hybrid photo/video shooters, this is especially worth paying attention to. If you are delivering short clips, social-friendly videos, or more complete hybrid galleries, having video inside the same client gallery system can be convenient.
It’s also worth pointing out that if you are a full on wedding videographer (as one example), Pic-Time may now be an actual gallery delivery solution for you, too!
For photographers who only deliver still images, this may not matter much.
Blogs
Pic-Time also includes a blogging feature. It’s actually crazy how many features in general are packed into this! 🙂 Anyways, Pic-Time describes its Blogs feature as a way to create blog posts directly from client galleries, with SEO-related tools such as descriptions, alt text, tags, and automatic file renaming.
This is one of the few places where I have a real hesitation.
I can see the appeal. If you are trying to quickly produce session highlight posts, Pic-Time Blogs may feel easier than building every post from scratch in WordPress or another website platform.
But for my own SEO strategy (and the strategy I’d recommend to pretty much any photographer who cares about their website presence), I prefer to keep blog content hosted directly on my own website.
My main concern here is around ownership and long-term control. If your blog content lives inside Pic-Time and you ever stop using the platform, you may create extra problems for yourself. As a business owner, I would rather have my SEO content, internal links, and long-term publishing system live on my own domain and website platform.
Another thing I have seen is if Pic-Time has an outage (which is admittedly rare), it will cause blogs on your website built through this feature to become unavailable in that time.
So I see Pic-Time Blogs as useful for some photographers, but not my preferred solution for serious SEO-focused blogging.
Portfolio and Art Galleries
Pic-Time also includes portfolio and art gallery features.
I do not personally use the portfolio page much because I showcase full galleries at a different stage of my sales process. But for photographers who want a simple way to showcase selected galleries, it can be a helpful built-in tool. For example, you could link directly to this page from a social media bio…might be useful for a photographer without an actual website yet.
Now, Art Galleries are similar to actual Client Galleries, but a better fit for photographers who are selling things like fine art, landscape work, travel photography, editorial work, or print collections. I do not use this heavily as a wedding and portrait photographer, but I can see it being useful for photographers who want a more gallery-like buying experience.
Pic-Time vs Other Online Galleries for Photographers
So in the pursuit of making a really comprehensive Pictime review, I also want to make a note here that Pic-Time is not the only good online gallery platform for photographers. Depending on your business, you may also be looking at Pixieset, ShootProof, CloudSpot, Zenfolio, or other gallery tools.
I do not think there is one perfect gallery platform for everyone.
The better question is: what do you need your gallery platform to do?
Here’s a little breakdown comparing Pic-Time with some other online gallery platforms:
| Platform | Best For | Where Pic-Time Is Stronger | Where the Alternative May Be Stronger |
| Pic-Time | Photographers who want polished galleries, strong print sales, automations, and vendor sharing | Store experience, sales automations, gallery design, print/product selling workflow | May feel like more setup than needed for very simple delivery |
| Pixieset | Photographers who want an all-in-one platform with galleries, website, store, and studio tools | More sales-forward gallery and print experience in my opinion | Pixieset may appeal if you want website, gallery, store, and studio tools in one ecosystem |
| ShootProof | Photographers who want galleries plus business tools like contracts and invoicing | Pic-Time feels especially strong as a gallery sales and product delivery platform | ShootProof may appeal if you want more booking, contract, and invoice tools together |
| CloudSpot | Photographers who want simple galleries, print sales, and studio tools | Pic-Time may be stronger for photographers prioritizing store presentation and automations | CloudSpot may feel simpler for photographers who want a lighter workflow |
| Zenfolio | Photographers who want website, galleries, selling, and marketing tools in one place | Pic-Time is more specialized around premium gallery delivery and sales experience | Zenfolio may appeal if you want a broader website and gallery platform together |
For me, Pic-Time makes the most sense when the priority is not just delivering photos, but turning galleries into a better client experience and a stronger sales system.
If you mostly want an all-in-one website and client management platform, another tool may be worth considering. If you already have your website, CRM, and business systems elsewhere, Pic-Time can fit really well as the dedicated gallery and sales piece.
To read more comparison articles (and I’ll be adding to these over time), check out:
What About Moving Existing Galleries to Pic-Time?
Switching gallery platforms can feel intimidating, especially if you already have years of client galleries somewhere else.
When I moved from Pixieset to Pic-Time, I handled the migration myself. I reuploaded client galleries and reshared links with clients. At the time, my business did not have the same volume it has now, so the process was manageable enough.
With that said, if I had to move hundreds of galleries today, I would think about it differently.
Sometimes Pic-Time and other gallery providers offer migration services, occasionally free or discounted, to make the transition easier. But even when migration is available, there is still a layer of communication and cleanup involved.
You may need to think about things like:
- Which galleries are worth migrating
- Whether old galleries still need to stay active
- How much storage you will need
- Whether email addresses or visitor data transfer
- Whether store settings need to be rebuilt
- How to communicate new links to past clients
- Whether migrated galleries need updated campaigns or discounts
This is why I would not switch platforms casually especially if you have a large archive. It may still be worth it, but it is not just moving files from one place to another. You are also rebuilding part of your client delivery system.
Pic-Time Pricing
Pic-Time currently offers Free, Beginner, Professional, and Advanced plans for individual photographers. As of this writing, Beginner, Professional, and Advanced include increasing levels of storage, video storage, gallery features, store features, and workflow tools.
Current listed storage includes:
| Plan | Photo Storage | Video Storage | My Take |
| Free | 10GB, reduced after 6 months | 1GB | Good for testing, not ideal for a working photographer |
| Beginner | 20GB | 5GB | Better for occasional sessions |
| Professional | 100GB | 30GB | Strong fit for many active photographers |
| Advanced | Unlimited photo storage, terms apply | 60GB | Best fit for high-volume wedding or portrait photographers |
For a serious working photographer, I would mostly look at Professional or Advanced. I personally am on their Advanced plan due to the volume of work I’ve taken on.
If you are only photographing occasional sessions, Beginner may be enough. If you are actively photographing weddings or maintaining many long-term galleries, Advanced may make more sense because of the storage and fuller feature set.
The more important question is not just “How much does Pic-Time cost?” It is “Can Pic-Time help you earn back more than it costs?”
In my experience, yes, if you actually use the store and automations. If you do not plan to sell prints, configure campaigns, or use the store seriously, then the value calculation changes.
Pros and Cons of Pic-Time
Pros
The biggest strengths of Pic-Time are:
- Beautiful client galleries
- Strong client experience
- Good mobile gallery experience, especially with Pic-Time 2.0
- Built-in print store
- Automatic fulfillment through connected labs
- Custom products and self-fulfillment options on higher plans
- Multiple price lists
- Sales automations and email campaigns
- Vendor network and usage terms
- Gallery templates for repeat workflows
- Album proofing and album sales tools
- Lightroom and HoneyBook workflow integrations
- Art galleries for fine art or print-based work
- Potential to generate revenue beyond the subscription cost
For my business, the combination of gallery delivery, store, and automations is the main reason Pic-Time stands out. It helps the gallery do more than sit there as a finished archive of images. It gives clients a better experience and gives the business more chances to earn from work that has already been created.
Cons
The biggest drawbacks are:
- Blogging feature may not be ideal if SEO is a serious long-term strategy
- Some AI features may not appeal to every photographer
- Supplier mistakes can still happen
- Customer support may be limited by what the supplier can resolve (particularly regarding print orders)
- The platform has enough features that setup can take time
- Higher-value use depends on actually configuring the store and campaigns
- Migration can take planning if you already have a lot of galleries elsewhere
- Album tools may not replace a more high-touch IPS album workflow (like I have)
On the supplier issue, I want to be fair. I have generally had good support from Pic-Time. But there have been a few occasions where print order issues became frustrating because I was caught between the supplier and Pic-Time support.
To give an example, last year, I had an issue where a supplier shipped a damaged print to one of my clients three separate times. Pic-Time support handled the situation with the supplier and made sure replacement prints were shipped without cost to me or my client.
That was good support.
But the situation still left a bad taste in my mouth toward the supplier itself. I had worked with that supplier for years, and after multiple damaged shipments, it made me question whether I wanted to keep relying on them. It was a major point of stress especially after the 2nd and 3rd instance of this happening…
This is one of the tradeoffs with automated fulfillment. When it works, it saves a lot of time. When something goes wrong, the client still sees you as responsible for the product experience, even if the issue happened with a lab or supplier behind the scenes.
That is not a reason I would stop using Pic-Time, but it is something photographers should understand before assuming automated fulfillment means they never have to think about print quality again.
Who Pic-Time Is Best For
Pic-Time is best for photographers who want a polished gallery delivery system and are serious about selling prints or products.
It is a strong fit for:
- Wedding photographers
- Elopement photographers
- Portrait photographers
- Family photographers
- Event photographers
- Fine art photographers
- Photographers who want passive or semi-passive print sales
- Photographers who want automations built into the gallery system
- Photographers who want a better client shopping experience
- Photographers who want better vendor gallery sharing
- Photographers who want their gallery system to support a larger business workflow
I’d actually argue that having an account is even valuable even if you are just more of a hobbyist photographer who wants to store their own images as a sort of cloud backup. I actually do this with a lot of personal photos of my travels, family, etc.
It is especially valuable if you are willing to invest time up front to configure templates, price lists, products, automations, and gallery settings.
That setup work is where the platform starts to pay off. Pic-Time can look good out of the box, but the business value comes from making the system match how you actually deliver galleries and sell products.
Who Pic-Time May Not Be Best For
Pic-Time may not be the right fit if you only need extremely basic gallery delivery and do not care about print sales, automations, products, or client workflow features.
You may want something simpler if:
- You rarely deliver galleries
- You do not sell prints or products
- You want the cheapest possible option
- You dislike AI-related features entirely
- You want your blog and gallery platform to be completely separate
- You do not want to spend time configuring store settings
- You want one platform to handle your website, CRM, contracts, invoices, and galleries
Pic-Time can still work for simple delivery (and if you have a low volume of images you can even just set yourself up on their free plan and have what you need), but I’d argue its biggest value comes from the fuller ecosystem.
My Final Recommendation
After using Pic-Time for years, I still think it is one of the strongest online gallery platforms for photographers, especially working photographers who want their galleries to do more than just deliver files.
The client galleries are polished. The store is well integrated. The automations can directly support print sales. The vendor network is genuinely useful for wedding photographers like myself. And the recently released Pic-Time 2.0 has made the gallery experience feel more current, especially on mobile.
With that said, it’s not perfect. I would be cautious about relying on Pic-Time Blogs as your main SEO blogging system, and I would take time to review AI settings, store settings, migration needs, and supplier options before going all in. That’s the benefit of signing up and trying it for yourself, which is easy enough to do!
But overall, Pic-Time has been a very positive part of my photography workflow. It has made delivery easier, improved the client experience, and helped generate meaningful product revenue in my business.
If you are a photographer who wants a gallery platform that also supports sales, automation, and a more professional delivery experience, Pic-Time is absolutely worth considering.
Special offer: if you want to try out Pic-Time, use my referral link or promo code FORMEDFROMLIGHT.
Pic-Time FAQ
Is Pic-Time good for wedding photographers?
Yes. Pic-Time is especially strong for wedding photographers because it supports large galleries, organized scenes, client downloads, print sales, album-related workflows, vendor sharing, and automated campaigns.
The vendor network is also useful for weddings because there are usually many creative partners involved. Venues, planners, florists, DJs, videographers, and other vendors often want access to images after the event. Pic-Time gives you a more structured way to share those images instead of just sending out a generic download link.
Can clients buy prints through Pic-Time?
Yes. Pic-Time includes a built-in print store with products such as prints, frames, albums, calendars, cards, and more. It also supports automatic fulfillment through connected labs, and higher-tier plans include custom products and self-fulfillment options.
This is one of the biggest reasons I use it. The store is not just technically available. It is visually integrated into the gallery experience, which helps clients imagine their images as finished products.
Does Pic-Time have a free plan?
Yes. Pic-Time currently lists a Free plan, along with Beginner, Professional, and Advanced paid plans. The free plan can be useful for testing the platform, but I would not treat it as the best long-term option for an active working photographer.
Is Pic-Time good for SEO blogging?
Pic-Time offers blog features and describes them as SEO-optimized, with tools such as descriptions, alt text, tags, and automatic file renaming.
Personally, I would still use my own website for serious SEO blogging. Pic-Time Blogs may be useful for quick session highlights, but I prefer to own and control long-term blog content directly on my website.
Does Pic-Time support video?
Yes. Pic-Time supports video delivery, with video storage amounts depending on the plan. Pic-Time also offers add-on video storage plans for photographers who need more space.
This is especially useful for photographers who deliver hybrid galleries, short clips, or video alongside still images.
Can Pic-Time help increase print sales?
Yes, if you actually use the store and automations.
In my own business, Pic-Time’s shop, abandoned cart emails, promotions, and built-in campaigns have helped increase product sales from galleries. It will not magically sell products if you never configure the store or campaigns, but the tools are there if you want your galleries to become more sales-capable.
The bigger point is that print sales usually require more than a store button. You need to talk about prints before gallery delivery, make products easy to understand, create multiple touchpoints, and use campaigns or reminders that encourage clients to act.
Does Pic-Time work with HoneyBook?
Yes, Pic-Time has a HoneyBook integration. For photographers who use HoneyBook for client communication, contracts, invoices, and project management, this can help make the gallery delivery process feel more connected to the rest of the client workflow.
In my own business, HoneyBook handles the booking and client communication side, while Pic-Time handles gallery delivery and product sales. I like keeping those roles clear.
Does Pic-Time have a Lightroom plugin?
Yes, Pic-Time has a Lightroom Classic plugin. This can help photographers create or connect galleries and publish images more directly from Lightroom.
For wedding photographers or anyone delivering large galleries, this kind of workflow improvement can be useful. It is not the flashiest feature, but it can reduce friction in a process you repeat often.
Can you migrate galleries to Pic-Time?
Yes, Pic-Time has offered gallery migration options from other gallery platforms, though details and pricing may change over time. If you already have many galleries hosted elsewhere, I would check Pic-Time’s current migration options before switching.
When I moved from Pixieset to Pic-Time, I handled the migration myself by reuploading and resharing links with clients. That worked because my volume was lower at the time. If I were moving a much larger archive today, I would plan the transition more carefully.
What are the best Pic-Time alternatives?
Some common Pic-Time alternatives include Pixieset, ShootProof, CloudSpot, and Zenfolio.
Pixieset may appeal to photographers who want a broader all-in-one platform with website, galleries, store, and studio tools. ShootProof may appeal to photographers who want galleries with business tools like booking, contracts, and invoicing. CloudSpot may appeal to photographers who want online galleries with studio tools and print sales. Zenfolio may appeal to photographers who want a website and gallery solution in one platform.
For my own workflow, Pic-Time remains my preferred fit because I care most about polished gallery delivery, product sales, automations, and client experience.
Is Pic-Time better than Pixieset?
It depends on what you need.
I switched from Pixieset to Pic-Time because I preferred Pic-Time’s online store, product presentation, and overall sales experience. That was the biggest deciding factor for me.
Pixieset may be a better fit if you want a more all-in-one ecosystem with website, galleries, store, and studio management tools. Pic-Time may be a better fit if you already have other systems for your website and CRM, and you want a dedicated gallery platform with strong print sales and automations.
Read more: Pic-Time vs Pixieset blog post